Andolasoft Awarded As TOP #21 iPhone App Development Company

top_10_php


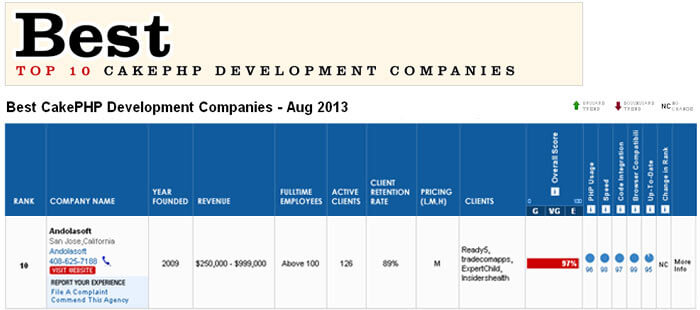
It is a great privilege to announce that Andolasoft has been ranked at 21 in Top 25 iPhone app development companies by bestwebdesignagencies.com. Heartfelt thanks to our customers for their continued appreciation which helped us to be here today.

Needless to say that our top-notch iOS app developers, our efficient project management team have been providing excellent customer service won us the rank.

Few more reasons behind our success:

  • Easy-to-use iPhone app with rich and engaging user experience
  • Agile methodology to facilitate rapid mobile app development
  • Step-by-step guidance and suggestions to our customers starting from creating an App-Store account, publishing and marketing their application
  • We provide the right technical help and resources to our customer’s need
  • Industry Best Practices
  • We help customers knowledgeable in building as well as promoting their applications
  • On-time delivery
  • Fast and responsive communication support
  • Quick turnaround service

The bestwebdesignagencies.com is an autonomous body that identifies and lists out the best design and development companies in the world. The purpose is to help customers to find the best names in the industry. They adopt a stringent evaluation process to determine the quality of work delivered by a company and customer satisfaction.

Things You Should Know Before Planning Your Mobile App-Part-I

When you are looking at all the popular apps, you too are tempted to have one of your own; however, it can’t be done overnight. It is because; there are thousands of mobile app programmers and companies who may be thinking of doing the very much similar things. To have a successful mobile app it takes lots of hard work and well defined requirements.  You need to think about the main development aspects before planning to go for your mobile app.

Basic Steps You Need to Know For Developing Mobile App:

From our experiences, here are some guidelines you must go through if you are planning to develop a successful mobile app:

  1. The most crucial step is to come up with an innovative idea. Here, you need to make sure that there is little or no competition for it.
  2. Identify your targeted audience and build your app form their perspective, something that is more likely to be appreciated by these users.
  3.  Judge and determine major pain points and challenges that you expect to face for your application. You should hire a dedicated development team who could understand your specific business requirements and turn your ideas into a working app.
  4. Make sure that your app provides good usability and practical values to the users i.e., they should find your app useful and productive.
  5. Your app should have a solid built with no loose ends. Make sure to run a vigorous crash test and beta test phase before actually publishing it. User experience must be intuitive as well as engaging. If you are willing to implement APIs, ensure that it is robust and doesn’t generate any glitches in the application.
  6. After publishing your app to the application stores, you need to start promoting and market your application. One of the best ways to reach a wider audience is by promoting it over social media. Next, you will have to avail as much positive feedback from users as possible.
  7. You should offer constant support to your customers by addressing their comments, expectations and complaints. Then you should release updates and new features for your app to woo your existing customers as well as attracting the attention of new ones.
  8. Offering basic features for free and then selling premium stuff is a popular way to keep users hooked up and to gain traction. Also make sure that the app is noticed and favored by your customer.

iOS application development and Android app development can be easily executed and managed with the help of expertise mobile app developers. Moreover, it is advisable to outsource mobile application development tasks to development companies. Hiring a professional development company would facilitate you to build flawless and unique mobile apps which would greatly leverage revenue.

How To Integrate PayPal In PHP

To accept online payments through your website you would need a payment gateway. There are numerous payment gateways that can be implemented to your website; however you will need to choose the best for your PHP application. “PayPal” is one of the most renowned payment platforms that offers the best in class services as well as secure payment transaction. One of the best features of PayPal is that it facilitates developers to check-out the integration on merchant sites.

From a developer’s point of view, PayPal API is a simple, user friendly and versatile which facilitates them to avoid the PCI burden of having credit card details to be passed through their servers. PayPal is also the most secure platform that takes care of all the money transactions for the users.

Integrating PayPal in Your Website

The first thing we need is a Sandbox Credential and API Credentials. This can be availed using the following steps:

  • Create a Business account in “https://developer.paypal.com/” in order to access the Sandbox account.
  • Log into your business account; move to the ‘Application Tab’ and create a Sandbox test account for developers to check-out the PayPal integration.
  • For PayPal payment pro services, you can use this Sandbox Credentials for logging into “https://www.sandbox.paypal.com/”
  • If you want to login to your sandbox account you have to first log into your developer account.

Steps to Implement ‘the work’ in Your Site

  • In PayPal payment pro ‘the work’ is done through API call.
  • In your code you will have to implement a function i.e. ‘PPHttpPost(methodname,str);’
  • ‘methodname’ specifies the name of the API you want to call i.e. ‘CreateRecurringPaymentsProfile’, ‘GetTransactionDetails’ etc.

There are numerous other methods for the integration which can be availed form the PayPal developer site:  https://developer.paypal.com/webapps/developer/docs/classic/api/

Under ‘Merchant’ API you would find a list of functions that can be performed by PayPal website pro.
Clicking on NVP link of each function you can view the methods and the required parameters for that method.

Second Parameter in the string; which is passed to the API, is for getting the response. It includes all the parameters that have to be passed e.g.

[sourcecode]$str = "&TOKEN = $token&AMT = $paymentAmount&CURRENCYCODE = $currencyID&PROFILESTARTDATE =
$startDate";[/sourcecode]


[sourcecode]$nvpStr  .= "&BILLINGPERIOD = $billingPeriod&BILLINGFREQUENCY = $billingFreq&CREDITCARDTYPE = $CREDITCARDTYPE&ACCT = $ACCT&EXPDATE = $EXPDATE&CVV2 = $CVV2&EMAIL = $EMAIL&STREET = $STREET&CITY = $CITY&STATE = $STATE&COUNTRYCODE = $COUNTRYCODE&ZIP = $ZIP&FIRSTNAME = $FIRSTNAME&LASTNAME = $LASTNAME&DESC = $DESC&FAILEDINITAMTACTION = $FAILEDINITAMTACTION&INITAMT = $INITAMT";[/sourcecode]

Note: This string might differ for different methods but the structure is similar.

  • This function returns an array having one key as ACK.
  • The value of this key specifies the FAILURE and SUCCESS of the function.

If ACK is a failure then the returned array contains following error message.

[sourcecode]function PPHttpPost($methodName, $nvpStr_) {

$APIUserName = urlencode(‘API USERNAME’);

$APIPassword = urlencode(‘API PASSWORD’);

$APISignature = urlencode(‘API SIGNATURE’);

$APIEndpoint = "https://api-3t.sandbox.paypal.com/nvp"; //sandbox url.

$version = urlencode(‘51.0’);

//setting the curl parameters.

$choice = curl_init();

curl_setopt($choice, CURLOPT_URL, $APIEndpoint);

curl_setopt($choice, CURLOPT_VERBOSE, 1);

//turning off the server and peer verification(TrustManager Concept).

curl_setopt($choice, CURLOPT_SSL_VERIFYPEER, FALSE);

curl_setopt($choice, CURLOPT_SSL_VERIFYHOST, FALSE);

curl_setopt($choice, CURLOPT_RETURNTRANSFER, 1);

curl_setopt($choice, CURLOPT_POST, 1);

//NVPRequest for submitting to server

$nvprequest = "METHOD=$methodName&VERSION=$version&PWD=$APIPassword&USER=$APIUserName&SIGNATURE=$APISignature";

// setting the nvprequest as POST FIELD to curl

curl_setopt($choice, CURLOPT_POSTFIELDS, $nvprequest);

//getting response from server

$httpResponse = curl_exec($choice);

if(!$httpResponse) {

exit("$methodName failed: ".curl_error($choice).'(‘.curl_errno($choice).’)’);

}

// Here Extract the RefundTransaction response details

$httpResponseArr = explode("&", $httpResponse);

$httpParsedResponseArr = array();

foreach ($httpResponseArr as $i => $value) {

$tmpAr = explode("=", $value);

if(sizeof($tmpAr) > 1) {

$httpParsedResponseArr[$tmpAr[0]] = $tmpAr[1];
}
}

if((0 == sizeof($httpParsedResponseArr)) || !array_key_exists(‘ACK’, $httpParsedResponseArr)) {
exit("Invalid HTTP Response for POST request($nvprequest) to $APIEndpoint.");
}
return $httpParsedResponseArr;
}[/sourcecode]

Setting of IPN URL

IPN stands- Instant Payment Notification

Under the Profile tab of the sandbox site there is an ‘Instant Payment Notification preference’ link. Set the IPN URL from the link.

Conclusion:

This notification is sent from server to server when any transaction is done in PayPal. To capture this transaction we can set URL in Instant Payment Notification preferences page and manage those transaction information.

How To Use “UIActionSheet” As A Pop-over View In Your IOS Apps

iOS-destructive_button

What is UIActionSheet

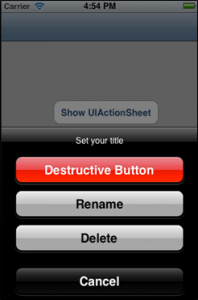
The action sheet in iOS contains a title and one or more buttons. Each of the buttons is associated with separate actions. It can be presented from a toolbar; tab bar, button bar item or from a view, however the title can be optional.

Why use UIActionSheet?

UIActionSheet is used in the following cases:

  • To show an option for a given task
  • To prompt the user to confirm an action
  • To get user input

Action sheet is dismissed by touching anywhere outside the pop-over.

How to use it?

  • Extend the UIActionSheetDeleagte in the .h header file of the ViewController
  • Then add a method named as”showActionSheet”

Example

[sourcecode]@interface MyViewController : UIViewController {
…
}
…
-(IBAction)showActionSheet:(id)sender;
@end[/sourcecode]

Initializing the UIActionSheet takes 5 following parameters

  •  initWithTitle
  • delegate
  • cancelButtonTitle
  • destructiveButtonTitle
  • otherButtonTitles

Add the following code in the .m file of viewcontroller.

Example

[sourcecode]-(IBAction)showActionSheet:(id)sender {
UIActionSheet *popupQuery = [[UIActionSheet alloc] initWithTitle:@"Set your title" delegate:self cancelButtonTitle:@"Cancel" destructiveButtonTitle:@"Destructive Button" otherButtonTitles:@"Rename",@"Delete", nil];

popupQuery.actionSheetStyle = UIActionSheetStyleBlackOpaque;
[popupQuery showInView:self.view];
[popupQuery release];
}[/sourcecode]

How to know which button was clicked by user?

There is a delegate method named as “actionSheet clickedButtonAtIndex” in which you can get the action.

[sourcecode]-(void)actionSheet:(UIActionSheet *)actionSheet clickedButtonAtIndex:(NSInteger)buttonIndex {

switch (buttonIndex) {
case 0:
NSLog(@”%@”,Destructive Button Clicked);
break;
case 1:
NSLog(@”%@”,Rename Button Clicked);
break;
case 2:
NSLog(@”%@”,Delete Button Clicked);
break;
case 3:
NSLog(@”%@”,Cancel Button Clicked);
break;
}
}[/sourcecode]

Conclusion:

UIActionSheet gives additional choices to the users for a particular action & gives a cleaner look to the app.

Unveiling FeedZirra: Simplifying Feed Parsing in Your Rails Application

What is a Feed?

A feed is a data format which is used to provide frequent updates and latest contents to the users. A feed has no particular type; it could be news, latest technology, game, gadgets, sports etc. These feeds can be easily parsed into your Rails application to make it more useful for the users. The feed is build up with XML and has particular format type.

What is Feedzirra?

“Feedzirra” on the other hand is a feed library built on Ruby that is designed to get and update a number of feeds as fast as possible. This includes using “libcurl-multi” through the “curb” gem for faster http gets, and “libxml” through “nokogiri” and “sax-machine” for faster parsing.

Suppose you need to add some updated information to your Rails application from other feed site like ‘feedburner’, in such cases you can easily work it out by using the gem “feedzirra”.

Here are the steps to use ‘feedzirra’ in your Rails application.

Step-1

Add the gem ‘feedzirra’ in to your gem file.

[sourcecode language=”plain”]gem ‘feedzirra'[/sourcecode]

Run ‘bundle install’ to install the gem along with its dependencies.

Step-2

Modify your controller where you are fetching the feeds.

[sourcecode language=”plain”]require ‘feedzirra'[/sourcecode]

Step-3

Now, write the following code in your method in order to parse feeds from an external site.

[sourcecode language=”plain”]feed =Feedzirra::Feed.fetch_and_parse("http://feeds.feedburner.com/TechCrunch/gaming")
@entry = feed.entries
[/sourcecode]

Note: Here we are parsing the feeds from ‘feedburne’r site with updated information on gaming news.

Step-4

Now, open your view section and write the following code snippet to display the information regarding the feeds.

[sourcecode language=”plain”]<ul>
<%@entry.each do |t|%>
<li>
<%= link_to "#{t.title}", "#{t.url}",:target => "_blank" %>
<%=t.author%>
<%=t.content%>
<%=t.published%>
<%=t.categories%>
</li>
<%end%>
</ul>
[/sourcecode]

Note: The above code will display the feed title, author name, content, published date and category type. Clicking the feed title, will launch a new tab in browser and display the detail information of that feed.

Step-5

You can also fetch multiple feeds by writing the following code.

[sourcecode language=”plain”]feed_urls = ["http://feeds.feedburner.com/PaulDixExplainsNothing", "http://feeds.feedburner.com/trottercashion"]
feeds = Feedzirra::Feed.fetch_and_parse(feed_urls)
[/sourcecode]

Conclusion:

The FeedZirra gem empowers Rails developers to seamlessly integrate feed parsing capabilities into their applications. 

Are you looking for a Ruby on Rails developer

Contact Us

Whether you’re building a news aggregator, a blog reader, or a content recommendation system, FeedZirra simplifies the process of retrieving and presenting timely content from various sources. 

By harnessing the power of FeedZirra, you can enhance user engagement, keep your app’s content fresh, and deliver a more dynamic user experience.

Related Questions

Q1: What is the FeedZirra gem, and how does it simplify feed parsing in Rails applications?

The FeedZirra gem is a powerful tool in the Ruby ecosystem that provides a user-friendly way to parse RSS and Atom feeds. It abstracts the complexities of handling different feed formats, making it easier for developers to extract and utilize the content they need within their Rails apps.

Q2: How can I integrate the FeedZirra gem into my Rails application for parsing feeds?

To integrate the FeedZirra gem into your Rails app, start by adding it to your Gemfile with the following line: gem ‘feedzirra’. After running bundle install, you can fetch and parse feeds using the Feedzirra::Feed.fetch_and_parse method. This allows you to access the feed’s entries (articles) and display them in your app.

Q3: What are some of the advanced features offered by the FeedZirra gem for feed parsing in Rails?

The FeedZirra gem provides several advanced features, including access to various properties of feed entries such as publication date, author, summary, and content. It also offers automatic HTML content sanitization to ensure safe rendering. Additionally, you can implement caching to reduce the load on feed sources and optimize performance.

Q4: How does the FeedZirra gem benefit developers when integrating feed parsing into their Rails applications?

The FeedZirra gem brings several benefits to developers, including streamlined efficiency by handling the intricacies of feed parsing. It supports multiple feed formats (RSS and Atom), making it compatible with a wide range of sources. The gem’s simple API is designed for ease of use, catering to developers of various skill levels. Moreover, it provides customization options to tailor parsed feed content to suit your app’s design and requirements.

Q5: Can the FeedZirra gem be used to enhance user engagement and content freshness in Rails apps?

Absolutely. By utilizing the FeedZirra gem to parse feeds, you can enhance user engagement by providing fresh and relevant content from various sources. Whether you’re building a news aggregator, a blog reader, or a content recommendation system, integrating feed parsing into your Rails app with FeedZirra helps create a dynamic user experience that keeps users informed and engaged.

3 Easy Steps to optimize Queries in Rails using ‘Bullet’

In the world of web development, performance optimization is a crucial aspect that can make or break the user experience. 

One area that often demands attention is database query optimization. Rails developers, rejoice!

The ‘Bullet’ gem is here to help you fine-tune your database queries and boost your application’s speed and efficiency. In this blog, we’ll delve into the steps to optimize queries in your Rails app using the powerful ‘Bullet’ gem.

First,

let me introduce you to the ‘Bullet’ gem

‘Bullet’ is a ruby gem which facilitates the developers by alerting when an application performs an inefficient database query, such as an N+1 query. It is one of the most efficient tool to optimize a Rails application.

Traditional Method (w/o optimization):

This example illustrates the old-fashioned method of optimizing a query.

For example there are two models, one is ‘Order’ and other is ‘Product’. And an order has many products. Then the code for order listing page will be

In app/controllers/orders_controller.rb

class OrdersController < ApplicationController
  def index
    @orders = Order.all
  end
end

In app/views/orders/index.html.erb

<h1>Orders</h1>

<% @orders.each do |order| %>
  <div class="order">
    <h2><%=link_to order.title, order_path(order)%></h2>
  </div>
  <%order.products.each do |product|%>
     <ul class=”product”>
        <li><%=link_to product.title, product_path(product)%></li>
     </ul>
  <%end%>
<% end %>

These codes would generate N+1 query issues, because here we have queried just once to get the orders and then separate queries for each order to fetch its products. These sorts of problems can be easily overlooked during development.

‘Bullet’ gem comes in handy for avoiding such problems.

Optimized Method – integrating gem ‘Bullet’:

Let me explain in just 3 easy steps, how the gem ‘Bullet’ can be integrated to optimize the query,

Step#1 – Add the gem to the Gemfile

Example

/Gemfile.rb

  gem 'bullet', '4.6.0', :group => “development”

Run “bundle install” to install the bullet gem in the development group.

Step#2 – Configuration setting in development.rb file

To enable Bullet change its configuration with the after_initialize block in the development.rb file. Set alert as true to get alert popup through the browser.

config.after_initialize do 
    Bullet.enable = true 
    Bullet.alert = true  
    Bullet.bullet_logger = true 
    Bullet.console = true 
    Bullet.rails_logger = true 
  end

Step#3 – Restart the Server

Restart the server as well as reload the page.
After completing the above mentioned steps a JavaScript alert popup would appear with the detected N+1 query. The alert would display the file containing the issue as well as what could be done to overcome the problem.

The previous N+1 query can be fixed by following below mentioned steps:

In Controller,

lass OrdersController < ApplicationController
  def index
    @orders = Order.includes(:products)
  end
end

After changing the statement from ‘Order.all’ to ‘Order.includes’(:products). We can fetch the products through eager loading. Now, if we reload the page we wouldn’t get any alert as we are fetching the efficiently. Here the data is fetched by only two queries, one to get the orders and the other to get the products in those orders.

‘Bullet’ can also tell us when we’re doing eager loading unnecessarily. Let’s say in the order listing page only order will be displayed. So, we removed the code that was displaying the list of products. Now after reloading the page we will get an alert popup displaying that Bullet has detected unused eager loading.

Step 4: Run Your App

With ‘Bullet’ enabled, navigate through your application by using its various features. ‘Bullet’ will keep a close eye on your queries and provide alerts if it detects N+1 query problems or suggests eager loading opportunities.

Step 5: Review Alerts

As you interact with your app, pay attention to any alerts generated by ‘Bullet.’ It will notify you about potential N+1 query issues, which occur when a single query fetches associated records for multiple main records, leading to excessive database hits.

Step 6: Eager Loading Optimization

When ‘Bullet’ suggests eager loading, take action by optimising your queries. Use ActiveRecord includes or eager_load methods to load associated records in advance, reducing the need for multiple queries.

Benefits:

  • No need to search the codes in each file to figure out the inefficient database query.
  • Bullet can notify us, through an alert message, by writing in the console or in the log file.
  • Prevent our application from performing an inefficient database query like an N+1 query.
  • It can also detect unused eager loading.

Conclusion

The ‘Bullet’ gem is a powerful tool that empowers Rails developers to optimize their application’s database queries and improve overall performance. 

By following the step-by-step guide outlined in this blog, you can easily integrate ‘Bullet’ into your development workflow, identify potential N+1 query problems, and capitalize on eager loading opportunities. 

Embrace the ‘Bullet’ gem and take your Rails app’s speed and efficiency to new heights, ensuring a seamless and delightful user experience.

Related Questions

Q1: What is the main purpose of the ‘Bullet’ gem in a Rails application?

Ans:
The ‘Bullet’ gem serves as a performance optimization tool in Rails applications. It monitors queries and helps identify potential N+1 query issues and opportunities for eager loading, ultimately optimizing database queries for improved application performance.

Q2: What steps are involved in installing and configuring the ‘Bullet’ gem for query optimization?

Ans:
To optimize queries using the ‘Bullet’ gem, start by adding it to your Gemfile. After installation, configure the gem in your config/environments/development.rb file by enabling it, enabling alerts, and setting up bullet logging. This allows ‘Bullet’ to monitor and alert you about query-related issues.

Q3: How does the ‘Bullet’ gem help in identifying N+1 query issues?

Ans:
The ‘Bullet’ gem identifies N+1 query problems by analyzing your application’s query patterns. If it detects instances where multiple queries are being executed to retrieve associated records for a main record, it generates alerts. These alerts prompt developers to address the issue and optimize queries through eager loading.

Q4: What is eager loading, and how does the ‘Bullet’ gem assist in optimizing it?

Ans:
Eager loading is a technique to fetch associated records in advance to avoid N+1 query problems. The ‘Bullet’ gem suggests opportunities for eager loading by analyzing query patterns. When an N+1 query issue is detected, ‘Bullet’ recommends using ActiveRecord’s includes or eager_load methods to load associated records efficiently.

Q5: What are the benefits of using the ‘Bullet’ gem for query optimization in Rails applications?

Ans:
Using the ‘Bullet’ gem offers several benefits, including optimized queries that reduce database hits, enhanced application performance, increased developer productivity through quick problem identification, and efficient use of eager loading to minimize query-related issues. Overall, it leads to a smoother user experience and improved application responsiveness.