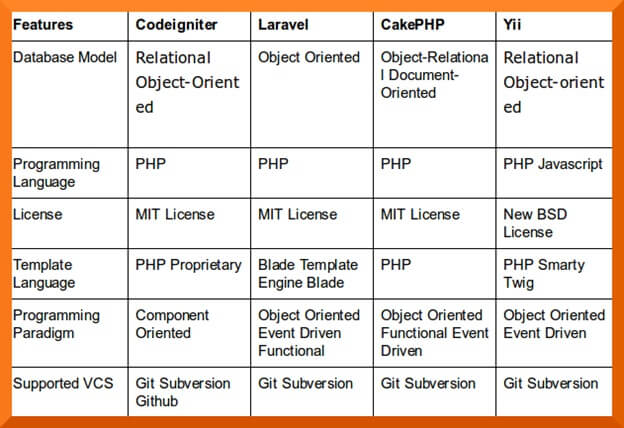
How to Develop a Highly Engaging Ecommerce Store Using CakePHP

The world of eCommerce business is evolving at a rapid pace. Business owners can choose from various technologies to develop their online store.

However, with the availability of open source technology, CakePHP eCommerce development is on the rise.

With its robust features and flexibility, CakePHP stands out as a reliable framework for developing dynamic and efficient eCommerce websites.

In this guide, we’ll take you through the step-by-step process of developing eCommerce web apps using CakePHP framework.

CakePHP offers a well-structured and organized framework that streamlines development. It’s impressive how it balances ease of use with powerful features.”

                    Matt Mullenweg, Founder of WordPress

Why Developers Choose CakePHP for eCommerce Development?

Choosing the right framework for developing an eCommerce app is crucial for ensuring efficiency, scalability, and maintainability.

CakePHP is one of the best frameworks for eCommerce app development due to its numerous advantages and little disadvantages.

Here are the top 10 reasons to consider CakePHP for your eCommerce app:

  1. Rapid Development:

CakePHP follows the convention over configuration (CoC) principle, reducing the need for manual setup.

This accelerates development by providing pre-defined conventions and tools, enabling developers to focus on building features rather than writing boilerplate code.

  1. MVC Architecture:

CakePHP development facilitates Model-View-Controller (MVC) architecture which promotes a clear separation of concerns.

This allows CakePHP developers to work on different aspects of the app independently, enhancing code organization and maintainability.

  1. Code Reusability:

CakePHP emphasizes reusable components and plugins.

This is invaluable in eCommerce development, where features like shopping carts, payment gateways, and user authentication can be developed once and integrated across the app.

  1. Security Features:

CakePHP integrates security practices by default, helping to mitigate common vulnerabilities like SQL injection and cross-site scripting (XSS).

It also provides tools for handling input validation and form tampering protection.

  1. ORM and Database Abstraction:

CakePHP’s Object-Relational Mapping (ORM) system simplifies database interactions.

Developers work with PHP objects instead of SQL queries, reducing the risk of errors and improving code readability.

  1. Built-in Validation:

CakePHP application development facilitates built-in validation methods, making it easier to enforce data integrity and validate user inputs.

This is crucial for maintaining accurate product information and ensuring a smooth checkout process in an eCommerce app.

  1. Community and Documentation:

The framework boasts an active and supportive community.

The official documentation is comprehensive, making it easier to learn the framework, troubleshoot issues, and stay up-to-date with best practices.

  1. Plugin Ecosystem:

The CakePHP plugin ecosystem offers a wide range of ready-made solutions for common eCommerce functionalities.

This saves development time and effort by allowing you to integrate existing plugins for features like user management, payment gateways, and SEO optimization.

  1. Flexible Theming:

eCommerce apps require appealing and responsive designs.

CakePHP’s theming capabilities allow you to separate design and logic, making it easy to create visually engaging and user-friendly storefronts.

  1. Scalability and Performance:

Its well-structured architecture and caching mechanisms contribute to improved performance and scalability.

As your eCommerce app grows, CakePHP programmers help maintain a high level of performance without sacrificing user experience.

 “CakePHP has played a significant role in shaping modern PHP frameworks. Its conventions and code generation tools have been an inspiration for frameworks like Laravel.”

                                                                                                               Taylor Otwell, Creator of Laravel

Why Do Business Owners Choose CakePHP for eCommerce Development?

  1. Cost-Effective:

eCommerce Business owners appreciate CakePHP for its cost-effectiveness.

The framework’s open-source nature means that there are no licensing fees, making it a suitable choice for startups and small to medium-sized businesses.

Additionally, the rapid development capabilities enable CakePHP developers with shorter development cycles, reducing overall development costs.

  1. Providing Customized User Experience:

It empowers business owners to create a tailored user experience for their customers.

The framework’s flexibility allows developers to build customized features and functionalities that align with the business’s unique needs and latest ecommerce trends.

Whether it’s a dynamic product catalog, personalized recommendations, or interactive user interfaces, CakePHP programmers make it possible to craft a user-centric experience.

  1. Strong Security:

Security is paramount in today’s digital landscape, especially for businesses handling sensitive customer data.

CakePHP’s built-in security features, including input validation, data sanitization, and protection against common vulnerabilities like SQL injection and cross-site scripting (XSS), provide a strong foundation for developing secure eCommerce applications.

  1. Community Support:

The CakePHP community is vibrant and active, offering a wealth of resources and support to business owners and developers alike.

With an extensive documentation repository, forums, tutorials, and user-contributed plugins, business owners can tap into a network of expertise to troubleshoot issues, share insights, and continuously improve their applications.

  1. Analytics:

Business owners understand the importance of data-driven decision-making.

CakePHP’s integration capabilities with analytics tools enable businesses to gather valuable insights into user behavior, sales trends, and other key metrics.

By leveraging analytics, business owners can refine their strategies and optimize their web applications for better performance.

“CakePHP’s architecture promotes scalability and maintainability. It’s reassuring to see a framework that values clean code and sensible defaults.”

                                                                             Jeffrey Zeldman, Web Designer and Entrepreneur

What are the Modules to Include While Developing an eCommerce Store?

What are the modules to include while developing an eCommerce Store

(Image source: www.webmynesystems.com)

Let’s delve deeper into each of the modules to include in a CakePHP eCommerce development:

  1. Admin Panel:

The admin panel is the command center of your eCommerce site, where administrators and store managers control various aspects of the store’s operations.

Using CakePHP, you can create an admin panel that allows authorized users to perform tasks like managing products, orders, customers, and more.

Implement authentication and authorization to ensure only authorized personnel access the admin functionalities.

  1. Product Management:

Product management is essential for adding, editing, and updating the products available in your store’s inventory.

With CakePHP web app development, you can create a user-friendly interface in the admin panel that allows administrators to add new products, edit existing ones, set prices, add images, and manage product descriptions.

  1. Categories Management:

Categories help organize products and make navigation easier for customers. Using CakePHP, you can design a module that lets administrators create, edit, and delete product categories.

Each category can have a name, description, and possibly an image to visually represent it.

  1. Product Attributes:

Product attributes define specific characteristics of a product, such as size, colour, and material.

In CakePHP ecommerce development, you can develop a system where administrators can define attributes and values for each product, enhancing the customization options for customers.

  1. Retailers:

If your eCommerce store involves partnerships with retailers, you can develop a module to manage retailer information.

This could include retailer profiles, contact details, product distribution, and orders associated with specific retailers.

  1. Orders Management:

This module handles the processing of customer orders. Administrators can view, update, and fulfil orders using the admin panel.

CakePHP can help you create an intuitive order management system that provides real-time order tracking and communication with customers regarding their orders.

  1. Coupon Codes Facility:

Creating and managing coupon codes is a great way to offer discounts and promotions to customers.

Using CakePHP, you can build a coupon code management module that allows administrators to generate, set conditions for, and track the usage of coupon codes.

  1. Shipping Modules for Delivery Rates:

Developing a shipping module involves integrating with shipping carriers to calculate accurate shipping rates based on factors like destination, weight, and shipping method.

In CakePHP development, you can implement a shipping module that fetches real-time shipping rates from carriers’ APIs and presents them to customers during checkout.

  1. Customers Management:

This module deals with customer profiles and information.

Administrators can manage customer accounts, view their order history, update contact details, and address any customer inquiries or issues.

  1. General Enquiries Module:

For customer inquiries that don’t necessarily fall under orders or products, you can develop a module to handle general enquiries.

Customers can submit questions or concerns, and administrators can respond and manage these inquiries from the admin panel.

  1. User Management:

Apart from customers, your site might have different user roles like administrators, store managers, and customer support.

CakePHP development features authentication and authorization capabilities which allow developers to manage user roles and access permissions effectively.

  1. Front Store:

The front store is the public-facing part of your website where customers browse and shop for products.

Using CakePHP, you can create a visually appealing and user-friendly interface that showcases products, categories, and special offers.

  1. Products Display:

This module displays products on the front store, allowing customers to browse and search through the product catalog.

Implement pagination and filtering options to enhance the shopping experience.

  1. Product Detail Page:

When a customer selects a product, they’re directed to the product detail page.

This page provides in-depth information about the product, including images, descriptions, prices, attributes, and customer reviews.

  1. Shopping Cart Management:

The shopping cart module keeps track of the items customers have added for purchase.

With CakePHP, you can create a dynamic shopping cart that allows customers to add, remove, and update quantities of products before proceeding to checkout.

  1. Checkout:

The checkout module guides customers through the final steps of purchasing.

It collects shipping and billing information, offers shipping options, and presents the order summary before payment.

  1. Payment via PayPal:

CakePHP enables you to integrate payment gateways like PayPal.

The PayPal integration module handles secure payment processing, ensuring customer payment information is handled safely and transactions are completed seamlessly.

  1. Order Management:

On the customer side, order management lets users view their order history, track order statuses, and possibly request returns or refunds.

On the admin side, this module enables administrators to process orders, update statuses, and communicate with customers regarding their orders.


“As a developer, CakePHP has been a reliable tool for building robust applications quickly. The framework’s commitment to following best practices sets a high standard for PHP development.”

Rachel Andrew, Web Developer and Co-Founder of Perch CMS

What are the Challenges of Using CakePHP for eCommerce?

  1. Steep Learning Curve:

CakePHP development has a structured and convention-based approach, which can result in a steeper learning curve for developers who are new to the framework.

Learning and adhering to CakePHP’s conventions might take time initially, especially if developers are accustomed to different coding patterns.

  1. Limited Flexibility for Complex Customizations:

While CakePHP’s conventions can speed up development, they may limit flexibility when dealing with highly complex customizations.

In scenarios where unique and unconventional features are required, working within the framework’s conventions might become challenging.

  1. Performance Overhead:

While CakePHP offers caching mechanisms and performance optimization tools, some applications may experience performance overhead, especially under heavy loads.

Fine-tuning the application’s performance might require additional effort.

  1. Smaller Community Compared to Other Frameworks:

While the CakePHP community is active and supportive, it may not be as extensive as some other popular PHP frameworks.

This could mean that finding solutions to less common issues might take more time or rely more on self-guided exploration.

  1. Dependency on Updates:

Keeping the framework up-to-date is important for security and performance reasons.

However, updates to CakePHP might require adjustments to your application, particularly if it relies on certain features or plugins that have undergone changes.

What are the Steps to Develop eCommerce using CakePHP?

What are the Steps to Develop eCommerce using CakePHP

(Image source: www.iflair.com)

Step 1: Setting the Foundation

Environment Setup:
Ensure you have PHP and a web server (like Apache) installed on your machine. Additionally, download and install Composer, a PHP dependency manager, to easily integrate libraries and plugins.

CakePHP Installation:
Use Composer to install CakePHP by running the command composer create-project –prefer-dist cakephp/app my_store.

Step 2: Database Configuration

Database Creation:
Create a new database for your eCommerce store using tools like phpMyAdmin or the command line.

Configuration:
Configure your database settings in config/app.php under the ‘Datasources‘ array.

Creating Tables:
Use CakePHP’s powerful schema generation tools to create your database tables. Run the command bin/cake bake migration CreateProducts to create a migration file.
Modify the migration file to define your product fields, then run bin/cake migrations to apply the changes to the database.

Step 3: Designing Your Store

Layouts and Views:
CakePHP uses a template system that separates logic from presentation. Create layout templates and views for your store’s pages, like the homepage, product listing, and product details.

Adding Styles and Assets:
Integrate CSS frameworks like Bootstrap to enhance the visual appeal of your store. Utilize CakePHP’s asset management to efficiently load CSS, JavaScript, and image files.

Step 4: Implementing eCommerce Features

Adding Products:
Create a controller and views to handle product management. Use CakePHP’s FormHelper for creating forms to add new products.

Product Listing:
Display products dynamically using CakePHP’s query builder to retrieve data from the database. Implement pagination to manage large product catalogs.

Shopping Cart:
Build a shopping cart system using sessions or database storage to keep track of selected products. Allow users to add, remove, and adjust quantities of items in their cart.

Checkout Process:
Design a multi-step checkout process. Implement form validation and user authentication for a seamless purchasing experience.

Payment Integration:
Integrate payment gateways like PayPal or Stripe to securely process payments. Leverage CakePHP’s plugin ecosystem to simplify the integration process.

Step 5: User Management

User Registration and Login:
Create user authentication using CakePHP’s built-in tools or third-party plugins. Allow users to register accounts and log in securely.

Step 6: Security and Performance

Data Validation:
Utilize CakePHP’s validation features to ensure data integrity and prevent malicious input.

Security Measures:
Implement security best practices like CSRF protection, input sanitation, and secure authentication to safeguard user data.

Step 7: Testing and Deployment

Unit Testing:
CakePHP comes with testing tools. Write unit tests to ensure the functionality of your application.

Deployment:
Choose a reliable hosting provider and deploy your application. Configure your server to meet CakePHP’s requirements.

Cal Evans, PHP Community Advocate:

“CakePHP’s influence on the PHP community has been undeniable. It’s contributed to the advancement of PHP frameworks and has helped developers produce quality code.”

Top Things to Consider when Hiring CakePHP Developers for eCommerce Development

Expertise and Experience:

Look for a CakePHP development company with expertise in the framework particularly for eCommerce projects.

Review their portfolio to assess the complexity and quality of their previous work. Experience in creating custom eCommerce solutions is essential to ensure that your specific needs are met.

eCommerce Domain Knowledge:

An understanding of eCommerce nuances is vital.

Ensure that the CakePHP development agency is familiar with eCommerce processes such as product management, cart functionality, payment gateways, shipping, and order processing.

Their experience in developing user-friendly and conversion-focused eCommerce experiences is crucial.

Technical Proficiency:

Verify the company’s technical expertise in CakePHP, as well as other related technologies like HTML, CSS, JavaScript, and database management.

Their ability to integrate third-party APIs and tools, such as payment gateways and analytics, is also important.

Customization Capabilities:

eCommerce websites often require unique features. Assess the company’s ability to customize CakePHP applications according to your business requirements.

They should be able to strike a balance between using CakePHP’s conventions and implementing tailor-made solutions.

Security Practices:

Given that eCommerce sites handle sensitive customer data, security is paramount.

Inquire about the company’s approach to security, including measures to prevent vulnerabilities, protect customer information, and ensure compliance with data protection regulations.

Quality Assurance and Testing:

A reputable development company should have a rigorous quality assurance process in place.

Ask about their testing methodologies, including unit testing, integration testing, and user acceptance testing, to ensure a bug-free and reliable eCommerce application.

Communication and Collaboration:

Effective communication is key to a successful project.

Ensure that the company maintains open lines of communication and is responsive to your queries.

Look for their ability to collaborate with your team, share progress updates, and discuss project milestones.

Scalability and Performance:

As your eCommerce business grows, your website needs to scale efficiently.

Discuss the company’s approach to ensuring optimal performance, handling increased traffic, and maintaining a seamless user experience as your store expands.

Project Management and Timeline:

A well-organized project management approach is crucial for meeting deadlines.

Understand how the CakePHP development company plans and manages projects, including how they handle milestones, iterations, and client feedback.

Post-Launch Support and Maintenance:

A reliable CakePHP development company should provide ongoing support after the project’s launch.

Inquire about their post-launch services, including bug fixes, updates, and technical support.

Client References and Testimonials:

Request references from previous clients and read testimonials to gain insights into the company’s work ethics, communication, and the overall client experience.

Cost and Budget Alignment:

While cost should not be the sole factor, ensure that the company’s pricing aligns with your budget.

Discuss the project scope, pricing structure, and any potential additional costs.

Phil Sturgeon, API Design Expert and Developer Advocate:

“CakePHP has continuously evolved to meet the demands of modern web development. Its focus on conventions and reusability has made it a favorite among developers.”

Who are the top 5 CakePHP Development Companies in the World?

Andolasoft:

Andolasoft Logo

Andolasoft is a software development company known for its expertise in CakePHP eCommerce development.

Apart from CakePHP the company offers web, mobile and cloud development services using a wide range of technologies.

The company has technology expertise on PHP, Python, Laravel, NodeJS, Ruby on Rails, VueJS, ReactJS, AngularJS, JavaScript etc.

With a focus on innovation and client satisfaction, Andolasoft has delivered solutions across various industries, helping businesses achieve their digital goals.

Top CakePHP Development Services Offered by Andolasoft

  • CakePHP eCommerce development services
  • CakePHP template design services
  • CakePHP CMS development services
  • CakePHP migration services
  • CakePHP plugin development services
  • CakePHP custom website development services
  • CakePHP maintenance and support services

Top 3 CakePHP Projects Developed by Andolasoft

  • D&B Auto Rental

D&B Auto Rental

Technologies used – PHP 5.6, Apache, jQuery, jQuery UI, AWS, Bootstrap

The web app is developed to provide reliable car rental services. It is designed with a focus on customer experience, intuitive interface and easy data handling.

  • In4Mng

In4Mng

Technologies used – PHP, jQuery, jQuery UI, Bootstrap

Are you looking for a CakePHP developer

Contact Us

In4Mng is an entertainment application which is based in Nigeria. The app aggregates content from both print and electronic media into a single platform. The app adds additional content such as giveaways, games and puzzles to make information engaging and interesting to consume.

Orangescrum Logo

Technologies used – CakePHP, jQuery, jQuery UI, DataTables, Bootstrap

Orangescrum is a versatile project management software designed to streamline project planning, execution, and collaboration for individuals and teams. It offers a comprehensive set of tools and features to help businesses manage tasks, track progress, and achieve project goals efficiently.

  • Orases:

Orases is a full-service digital agency that specializes in CakePHP development.

They provide end-to-end solutions, including web and mobile app development, UI/UX design, and digital marketing.

With a commitment to delivering exceptional user experiences and innovative solutions, Orases has established a reputation for helping businesses thrive in the digital landscape.

Hyperlink InfoSystem:

Hyperlink InfoSystem

Hyperlink InfoSystem is a global technology solutions provider offering CakePHP development among its array of services.

They have a vast portfolio of successful projects spanning web and mobile apps, blockchain, IoT, and more.

With a global clientele, Hyperlink InfoSystem is recognized for its technical expertise and dedication to delivering cutting-edge solutions.

DotSquares:

DotSquares

DotSquares is a technology company that offers a comprehensive suite of services, including CakePHP development.

With a focus on delivering tailored solutions to meet client objectives, they have worked on diverse projects ranging from eCommerce platforms to business applications.

DotSquares has a global presence and a track record of delivering high-quality software solutions.

illuminz:

illuminz

illuminz is a software development agency with a strong focus on CakePHP development.

They provide end-to-end solutions including web and mobile app development, UI/UX design, and digital marketing services.

With a commitment to delivering scalable and innovative solutions, illuminz collaborates with businesses to bring their visions to life in the digital realm.

What are top questions to ask a CakePHP development company before hiring?

  1. What is your experience with CakePHP development?

Ask about the company’s experience specifically with CakePHP projects. Inquire about their past projects, complexities they’ve handled, and the size of the eCommerce platforms they’ve developed.

  1. Can you provide references or case studies from previous CakePHP projects?

Request references or case studies from clients who have hired the company for CakePHP development. This can give you insights into their work quality, reliability, and client satisfaction.

  1. How do you approach security in CakePHP development for eCommerce applications?

Security is critical in eCommerce. Ask about their practices for securing sensitive customer data, implementing encryption, preventing SQL injection, and handling payment information securely.

  1. What testing procedures do you follow to ensure the quality of CakePHP projects?

Testing is crucial to deliver a bug-free application. Ask about their testing practices, including unit testing, integration testing, and user acceptance testing, to ensure the final product meets your expectations.

  1. How do you handle post-launch support and maintenance?

An eCommerce site requires ongoing support to address issues, implement updates, and ensure smooth operations. Discuss their approach to post-launch support and the availability of maintenance services.

  1. What happens in case of scope changes or unexpected challenges during development?

Projects can encounter changes or challenges. Ask how they handle scope changes and unexpected issues, and how they communicate such matters to you.

  1. What differentiates you from other CakePHP development companies?

This question can help you understand the company’s unique strengths, values, and offerings that set them apart in the market.

Conclusion

eCommerce business owners choose CakePHP for its cost-effectiveness, ability to provide customized user experiences, strong security features, community support, and integration capabilities with analytics tools.

This framework empowers business owners to develop eCommerce applications that not only meet their specific needs but also provide a competitive edge in the digital market.

By harnessing the benefits of CakePHP, businesses can create scalable, secure, and engaging eCommerce apps that resonate with their target audience and drive success.

FAQs

Q1: How can you implement personalized shopping experiences using CakePHP?

Utilize CakePHP’s session management and user authentication to track customer behavior and preferences.

Based on this data, one can implement personalized product recommendations, wish lists, and targeted promotions, enhancing the overall shopping experience.

Q3: What are some strategies for integrating popular payment gateways into a CakePHP eCommerce application?

Integrating payment gateways like PayPal, Stripe, or Square involves utilizing their APIs within the CakePHP eCommerce application.

You can create dedicated components or plugins to handle payment processing, ensuring that sensitive financial information is securely transmitted and stored.

Q4: What are the key features of CakePHP that make it suitable for eCommerce development?

CakePHP offers features like MVC architecture, ORM (Object-Relational Mapping), built-in security features, CRUD (Create, Read, Update, Delete) operations, scaffolding, and data validation. These features streamline eCommerce development by providing a solid foundation and reducing manual coding efforts.

Everything You Need To Know About WordPress Firewall Security

Website security basically refers to the measures taken to protect a website from potential security threats, such as hacking, data theft, or malware infections. Website security is crucial for protecting sensitive information and ensuring that a website remains accessible to users. The goal of website security is to ensure the confidentiality, integrity, and availability of the website and its data.

Some common security measures of a WordPress website are,

  • Using strong passwords and implementing two-factor authentication
  • Keeping the website and its components (e.g., themes, plugins) up to date
  • Using a reputable web host with built-in security features
  • Implementing an SSL/TLS certificate for encryption
  • Installing a security plugin, such as a firewall or antivirus software
  • Regularly backing up the website’s data
  • Monitoring the website for suspicious activity
  • Educating users on safe browsing practices.

A firewall is a security tool that monitors and controls incoming and outgoing network traffic based on predetermined security rules. In the context of WordPress website security, a WordPress firewall acts as a barrier between your website and potential security threats, such as hacking attempts, malware infections, or data theft.

Never miss an update from us. Join 10,000+ marketers and leaders.

Here are some of the benefits of using a WordPress firewall for your website security:

  • Protects against hacking attempts: Firewall helps to prevent unauthorized access to your website by blocking malicious traffic & suspicious IP addresses.
  • Prevents malware infections: A WordPress firewall can detect and block malware-infected requests before they reach your website.
  • Increases website speed: By blocking malicious traffic, a WordPress firewall can improve the overall speed and performance of your website.
  • Enhances security: A WordPress firewall provides an additional layer of security to complement other security measures, such as SSL certificates, anti-virus software, and regular backups.
  • Simplifies security management: Many WordPress firewalls come with user-friendly interfaces that make it easy for non-technical users to manage security settings.

What is WordPress Firewalls?

A WordPress firewall is a security tool that helps protect a WordPress website from various online threats, such as hacking attempts, malware, and malicious traffic. It acts as a barrier between the website and the internet, analyzing incoming traffic and blocking any requests that may be harmful to the site.

The firewall helps to prevent unauthorized access, data theft, and other security breaches, making the site more secure and reliable. Some popular WordPress firewalls include Sucuri, Wordfence, and All In One WP Security and Firewall.

Why use WordPress Firewall

Using a WordPress firewall in a website provides several benefits, like;

  • Improved security: A firewall helps to protect the website from various online security threats, such as hacking attempts, malware, and malicious traffic. It acts as an extra layer of security, filtering out harmful traffic and blocking potential attacks before they can cause damage.
  • Protection against attacks: A firewall helps to prevent unauthorized access, data theft, and other security breaches, making the site more secure and reliable.
  • Real-time monitoring: A firewall provides real-time monitoring of incoming traffic and alerts administrators if any suspicious activity is detected.
  • Enhanced website performance: By blocking malicious traffic and reducing the load on the server, a firewall can help improve the overall performance and speed of the website.
  • Easy to install and use: Many WordPress firewall plugins are easy to install and configure, making it simple for website owners to implement this extra layer of security without needing technical expertise.

Therefore, using firewall is a smart and effective way to secure a WordPress website and protect it from potential security threats.

Best WordPress Firewalls

There are many options available for WordPress firewalls, and the best one for a specific website will depend on its unique needs. Here are some popular and well-regarded WordPress firewalls below,

  • Sucuri: A comprehensive security solution that offers a firewall, malware scanning, and website monitoring.
  • Wordfence: A security plugin that includes a firewall, malware scanning, and real-time traffic monitoring.
  • All In One WP Security and Firewall: A security plugin that provides a range of security features, including a firewall, malware scanning, and website optimization.
  • Jetpack Security: A security solution that offers a firewall, automatic backups, and real-time security scanning.
  • IThemes Security: A security plugin that provides a firewall, two-factor authentication, and malware scanning.

These are just a few examples of the many WordPress firewalls available. It’s important to research and compare different options to find the one that best fits your site’s needs and budget.

How to Install a WordPress Firewall on Website

Installing a WordPress firewall on a website typically involves the following steps:

Choose a firewall plugin:

Choose a WordPress firewall plugin that fits the needs of your website. Some popular options include Sucuri, Wordfence, and All in One WP Security and Firewall.

Install the plugin:

Login to the WordPress admin dashboard and go to the “Plugins” section. Click “Add New” and search for the firewall plugin you’ve chosen. Install and activate the plugin.

Configure the plugin:

Once the plugin is installed and activated, navigate to its settings page to configure it according to your preferences. Some plugins may offer default settings that you can use or adjust as needed.

Test the firewall:

After configuring the firewall, test it to make sure it’s working correctly. You can do this by visiting your website and checking for any errors or issues.

Regularly update the plugin:

To ensure the firewall remains effective, it’s important to regularly update the plugin to the latest version. This will help to address any known security vulnerabilities and improve the overall security of your website.

Are you looking for a WordPress Developer

Contact Us

These are the general steps for installing a WordPress firewall. However, the exact steps may vary depending on the specific plugin you choose, so it’s recommended to consult the plugin’s documentation for detailed instructions.

Conclusion

WordPress firewall security is a crucial aspect of maintaining the security of your website. By using a combination of security plugins, server-side security measures, and best practices for website management, you can significantly reduce the risk of your site being hacked or compromised.

Regularly updating your WordPress software, plugins, and themes, and backing up your website regularly can also help ensure that your site remains secure and protected from potential threats.

Security must be taken seriously: a breached website can lead to sensitive data loss, reputational harm, and costly losses.

Angular 14: All the Important Features and Updates

Angular is a typescript-based web application framework and is Google’s brilliant creation. It has released its latest version which is Angular 14. It has arrived with stand-alone components, promising to streamline application development by reducing the need for angular modules.

It is believed to be the most systematic pre-planned upgrade by Angular. It has released new features which include CLI auto-completion, typed reactive forms, stand-alone components, directives, pipes, and enhanced template diagnostics.

Stand-alone Components:

The standalone component is a new feature that lets you create your components and use them anywhere in the app. The biggest advantage of standalone components is that they are easier to customize than other types of components.

You can create these kinds of components using the @Component annotation, which tells angular how to build this kind of component when you include it in the app. Here’s an example:

[code language=”css”]
import {Component} from ‘@angular/core’;
import {AppComponent} from ‘./app.component’;
@Component({ selector: demo-app’, template: `<h1>Hello World!</h1>`}) export class AppComponent {}
[/code]

Strictly Typed Forms:

In Angular 14, you can now use TypeScript to enforce a strict form of types on the forms. This means that each field will be checked against its type when it is submitted or validated, which makes it easier to make sure that the forms are not invalid.

The strictly typed forms have been improved as follows:

  • More responsive look and feel
  • The form is now easier to use and less confusing to the users
  • Form validation errors are displayed at once on the screen instead of having them displayed as pop-ups after submitting data

Never miss an update from us. Join 10,000+ marketers and leaders.

Angular CLI Auto-Completion

Angular CLI auto-completion is a new feature that provides auto-completion for the angular command line interface (CLI) commands. The completion feature is based on the TypeScript definition files and uses the IntelliJ IDEA plugin.

It can be enabled by adding @types/angular to the list of types you want to use in the app. In addition, you can select which kinds of completion you want such as TypeScript or ECMAScript features related to angular.

The auto-completion feature in the Angular CLI gives the ability to type < and then press Tab or Shift+Tab to complete the selection. You can also use Ctrl+Space or Command+Space to make the selections by typing words in the console.

In addition, it will turn on the tab completion automatically when you are in an editor window or running an application. This makes it easier for developers who don’t have a lot of experience with Angular to get started with it quickly.

Improved Template Diagnostics

The ng template debug method is removed from the new release of the framework. To ensure that you have time to migrate the new way of debugging template syntax errors in Angular 14. We are introducing a new diagnostic method called ng-template-error. This diagnostic will print the offending code within an error message when the app throws an error during the runtime.

It can enable this new diagnostic by including the following @Output decorator on all of the components:

[code language=”css”]
import { NgModule } from ‘@angular/core’;
import { BrowserModule } from ‘@angular/platform browser;
import { DemoApp } from `./app`; import { AppComponent } from `./app.component`;
@NgModule({ imports: [ BrowserModule ], declarations: [ AppComponent ], bootstrap: [ AppComponent ] }) export class AppModule {}
[/code]

Streamlined Page Title Accessibility

The page title is the most visible piece of information on a web page. It is what users see when they open a new tab or window and it is what search engines used to index the content.

You can customize the title tag of your pages directly from within the <head> of your style sheet. You can now leverage the power of the HTML to provide additional context for the title tag.

In the previous release, Angular had to assume that the title property of

elements was accessible. However, this assumption was not always accurate and could lead to unexpected behavior.

Now, Angular can assume that the title property is accessible when it needs to be. This means that you will see fewer exceptions when using

elements with a title attribute in the application.

You can also opt-in to using this new feature by configuring the app with @angular/platform-server@2.0.0-beta.18 or higher and adding the following element in the component’s template:

[code language=”css”]
<%= raw `<ng-content></ng-content>` %>
[/code]

In Angular 14, the page title is accessible via a simple API. If you have a component with a template and a pipe that returns an object, you can use the title property on the returned object to access the page title.

[code language=”css”]
import { Component } from ‘@angular/core’;
import { RouterLink } from ‘@angular/router’;
import { NavController } from ‘@angular/common;
import { AppComponent } from ‘./app.component’;
@Component({ selector: ‘app-root’, styleUrls: [‘./app.component.css’], template: `<router-outlet></router-outlet>; ` }) export class AppComponent {}
export function getTitle(): any;
export const router = new RouterLink({ path: ‘/’, title: getTitle() });
[/code]

Latest Primitives in the Angular CDK

The Angular CDK (Compiler-Dependent JavaScript) is a library that provides a set of primitives for building components, services, and many other types of applications.

The latest version of the CDK is now available in an alpha release with several new features:

  • Angular Elements: A new way to build HTML elements, which can be placed inside the other components or used standalone as an <div> element. The new elements are inspired by the ShadowDOM APIs in V8 and Web Components.
  • New FormBuilder: An Angular form builder that allows you to create forms with ease using simple declarative expressions and properties instead of creating a separate controller for each form field.

There are a bunch of new primitives in the Angular CDK, including:

  • @Output () decorator: It allows you to write template code directly into your component class.
  • @Injectable () decorator: This allows you to inject any other component or service into your component class.
  • @Link () decorator: This allows you to create link tags that can be used in templates and directives.

I’ve worked with the team at Andolasoft on multiple websites. They are professional, responsive, & easy to work with. I’ve had great experiences & would recommend their services to anyone.

Ruthie Miller, Sr. Mktg. Specialist

Salesforce, Houston, Texas

LEARN MORE

Conclusion

Angular 14 is finally released with some amazing new features and updates. This version will have a major impact on the development community as a whole.

The Angular developer community strives to make sure that web developers get better versions of the framework allowing them to stay updated with the rest of the online ecosystem and users’ needs.

Service Oriented Architecture in NodeJS

What is Service-oriented Architecture in NodeJS?

Service-oriented architecture is a way to build backend applications consisting of multiple independent services. A service can be any business logic that completes an action and provides a specified result to the endpoint user.

Each service in SOA is a complete business function in itself.

For an Example

Let’s discuss this at a grocery store.

The owner adds the product details to the inventory. The owner searches to find data about a unique product. And the backend application database query should be inside the service section by leveraging the data access layer. Then it securely fetches data and gives the response to the owner.

Layers in Service-oriented Architecture

  1. Router layer
  2. Service layer
  3. Data access layer

How SOA Works

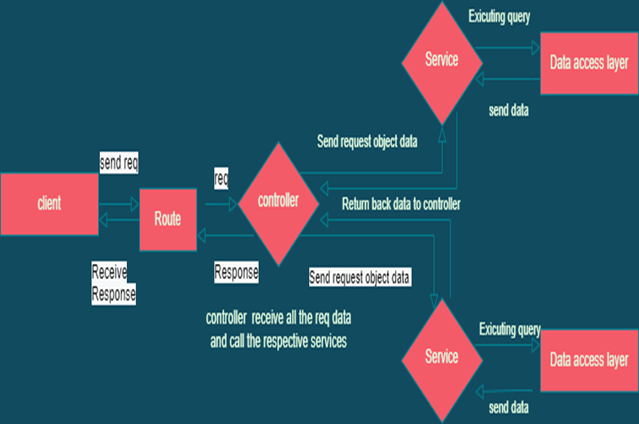
  • Here first when the API call, in the node app first it faces the router section where all the authentication and validation occur through the middleware function. Then control moves toward the controller section which work is collect the incoming data related to API requests. Here all the business logic to access data is combined inside a service. So the controller invokes that service and service leverage data access layer to connect with database and calculation. Then services return the data to the controller. After that controller gives the response to the endpoint user.
  • The most important benefit of SOA is as all the services are independent and small chunks so whenever we want to change our programing language it should be very fast and easy in the development process.

Flow chart diagram:

SOA Flow Daigram

SOA Advantages

  • Reliable– Even though service-oriented architecture has small and independent services, it becomes easier to debug code as it checks small chunks instead of checking a large codebase
  • Independent of location– Services can be accessed through URL therefore change in location doesn’t affect customer experience
  • Scalable– Service-oriented architecture can run on multiple platforms and can operate various servers within the given environment
  • Reusability– The SOA uses its services in multiple applications independently without disturbing other services
  • Easy maintenance– SOA is an independent unit therefore updating becomes easy as it is a single entity
  • Agile– Due to reusable components and services, it helps developers to integrate and build applications quickly according to requirements and consequently increases the agility of service-oriented architecture.

Now the question is why we shouldn’t do this directly inside the controller.

As the router is built with express so it is combined with req and res objects. So when we put our business logic inside the controller then at the testing we have to write a mock for the test with a response mock.

The problem is when we try to only test our business logic we can’t do that but when we combined that inside service we can test that service without req, res object.

Code Example:

In this example, we create a service that resists a user in the database for sign-up API.

In user.js controller receive all the requested data and call the user service

[code language=”css”]
// controllers/user.js
const UserService = require( "../services/UserService" );
const UserServicesec = new UserService();

async function makeUser ( req, res ) {
try {
let bodyData = req.body;
const makeUser = await UserServicesec.create( bodyData );
return res.send( makeUser );
} catch ( err ) {
res.
status( 500 ).
send( err );
}
}

module.exports = { makeUser };
[/code]

Then in the user service folder import the data access layer and database model then service used that data access layer and executes the query in the database

[code language=”css”]
// services/UserService.js
// Data Access Layer
const MongooseService = require( "./MongooseService" );
const userModel = require( "../models/user" );
class UserService {
constructor () {
this.MongooseService = new MongooseService( userModel );
}
async create ( createUser ) {
try {
const result = await this.MongooseService.create( createUser );
return { success: true, body: result };
} catch ( err ) {
return { success: false, error: err };
}
}
}
module.exports = UserService;
[/code]

Conclusion:

The main aim of service-oriented architecture is to allow users to mix large chunks of functionalities into one in order to build an application and services by combining services. This architectural design of node backend application is considered a best practice in industrial labels.

Angular 13: Top New Features and Updates

Angular 13, the latest version of the TypeScript-based web framework was released. The release has brought several essential updates that can be useful for Angular development.

1. TypeScript 4.4 support

TypeScript 4.4 support is now available in Angular 13. It means now we can use many fantastic language features. Moreover, they stopped supporting TypeScript 4.2 and 4.3 also. One breaking change in TypeScript 4.4 that is advantageous for Angular apps is that it no longer implements setters and getters to get a similar type.

The significant highlights of TypeScript 4.4 are:

  • Improved detection of type guards.
  • Default catch variables.
  • Faster incremental builds.
  • The control flow of conditions can be analyzed
  • Symbol and template string pattern index signatures.

2. Version 7.4 of RxJS

The Angular 13 update adds RxJS, a reactive extension for JavaScript, and includes all versions of RxJS up to and including version 7.

For apps created with ng new, RxJS 7.4 has become the default.

Existing RxJS v6.x apps will need to be manually updated with the npm install rxjs@7.4 command. You can always rely on RxJS 7 for new project creation. As for migrations, existing projects should keep on RxJS 6.

3. 100% Ivy and No More Support for View Engine

The legacy View Engine is no longer supported. Now that there is no View engine-specific metadata or older output formats, it eliminates the codebase complicacy and maintenance costs. Ivy is now the only view engine supported by Angular. Ivy can now compile individual components independently of one another, which significantly improves performance and accelerates development times.

By removing the View Engine, Angular can reduce its reliance on ngcc too. There is no more requirement of using ngcc (Angular compatibility compiler) for the libraries created using the latest APF version. The development team can expect quicker compilation as there is no more requirement for metadata and summary files.

4. IE 11 Support Removed

This stands out to be one of the significant Angular 13 features. Angular 13 no longer supports IE11. CSS code paths, build passes, polyfills, special JS, and other parameters that were previously required for IE 11 have now been completely dropped off.

As a result, Angular has grown faster, and it is now easier for Angular to use new browser features like CSS variables and web animations using native web APIs.

During project migration, running the ng update will automatically remove these IE-specific polyfills and reduce the bundle size.

5. Angular CLI Improvements

The Angular CLI is one of the key components of the Angular Puzzle. Angular CLI helps standardize the process of handling the complexities of the modern web development ecosystem by minimizing these complexities on a large scale.

With the release of Angular 13, this framework now includes a persistent build cache as a default feature, which saves built-in results to disk. As a result, the development process will be accelerated. Furthermore, you have complete control over enabling or disabling this feature in current Angular apps.

6. Improvements to Angular testing

The Angular team has made some notable changes to TestBed, which now correctly tears down test environments and modules after each test.

As the DOM now experiences cleaning after tests, developers can anticipate more optimized, less interdependent, less memory-intensive, and quicker tests.

7. Changes to the Angular Package Format (APF)

The Angular Package Format (APF) defines the format and structure of Angular Framework packages and View Engine metadata. It’s an excellent strategy for packaging every third-party library in the web development environment.

Older output formats, including some View Engine-specific metadata, are removed with Angular 13. The updated version of APF will no longer necessitate the use of ngcc. As a result of these library changes, developers can expect faster execution.

8. TestBed updates

The latest Angular update improves the TestBed significantly, as the DOM is cleaned after every test.  In addition to this, the TestBed tears down test modules and environments in a more effective manner.

Therefore, developers using Angular 13 will get faster, less interdependent, memory-intensive, and optimized tests.

9. Creating dynamic components

One Ivy-enabled API update in Angular 13 is a more streamlined method for dynamically constructing a component. ViewContainerRef.create component no longer requires an instantiated factory to construct a component (no longer need to use ComponentFactoryResolver).

Due to the improved ViewContainerRef.createComponent API, it is now possible to create dynamic components with less boilerplate code. Following is an example of creating dynamic components using previous versions of Angular.

[code language=”css”]
@Directive({ … })
export class Test {
constructor(private viewContainerRef: ViewContainerRef,
private componentFactoryResolver:
ComponentFactoryResolver) {}
createMyComponent() {
const componentFactory = this.componentFactoryResolver.
resolveComponentFactory(MyComponent);
this.viewContainerRef.createComponent(componentFactory);
}
}
[/code]

In Angular 13, this code can become as follows.

[code language=”css”]
@Directive({ … })
export class Test {
constructor(private viewContainerRef: ViewContainerRef) {}
createMyComponent() {
this.viewContainerRef.createComponent(MyComponent);
}
}
[/code]

10. NodeJS Support

Node versions older than v12.20.0 are no longer supported by the Angular framework. Web developers might face certain issues while installing different packages if working with older versions.

16.14.2 is the current stable version of NodeJS. For ensuring seamless deployment of your project, it is recommended to install the latest versions of NodeJS.

Conclusion

The Angular team tries to release a new version update every six months. Now that you know the significant updates and features of the all-new Angular 13. Apart from delivering on the Ivy everywhere promise made in Angular 12 and removing the View Engine altogether, Angular 13 has many impressive features and updates. The framework has become more efficient with inline support for fonts, simplified API, components, and CLI improvements.

The release of Angular 13 enhances the web development process so that the Angular developer can create awesome apps to meet modern web development standards.  If you’re still using Angular 12, it’s time to upgrade your next project with new features.

At Andolasoft, we have expert Angular developers who can help you migrate your existing applications, and also create new web and mobile applications with the best quality. Feel free to book a free consultation with our experts.

How to Make Your React Web App SEO-Friendly

React is an open source library which has been developed and maintained by Facebook for building interactive UI components for both mobile apps and Single Page Applications (SPA).

It runs on JavaScript and is popularly used by developers as it boosts productivity during the development process.

SPA problems with SEO

The way these sites are built makes it harder for search engines to crawl their content.

What happens when you use React without server-side rendering is that the crawler halts on the very first page because it can’t see any hyperlinks to follow. It sends the page to the indexer, which then has to render the page and extracts the hyperlinks, which will then be added to the crawler’s queue. Then the crawler will eventually crawl the next set of pages, and again will stop there because all the links are invisible until the JavaScript is rendered. So it has to wait for the indexer to come back with a new set of URLs to crawl.”

But this can be improved in 2 ways

  1. React Helmet
  2. Isomorphic React Applications

What is a React Helmet?

React Helmet is a library that helps you deal with search engines and social media crawlers by adding meta tags to your pages/components on React so your site gives more valuable information to the crawlers.

React Helmet Usage

Let’s assume we have a React application with a Home Component, which is the landing page of a business which sells products for pets.

[code language=”css”]
Import React from ‘react’;’
Import ProductList from ‘../components/ProductList’;
Const Home = () =&gt;{
Return &lt;ProductList/&gt;
};
Export default Home;
[/code]

This is a basic component that doesn’t include any Meta data useful for search engines and social media crawlers, so we need React Helmet to do it.

To start using React Helmet we need to install the library as follows:

npm install -save react-helmet

Then we need to modify the Home component to start using Helmet in a way that we can use title tags and Meta tags:

[code language=”css”]
import React from ‘react’;
import { Helmet } from ‘react-helmet’;
import ProductList from ‘../components/ProductList’;
const Home = () =&gt; {
return (
&lt;&gt;
&lt;Helmet&gt;
&lt;title&gt;Pets – Products&lt;/title&gt;
&lt;meta name="description" content="Find all the best quality products your pet may need" /&gt;
&lt;meta name="twitter:card" content="summary_large_image" /&gt;
&lt;meta name="twitter:site" content="@user" /&gt;
&lt;meta name="twitter:creator" content="@user" /&gt;
&lt;meta name="twitter:title" content="Pets – Products" /&gt;
&lt;meta name="twitter:description" content="Best Products for your pet" /&gt;
&lt;meta name="twitter:image" content="url_to_image"/&gt;
&lt;meta property="og:description" content="Best Products for your pet" /&gt;
&lt;meta property="og:url" content="pets.abc" /&gt;
&lt;meta property="og:site_name" content="Pets – Products" /&gt;
&lt;meta property="og:locale" content="en_US" /&gt;
&lt;meta property="og:type" content="article" /&gt;
&lt;meta property="fb:app_id" content="ID_APP_FACEBOOK" /&gt;
&lt;/Helmet&gt;
&lt;ProductList /&gt;&lt;/&gt;)};
export default Home;
[/code]

Isomorphic React Applications

Isomorphic React App is a web app that consists of code that can run on both server and client-side.

An isomorphic app defines whether the client is able to run scripts or not. When JavaScript is turned off, the code is rendered on the server, so a browser or bot gets all Meta tags and content in HTML and CSS.

When JavaScript is on, only the first page is rendered on the server, so the browser gets HTML, CSS, and JavaScript files. Then JavaScript starts running and the rest of the content is loaded dynamically.

The first screen is displayed faster, the app is compatible with older browsers, and user interactions are smoother in contrast to when websites are rendered on the client side.

Building an isomorphic app can be really time-consuming. There are frameworks that facilitate this process. The two most popular solutions for SEO are Next.js and Gatsby.

  1. Next.js is a framework that helps you create react apps that are generated on the server side quickly and without hassle. It also allows for automatic code splitting and hot code reloading.

    Next.js can do full-fledged server-side rendering, meaning HTML is generated for each request right when the request is made.

  2. Gatsby is a free open-source compiler that allows developers to make fast and powerful websites. Gatsby doesn’t offer full-fledged server-side rendering.

    Instead, it generates a static website beforehand and stores generated HTML files in the cloud or on the hosting service. Let’s take a closer look at their approaches.

Server-side rendering with Next.js

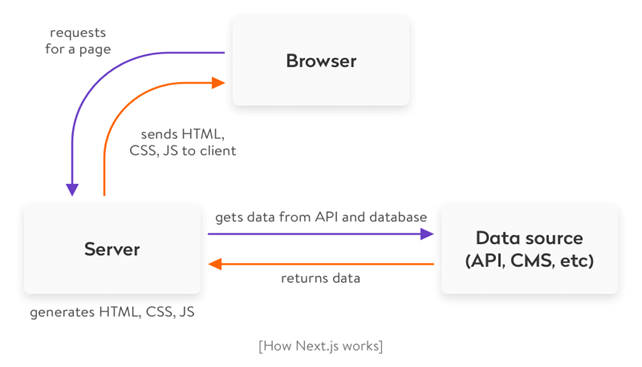
  1. The Next.js server, running on Node.js, receives a request and matches it with a certain page (a React component) using a URL address.
  2. The page can request data from an API or database, and the server will wait for this data.
  3. The Next.js app generates HTML and CSS based on the received data and existing React components.
  4. The server sends a response with HTML, CSS, and JavaScript.

Server side rendering with Nextjs

Making website SEO Friendly with GatsbyJS

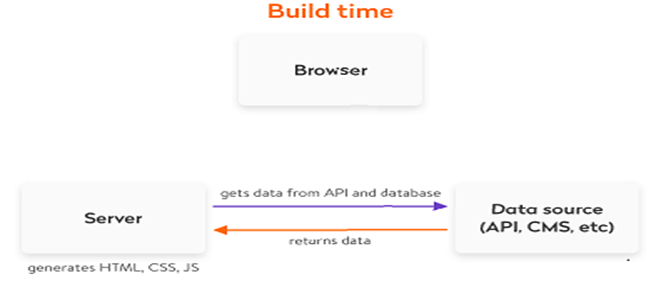
The process of optimizing React applications is divided into two phases: generating a static website during the build and processing requests during runtime.

The build time process looks as follows:

  1. Gatsby’s bundling tool receives data from an API, CMS, and file system.
  2. During deployment or setting up a CI/CD pipeline, the tool generates static HTML and CSS on the basis of data and React components.
  3. After compilation, the tool creates an about folder with an index.html file. The website consists of only static files, which can be hosted on any hosting service or in the cloud.

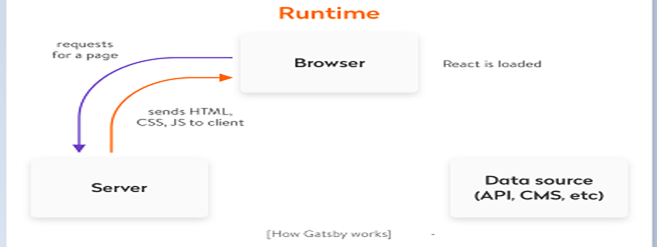
Request processing during runtime happens like this:

  1. Gatsby instantly sends HTML, CSS, and JavaScript files to the requested page, since they already were rendered during compilation.
  2. After JavaScript is loaded to the browser, the website starts working like a typical React app.

    You can dynamically request data that isn’t important for SEO and work with the website just like you work with a regular single-page react app.


Built TimeRun Time

Creating an isomorphic app is considered the most reliable way to make React SEO-compatible, but it’s not the only option.

Conclusion:

SEO-friendliness of single-page applications develop with react is still a challenge. To make an SPA visible for Google crawlers and available for indexing, you might opt for per-rendering or server-side rendering.

Frameworks like Next.js, makes the work of an SEO much easier. You can also overcome the all the SEO-challenges with the help of the above solutions and frameworks.

I hope the above react SEO guide helps you. To develop your new application with react or any further assistance you can contact Andolasoft experienced react developers.