5 Reasons Why Web Development is Faster With Ruby On Rails

Ruby on Rails aka “RoR” is an open-source MVC framework built using the Ruby programming language.

It is considered as the epitome of the latest generation of high-productivity, open source web development tool. The growing demand for Ruby on Rails has been driven by successful RoR development companies like Andolasoft, who benefit from the speed and agility of building applications in Rails, which results in increased productivity and company growth.

1. Framework Built on Agile Methodology

RoR is faster because the framework was built based on Agile development methodology, best practices are emulated so web development is done with high quality and speed.

RoR framework includes support programs, compilers, code libraries, tool sets, and application programming interfaces (APIs) that bring together the different components to enable development of a project or solution.

Never miss an update from us. Join 10,000+ marketers and leaders.

It’s possible to build sites that used to take 12 weeks in just 6 weeks using Ruby on Rails. It means you can save 50% on your development expenses.

2. Less Code Writing

Rails creates a skeleton for an application or module by executing all the code libraries. You must write some commands to accomplish this. This is what makes the process of web development faster.

Rails makes database deployments simpler than any open, or proprietary solution by allowing for migrations.

  • Adopting principle of DRY

    It also adopts the principle of “Don’t Repeat Yourself”. So all information can be retrieved from a single unambiguous database which tends to easier development.

  • Easy Configuration

    A key principle of Ruby on Rails development is convention over configuration. This means that the programmer does not have to spend a lot of time configuring files in order to get setup, Rails comes with a set of conventions which help speeding up development.

  • Modular Design

    Ruby code is very readable and mostly self-documenting. This increases productivity, as there is little need to write out separate documentation, making it easier for other developers to pick up existing projects.

  • Designer Friendly Templates

    HTML templates is a core feature of Rails. It allow templates to be composed of a base template that defines the overall layout of the page,the base template is called a “layout” while the individual page templates are “views”. The Rails application retrieves the list of tags from the database and makes it available to the view.The section of the view that renders these category is:

    <%= render :partial => 'category' %>

    This refers to a Ruby partial, a fragment of a page, which is contained in _category.html.erb. That file’s content is:

<h3>categories</h3>
<p class="categorylist">
<%= render :partial => 'categorylist', :collection => @category %>
</p>
  • This generates the heading then refers to another partial, which will be used once for each object in the collection named “categorylist”.

3. Third Party Plugin/Gem Support

Mature plugin architecture, well used by the growing community. Rails plugins allows developer to extend or override nearly any part of the Rails framework, and share these modifications with others in an encapsulated and reusable manner.

Rails community provides a wealth of plugins as Ruby Gems that you simply add to your project Gem-file and install. This significantly accelerates development and maintenance time as you’re not trying to integrate disparate libraries, it’s already done for you.

4. Automated Testing

Rails has developed a strong focus on testing, and has good testing suit in-built within the frameworks.

Rails makes it super easy to write your tests. It starts by producing skeleton test code while you are creating your models and controllers.

I’ve worked with the team at Andolasoft on multiple websites. They are professional, responsive, & easy to work with. I’ve had great experiences & would recommend their services to anyone.

Ruthie Miller, Sr. Mktg. Specialist

Salesforce, Houston, Texas

LEARN MORE

Rails ships with a built-in test suite. There are many tools available in the market for testing Rails application as mentioned below with other web apps from many different aspects.

  • Rspec
  • Cucumber
  • Test Unit
  • Shoulda
  • Selenium (not really a ruby thing but more of a web thing)

But if you are new to testing we highly recommend you start with learning Rails own testing suite before start using other tools

5. Easier Maintenance

Once site launches, future modifications to your site (e.g., adding new features, making changes to the data model) can be made more quickly, for the same reasons noted above.
New features can be added quickly and maintaining applications over time can also be more cost-effective.

If you like this one, you might also like Why Rails framework popular among Ruby developers and The Best practices for Rails App Development .
Andolasoft launches “Patia” – Free App to Find your file in Dropbox & Google Drive

Now-a-days usage of cloud storage services like Google Drive, Dropbox are very popular. In general it is too hard to find a specific file from large heap of files in these cloud storages. We at Andolasoft released of a new FREE app named Patia to make your life easy.

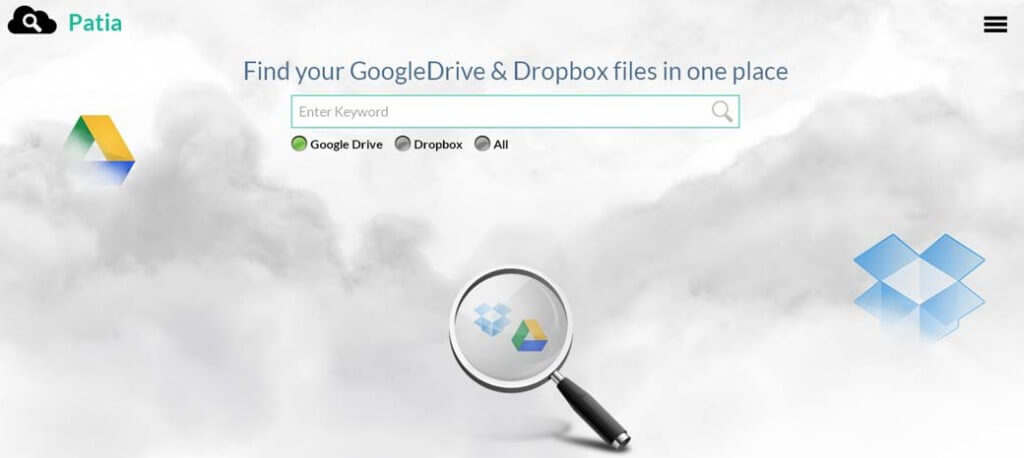
Patia is designed to help you search Google Drive and Dropbox to find the shared files and documents from cloud storage without having to check them individually.

How does Patia work?

With Patia, you can type a keyword in the search bar and it will scan your Google Drive and Dropbox account for relevant files using the search term.

getpatia-1024x458

Setting Up Patia

To set-up Patia, you just need to run GetPatia.com in your browser.

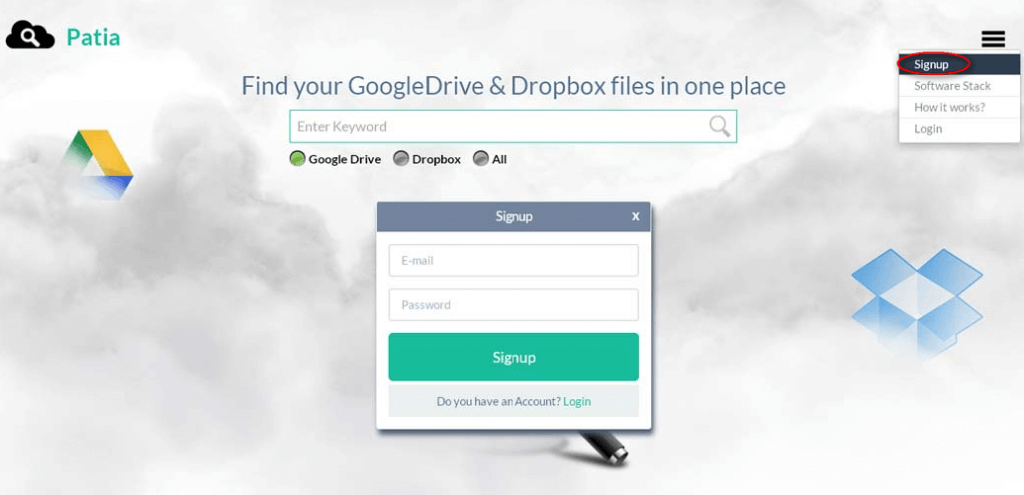
Just tap into the ‘Signup’ link and it requires only email address and password.

gp_sign_up-1024x495

Setting Up Patia

To set-up Patia, you just need to run GetPatia.com in your browser.

Just tap into the ‘Signup’ link and it requires only email address and password.


gp_GoogleDrive-1024x453(1)

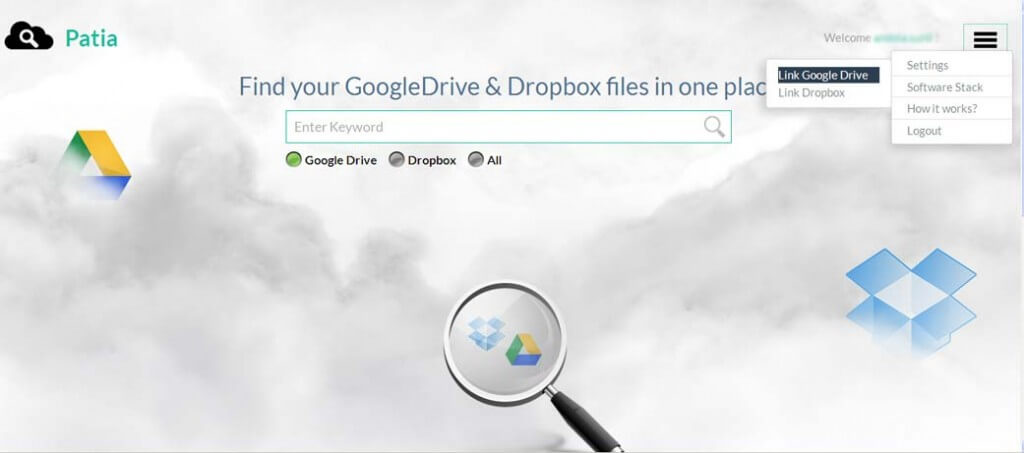
Once you are linked with your accounts, simply click on the search bar and enter what you are searching for. Patia will quickly scan the integrated accounts to find the items matching the term you entered.

You can narrow down your search by selecting specific options.
For example, if you would like to search a file from the Google Drive then just select the “Google Drive” button and start search.

gp_srch-1024x456

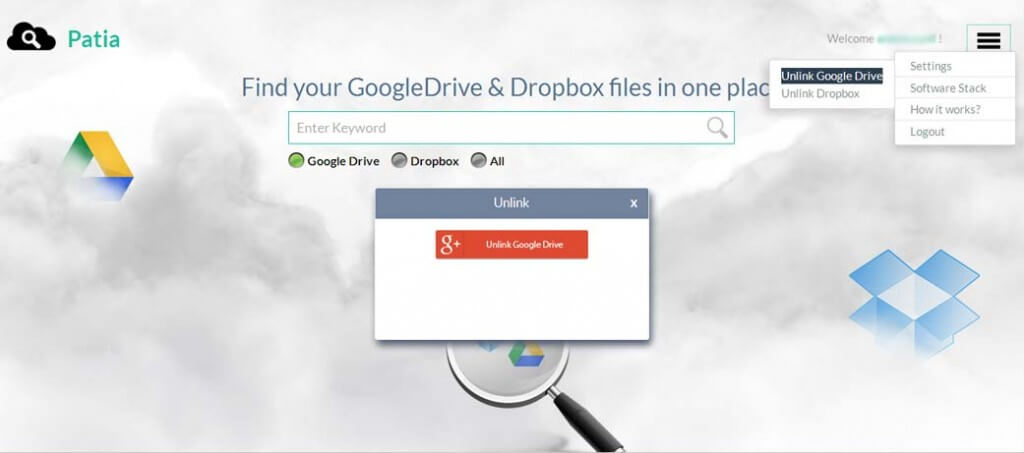
If you would like to disconnect the Google Drive from Patia, then simply click on ‘Unlink Google Drive’ under Setting menu. It will unlink your Google Drive account. Do the same for Dropbox to unlink from Patia.

gp_Unlink-1024x453

Patia requires no installation and you can access it using your Smartphone or Tablet on the go.

Check out some of our free apps and  free responsive web templates.

If you have any questions/comments we will be happy to get them in the comments section.


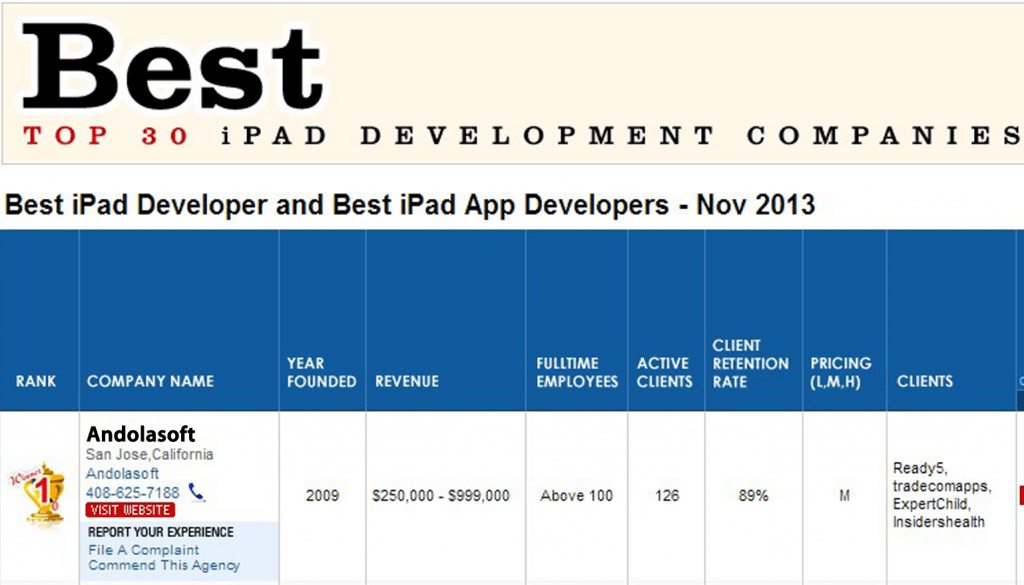
We are ranked TOP #1 for iPad Development

Hooray! We are the TOP #1 company in world, this time for iPad development

We are elated to declare that just we are ranked #1 by the bestwebdesignagencies.com

We dedicate this honor to our patrons without whom it would not have possible to be here.

as_top_ipad-1024x585

The credit goes to the good job done by our top-notch iOS app developers, who have been providing excellent services to our valued clientele.

How We Can Help

If you have an idea for an iPad/iPhone app, Andolasoft’s expert staff can help you turn that concept into a reality. We also have experience in rescuing troubled projects or improving

existing apps. No matter what stage your app is at, Andolasoft can help you bring it to market.

What You Get:

  • Easy-to-use iPad app with rich and engaging user experience
  • Step-by-step guidance and suggestions to you from building an app till publishing to App-Store
  • We provide perfect technical resources, support for your  needs
  • We follow the  Industry Best Practices
  • Timely delivery matching your budget
  • We follow Agile methodology and Scrum to facilitate rapid iPad app development
  • Quick turnaround service

The bestwebdesignagencies.com is an autonomous body that identifies and lists out best design and development companies in the world. The purpose is to help customers to pick the best ones from the lot. They adopt a stringent evaluation process to determine the quality of work delivered by a company to their customer satisfaction.

Top 10 simple tools you should know for working with remote team

remote_development_work-123There has been a sharp increase in Remote Development team in different parts of world, who provide product development, support and maintenance services.

Looking into current demand for skilled pool of Dedicated Developers, it is efficient to hire skilled developers and designers who are located at remote locations and use the right tools to chat, video conference, share screen and keep all the tasks in single place to develop your product efficiently and cost-effectively.

Here are the 10 must have tools to set up a virtual office and work with your remote team:

1. Skype:

Skype_logo


Skype is a voice and text based Instant messaging system that works on the VOIP technology. If you have a microphone and speaker, you can make phone free calls from your computer to other people on Skype and make cheaper calls to landlines and cell phones. Other features include instant messaging, file transfer, video conferencing and screen sharing. Skype also has an Internet connection box that lets you convert your regular telephone to use the internet for telephone service.


2. Google+ Hangouts:

Google_Hangouts


It is a free video chat service that offers both ‘one-on-one’ and group chats with up to ten people at a time. It focuses more on “face-to-face-to-face” group interaction as opposed to one-on-one video chats, and makes use of sophisticated technology to seamlessly switch the focus to the person currently chatting. It provides a ‘Hangouts on Air’ to broadcast live video conversation which are accessible to anyone with web browser.

3. join.me

join.me_image


join.me is a free one click screen sharing and conferencing tool. Just download the app, run and share the URL and you’ve got instant screen sharing along with text chat, voice conferencing as well as mouse sharing (if you allow it). You can also voice chat while watching the demonstration on the shared screen and even share files.

4. Cisco WebEx:

CiscoWebex_image


It is an on demand collaboration, web conferencing, online meeting and video conferencing app.  It is a full-fledged service that offers Screen sharing, audio and video recording, meeting scheduling and future event scheduling tools for both presenters and participants.

5. Orangescrum:

OrangeScrum_new_logo


There are numerous project collaboration tools available. However, we used Orangescrum which is developed by our development team. It is a project collaboration tool for project handling and effective communication between the developers and customers. It facilitates file attachments of any size and format; assigning tasks to a group. Set e-mail alerts as well as prioritize and target them to the concerned team members. It has got everything that a project collaboration tool demands.


6. Google Docs:

Google_logo


Google Docs is a free web based application in which documents and spreadsheets can be created, edited at the real time. Files can be accessed remotely form any PC with an internet connection and a Web browser. Users can import and edit docs and spreadsheets in various fonts, formats, formulas, lists, tables and images. Multiple users can work together in real time from remote locations.


7. DropBox:

Dropbox_image


DropBox is a personal cloud storage service which is used for file sharing and collaboration. It automatically updates the file changes across multiple devices which can be accessed from the DropBox repository. It can also be used with Android, iOS and windows mobile devices. Along with file sharing it also offers file versioning which are saved automatically.


8. Google Calendar:

Google_logo


Google Calendar app facilitates users to create private and public calendars. It store the calendars within its own servers hence, can be accessed from anywhere through a Web browser. This is probably the best app for scheduling and managing your events and meetings.


9. Sqwiggle:

sqwiggle1


Sqwiggle is browser-based group video chat service. They also have a stand-alone client for OS-X. According to TechCrunch- “It’s got the office-like immediacy that Skype lacks, but without the noise of a Google Hangout”


10. HipChat:

HipChat


HipChat is a private chat and instant messaging service that allows users to create and join chat rooms and send one-on-one messages with other users. Other primary features include searchable chat history, sharing images, uploading files and also SMS messaging for one-to-one conversation.

How to put custom Gradient backgrounds in IOS App

iOS_screenshot-196x300

Introduction:

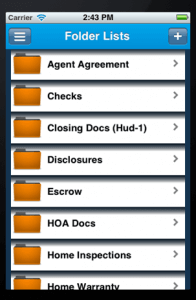
It is essential to have a unique design for every iPhone application; in order to deliver the most intriguing and compelling interfaces, customization is necessary in every step. A great place to start is to implement your own background and use a clear table view background. Many iOS apps are now following this. Another way is to add a custom background colour. It is as easy as setting the cells background color property.

I tried both the above methods, and still not satisfied with it. There are numerous applications that have pretty similar interfaces. That’s why I thought about putting a gradient view as the background.

Core Graphics is a great resource that helped me in the right direction. It is supposed to customize the background of a cell, but I used it as a basis for my code to draw a gradient.

Here is an example of GradientView

GradientView.h

[sourcecode]#import <UIKit/UIKit.h>
@interface GradientView : UIView
{
}
@end[/sourcecode]

GradientView.m

[sourcecode]#import "GradientView.h"
#import <QuartzCore/QuartzCore.h>
@implementation GradientView
//
// layerClass
//
// returns a CAGradientLayer class as the default layer class for this view
//
+ (Class)layerClass
{
return [CAGradientLayer class];
}
//
// setupGradientLayer
//
// Construct the gradient for either construction method
//
– (void)setupGradientLayer
{
CAGradientLayer *gradientLayer = (CAGradientLayer *)self.layer;
gradientLayer.colors =
[NSArray arrayWithObjects:
(id)[UIColor colorWithRed:0.85 green:0.85 blue:0.85 alpha:0.8].CGColor,(id)[UIColor colorWithRed:1.0 green:1.0 blue:1.0 alpha:1].CGColor,
(id)[UIColor colorWithRed:1.0 green:1.0 blue:1.0 alpha:1].CGColor,(id)[UIColor colorWithRed:1.0 green:1.0 blue:1.0 alpha:1].CGColor,
nil];
self.backgroundColor = [UIColor clearColor];
}
//
// initWithFrame:
//
// Initialise the view.
//
– (id)initWithFrame:(CGRect)frame
{
self = [super initWithFrame:frame];
if (self)
{
CAGradientLayer *gradientLayer = (CAGradientLayer *)self.layer;
//gradientLayer.cornerRadius = 10;
gradientLayer.colors =
[NSArray arrayWithObjects:
(id)[UIColor colorWithRed:0.255/255.0 green:0.215/255.0 blue:0.0/255.0 alpha:0.5].CGColor,(id)[UIColor colorWithRed:1.0 green:1.0 blue:1.0 alpha:1].CGColor,
(id)[UIColor colorWithRed:1.0 green:1.0 blue:1.0 alpha:1].CGColor,(id)[UIColor colorWithRed:1.0 green:1.0 blue:1.0 alpha:1].CGColor,(id)[UIColor colorWithRed:1.0 green:1.0 blue:1.0 alpha:1].CGColor,
nil];
self.backgroundColor = [UIColor clearColor];
}
return self;
}
@end[/sourcecode]

Then u can use this class object in “cellForRowAtIndex” method of “UITableViewController” class as follows

[sourcecode]- (UITableViewCell *)tableView:(UITableView *)tableView cellForRowAtIndexPath:(NSIndexPath *)indexPath
{
static NSString *CellIdentifier = @"Cell";
UITableViewCell *cell = [tableView dequeueReusableCellWithIdentifier:CellIdentifier];
if (cell == nil) {
cell = [[UITableViewCell alloc]
initWithStyle:UITableViewCellStyleDefault         reuseIdentifier:CellIdentifier] ;            cell.accessoryType=UITableViewCellAccessoryDisclosureIndicator;
cell.selectionStyle = UITableViewCellSelectionStyleNone;
cell.backgroundView = [[[GradientView alloc] init] autorelease];
}
// Configure the cell.
cell.textLabel.text = [self.allFolder objectAtIndex:indexPath.row];
cell.textLabel.backgroundColor = [UIColor clearColor];
cell.imageView.image=[UIImage imageNamed:@"folder.png"];
return cell;
}[/sourcecode]

Conclusion:

Many times, we need to make the application stand out from the crowd. While redesigning, we need something that would make our list of contents distinct from all the other table views. Hence, implementing custom background tables in ‘UITableView’ will be a smart way to start.