Grow Your Business For Your Mobile App With Google Analytics

In this digital era, information or data plays pivotal role in the process of development. The more information you have, more precise and accurate decision you can take. And this is also applies to mobile apps.

As per report comes from Portio “1.2 billion people worldwide were using mobile apps at the end of 2012. This is forecast to grow at a 29.8 percent each year, to reach 4.4 billion users by the end of 2017.” This simply indicates industry’s future growth potential; but to stand out this industry is not an easy job. Good news is that Google has its own free analytics tool that helps you to find out insight details of your mobile app which can be your vital part of our app development process.

In June 2012, Google introduced beta version of mobile app analytics ; but now it becomes the part of Universal Analytics. Today our purpose is to educate those developers or users who are not familiar with this influential API(Application Program Interface)

How To Setup Google Analytics for Mobile App?

Step 1:

Set up a new app property in your analytics accounts.
First login into your google analytic profile. Here you get two options:

  • Option One: You can create new account for your mobile app. For this go to admin section, then create new accounts from the account tab and choose “mobile app” tab. Now just provide details like Account name, App name, Industry category and time zone and you will get your tracking code. This option is more suitable if you want to see your analytic data of your mobile apps only.
  • Option Two: Here you can create a new property from your existing account. For this simply go to account where you want to add your new property and then select “Create new property” tab under property section and rest is similar to option one.This option is more suitable if you want to see analytic data of your web application as well as corresponding mobile application.

Step 2:

Download the Google Analytics SDK for Android or iOS from the same account screen that provides the tracking ID. Suggest to take help of mobile developer to implement tracking via SDK.

Never miss an update from us. Join 10,000+ marketers and leaders.

Once you setup your analytic for mobile app you can analyze your data through lots of cool features and out of them I have listed few features here:

  • Enhance your customer base by knowing who utilizes your app, on what platform, where they come from and what they looking for from Traffic Source report and Google play integration.Note: If you link your Google Analytics account to Google Play then your android apps will be automatically recognized in Google Analytic; but you have to associate each application separately with an analytic account.
  • Event tracking, Flow visualization, and Real time reporting helps you to identify scope of improvement for better customer engagement. With in-built crash and exception reporting, you can prioritize the issues which are impacting your visitors, helping you to serve better user experience. More you engage your visitor, better chance to achieve your objective.
  • Every single application has certain goals such as purchase, leads, signup or simply spending time on app. This helps you to setup and track those goals.
  • Google Analytics is now available on Admob. So you can get full analytic data either from Google Analytics or from Analyze tab of Admob account.

Recently, Google also released official Google Analytic app for iphone user (https://itunes.apple.com/app/google-analytics/id881599038). In future we may review this app for you.

See Also : Tips to increase your app download through App Store Optimization(ASO)

Andolasoft has been successfully delivered lots of iOS and Android app for his worldwide customer. You can check out our portfolio page. I would love to hear how you are using, or plan to use, this powerful Google API.

What is TDD and BDD in Rails App Development

What Does “Testing” Means ?

Testing of a product of services is an investigation to find out how well it is working against the expectation. Thus the quality of product can be assessed. Whether computer hardware or software development, testing is done at key checkpoints in the overall process to determine whether objectives are being met.

TDD-vs-BDD

What is TDD (Test-Driven Development) ?

TDD is a way of designing the code by writing a test which expresses what you intend the code to do. It defines a set of rules for developing software in which test cases are written before any code and the only code written will be enough to make the tests pass.

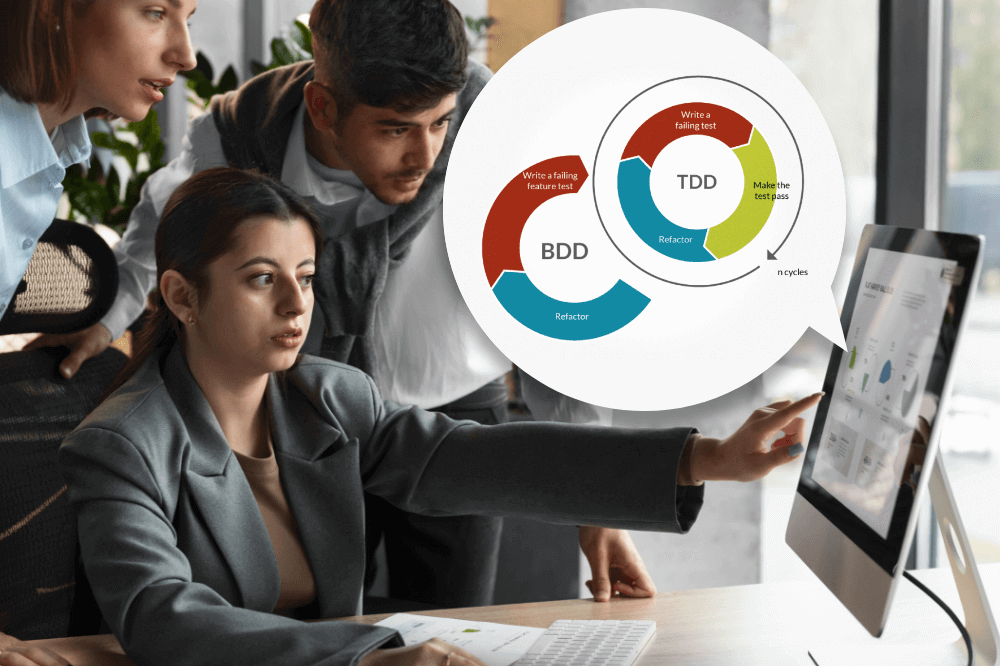
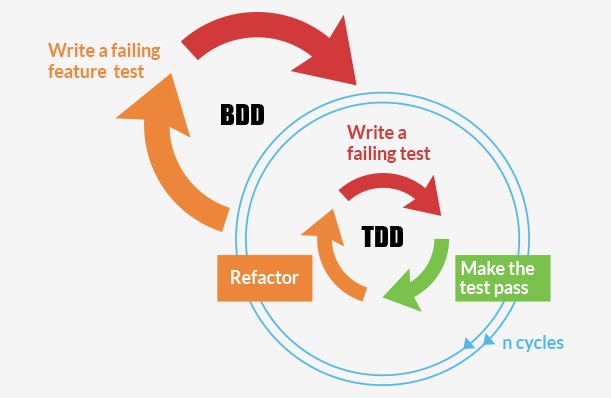
TDD is basically a software development technique that relies on the repetition of a very short development cycle. In this technique, first the developer starts by writing a failing automated test case (Red), implement the simplest solution that will pass the test cases (Green) and then finally improves or refactor the code (Refactor).”RED-GREEN-REFACTOR” is the main agenda for TDD.

Test-Driven Development (TDD) is a software development process that focuses on writing tests before writing the actual code. The TDD cycle typically follows three steps:

  • Write a Test:
    Developers begin by writing a test that defines the desired behavior of a particular piece of code. This test initially fails because the code to fulfill the behavior hasn’t been implemented yet.
  • Write Code:
    Next, the developer writes the minimum amount of code necessary to make the test pass. This phase emphasizes simplicity and getting the code to work.
  • Refactor:
    After the test passes, developers refactor the code to improve its quality, maintainability, and efficiency. This step ensures that the codebase remains clean and easy to maintain.

TDD is renowned for its ability to catch bugs early in the development process, enhance code quality, and provide clear documentation of how the code is intended to work.

Tools to use:
There are some popular gems available to implement TDD in Ruby on Rails like rspec-rails, capybara, factory_girl_rails, spork, launchy etc…

Example:
Below is the code snippet for writing controller tests, like this:

[sourcecode language=”plain”]
describe ArticlesController do
it "renders the index template" do
get :index
response.should render_template("index")
end
end[/sourcecode]

What is BDD (Behavior-Driven Development)?

BDD extends Test driven development by writing test cases in a way anyone can understand.With the help of BDD, software development is managed by both business interests and technical insight.

It focuses and associates behavioral specifications with each unit of software under development.

Basically BDD is an Agile software development technique that encourages collaboration between developers, QA and non-technical or business participants in a software project.

It extends TDD by writing test cases in a natural language that non-programmers can read. In other way it is like story writing.

Behavior-Driven Development (BDD) is an extension of TDD that focuses on the behavior of software from the user’s perspective.

BDD emphasizes collaboration between developers, testers, and business stakeholders to ensure that the software meets the desired behaviors and outcomes. Key components of BDD include:

  • Specifying Behavior:
    In BDD, behaviors are specified using human-readable language, often in the form of “Given-When-Then” scenarios. These scenarios describe the expected behavior of the software from the user’s viewpoint.
  • Collaboration:
    BDD promotes collaboration between technical and non-technical team members. Developers, testers, and business stakeholders work together to define and understand the software’s behavior.

Automated Testing: BDD scenarios are translated into automated tests that verify the desired behaviors. These tests serve as living documentation that ensures the software aligns with the intended behavior.

The main thing to know is that BDD is meant to eliminate issues that TDD might cause.

Tools to use:
Some popular gems are available to implement BDD in Rails are rpsec-rails, factory_girl_rails, cucumber-rails, guard-cucumber, mocha etc…

Example:
Below is the code snippet for writing the BDD:

[sourcecode language=”plain”]
#articles.feature
Given an article exists called "Testing Demonstration"
When I visit the list of articles
Then I should see an article called "Testing Demonstration"

#article_steps.rb
Given /^an article exists called "(.+)"$/ do |title|
FactoryGirl.create(:article, title: title)
end
When /^I visit the list of articles$/ do
visit articles_path
end
Then /^I should see an article called "(.+)"$/ do |title|
page.should have_content title
end
[/sourcecode]

TDD or BDD, which is better?
The main difference between TDD and BDD is the business readability factor. BDD’s main draw is that the specifications or features are separate from the test code, so the product owners can provide or review the specification without having to go through code.

TDD has a similar mechanism, but instead you describe a step with a Describe, Context or It block that contains the business specification, and then immediately have the code that executes that statement.

Few drawbacks of TDD are as follows:

  • Big time investment: For the simple case you lose about 20% of the actual implementation, but for complicated cases you lose much more.
  • Additional Complexity: For complex cases, test cases are harder to calculate.
  • Design Impacts: Sometimes the design is not clear at the start and evolves as you go along – this will force you to redo your test which will generate a big time lose.
  • Continuous Tweaking: For data structures and black box algorithms unit tests would be perfect, but for algorithms that tend to change, this can cause a big time investment that one might claim is not justified.

Benefits of TDD and BDD in Rails Development

  • Early Bug Detection:
    TDD and BDD catch bugs at an early stage of development, reducing the likelihood of critical issues arising in production.
  • Enhanced Code Quality:
    Writing tests before code enforces well-structured, modular, and maintainable code, resulting in a more robust application.
  • Clear Documentation:
    Test cases serve as clear documentation of the code’s intended behavior, making it easier for developers to understand and work with the codebase.
  • Collaboration:
    BDD encourages collaboration between technical and non-technical team members, leading to a shared understanding of requirements.
  • Regression Prevention:
    Automated tests created through TDD and BDD ensure that new changes do not break existing functionalities.

Best Practices for TDD and BDD in Rails

  • Start Small:
    Begin by writing tests for small, incremental features. This helps you master the TDD/BDD process and ensures a gradual buildup of test coverage.
  • Red-Green-Refactor:
    Follow the TDD cycle religiously: write a failing test, make it pass with minimal code, then refactor to improve code quality.
  • Human-Readable Scenarios:
    In BDD, use human-readable language to describe scenarios, making them understandable to all team members.
  • Automate Everything:
    Automate your tests so that they can be executed frequently and consistently.
  • Maintain Test Suite:
    Regularly maintain and update your test suite to reflect changes in requirements and keep it relevant.

Verdict

If you are the sole developer and a product owner too, then you should go for TDD. It’s easier for a technical person to understand, which is an advantage in keeping things scoped and under control. Thus keeps you out of messing up with RegExs for test steps. On the flip side, you should go with BDD,  if you are building this for a client, and they are hands-on with regard to the specifications.

See Also : Security Checks you must do before Rails App release

Hope you liked it. Go ahead and post your comments what you think about this?

Related Questions

What is the fundamental principle behind Test-Driven Development (TDD) in Rails development?

Test-Driven Development (TDD) in Rails involves writing tests before writing the actual code. This approach ensures that the code meets the desired behavior defined by the tests.

The TDD cycle includes writing a failing test, writing the minimum code required to pass the test, and then refactoring the code for improved quality.

How does Behavior-Driven Development (BDD) differ from Test-Driven Development (TDD)?

Behavior-Driven Development (BDD) extends the principles of TDD by focusing on the behavior of software from the user’s perspective.

BDD emphasizes collaboration between developers, testers, and business stakeholders to define behavior using human-readable scenarios like “Given-When-Then.” BDD scenarios are translated into automated tests, serving as living documentation that ensures the software aligns with intended behaviors.

Q3: What benefits does Test-Driven Development (TDD) bring to Rails development projects?

Test-Driven Development (TDD) offers benefits such as early bug detection, enhanced code quality, clear documentation of desired behavior, collaboration among team members, and prevention of regressions.

TDD ensures that the codebase is well-structured, modular, and maintainable, leading to a more robust and dependable Rails application.

How can Behavior-Driven Development (BDD) foster effective collaboration in Rails development teams?

Behavior-Driven Development (BDD) promotes collaboration by involving technical and non-technical team members in defining behavior scenarios.

Developers, testers, and business stakeholders work together to create human-readable scenarios that describe the software’s behavior. This shared understanding ensures that everyone is on the same page regarding the requirements and expectations.

What are some best practices for successfully implementing Test-Driven Development (TDD) and Behavior-Driven Development (BDD) in Rails projects?

Best practices for TDD and BDD include starting small by writing tests for incremental features, following the red-green-refactor cycle, using human-readable language for BDD scenarios, automating tests for frequent execution, and regularly maintaining and updating the test suite to reflect changes in requirements.

These practices ensure that TDD and BDD are effectively integrated into the development process, leading to high-quality Rails applications.

Creating A Custom Handler Session In CakePHP 2.x

Sessions manage and customization is very easy in CakePHP. Setting and configuration come out of the box so basically you don’t need to configure at all. But still at some point we need customization like, if we need some changes in php.ini or want to store session in a different place.

You can manage session, write custom handler, add option to save on different places, override php.ini settings.

Write Your Own Custom Handler For Sessions in Cake:

To Save Session With Setting in php.ini:

Configure::write('Session', array(
'defaults' => 'php'
));

This is the default setting that comes out of the box by CakePHP.

To Save Session Inside Cake tmp Folder:

Configure::write('Session', array(
'defaults' => 'cake'
));

This is required in a host where it does not allow you to write outside your home directory.

To Save Session in Database:

Configure::write('Session', array(
'defaults' => 'database'
));

This uses a built-in database defaults. It stores session in ‘cake_sessions’ table.
So you need to create a table for this:

CREATE TABLE `cake_sessions` (
`id` varchar(255) NOT NULL DEFAULT '',
`data` text,
`expires` int(11) DEFAULT NULL,
PRIMARY KEY (`id`)
);

But you can specify you own session handler to store session using a different model:

Configure::write('Session', array(
'defaults' => 'database',
'handler' => array(
'model' => 'MyCakeSession'
)
));

Create ‘MyCakeSession’ model at app/Model/MyCakeSession.php  And create ‘my_cake_sessions’ table:

CREATE TABLE `my_cake_sessions` (
`id` varchar(255) NOT NULL DEFAULT '',
`data` text,
`expires` int(11) DEFAULT NULL,
PRIMARY KEY (`id`)
);

This will save session ‘my_cake_sessions’ using MyCakeSession model.

To Save Session in Cake Cache:

Configure::write('Session', array(
'defaults' => 'database'
));

Making Session Persist Across All Sub-Domains:

  • Add below in bootstrap:
    ini_set(‘session.cookie_domain’, env(‘HTTP_BASE’));
  • This changes the default, that only the domain generating a session can access, to all sub-domains.
  • You don’t need to make core Security.level to low or medium.
  • You can also use php, cake, database or cache in core Session default to persist session in all sub-domains.

Troubleshoot:

  • When you test with the session management you might get error: “cakephp 404 The request has been black-holed”.
  • Try clear tmp/cache/, tmp/cache/models, tmp/cache/persistent, tmp/sessions.
  • Try clear browser cookie and cache.
  • Check core Session configurations.

Always try to clear browser cookie, cache before doing changes in core Session or php.ini configuration.

Other Session configuration that can be done are cookie name, timeout, cookieTimeout, checkAgent, autoRegenerate, and other ini values like cookie_secure, cookie_path, cookie_httponly.

See Also : How to migrate CakePHP 1.x to 2.x

Like this blog? I’d love to hear about your thoughts on this. Thanks for sharing your comments.

Asynchronous processing with Sidekiq gem in Rails

Introduction to Sidekiq

Sidekiq gem is used to move long running jobs to background for asynchronous processing.

It is more efficient, with respect to memory usage, than delayed_job and Resque as it uses threads instead of forks.

Need of background process

For example, in a mailing application you need to send emails to a large list of recipients. It will take large time to process with the large list of recipients, which is too long for a User to wait for a response after clicking a link. So, it’s better to move the long running task as the background process by using Sidekiq gem.

Integration of Sidekiq in a Rails application

Steps to integrate Sidekiq gem in a Rails Application :

Step#1 – Add the gem to the Gemfile to use Sidekiq with Active Record

gem 'sidekiq'

You can also view the web interface to manage the background jobs. It isn’t included by default with Sidekiq. To use the web interface we need to add couple of gems to the Gemfile like ‘sinatra‘ and ‘slim

 gem 'sidekiq', '2.9.0'
 gem 'sinatra', '1.3.6', require: false
 
 gem 'slim', '1.3.6'

Run “bundle install” to install the sidekiq gem

Step#2 – Install Redis Server to manage its job queue

Redis is an open-source, advanced key-value pair store. It is often referred to as a data structure server.
Sidekiq uses Redis to manage its job queue.

If you’re running OS X follow the steps as below:
Logged in as a Admin user or add sudo prefix on terminal

$ brew install redis

After installation completed starts the Redis server up with the following command

$ redis-server /usr/local/etc/redis.conf

if you’re running CentOS 5.6 follow the steps as below:

yum install make gcc wget telnet
 wget http://redis.googlecode.com/files/redis-2.2.12.tar.gz
 tar -xf redis-2.2.12.tar.gz
 cd redis-2.2.12
 make && make install

Change the default redis.conf file to daemonize it.

mkdir /etc/redis /var/lib/redis
sed -e "s/^daemonize no$/daemonize yes/" -e "s/^dir \.\//dir \/var\/lib\/redis\//" -e     "s/^loglevel debug$/loglevel notice/" -e "s/^logfile stdout$/logfile     \/var\/log\/redis.log/" redis.conf > /etc/redis/redis.conf

To make management easy, use an init script by using sed to update it.

 Wget https://raw.github.com/gist/257849/9f1e627e0b7dbe68882fa2b7bdb1b2b263522004/redis-server
 sed -i "s/usr\/local\/sbin\/redis/usr\/local\/bin\/redis/" redis-server
 
 chmod u+x redis-server
 
 mv redis-server /etc/init.d
 
 /sbin/chkconfig --add redis-server
 
 /sbin/chkconfig --level 345 redis-server on
 
 /sbin/service redis-server start

Step#3 – Start up the jobs process

There are couple of ways to do this,

  • If application is in development mode, we should use the below rake task file instead.
bundle exec sidekiq

If application is in production mode, then it is preferred to daemonizes the job process and allows multiple background processes to be spawned. To use this, follow the following step:
1. Add gem “daemon-spawn”, “0.4.2” to your Gemfile
2. Run bundle install
3. Run the below command to run it in background

bundle exec sidekiq -d -L log/delayed_job.log

4. You have to pass path of log file while using above command.

Step#4 – Add task to run in background

We need to add the background work in a separate class and store it in a new directory, let’s say app/background_jobs and ensures that it’s auto-loaded by the application.

We need to include the Sidekiq::Worker module.

class NotifyUsers
   include Sidekiq::Worker
   def perform
     User.find_each(is_subscribed: true) do |user|
       NewsMailer.newsletter_mail(user).deliver
     end
   end
end

This class must have a perform method. Add the code that need be to run in the background. Then call NotifyUsers.perform_async method inside the controller which will add the job to Redis and then it will call function perform asynchronously.

For Example:
Before background job in UsersController

class UsersController < ApplicationController
  def send_email
    User.find_each(is_subscribed: true) do |user|
      NewsMailer.newsletter_mail(user).deliver
      flash[:notice] = "Mail delivered"
      redirect_to root_path
    end
  end
end

After implementation of UsersController after adding to background job

class UsersController < ApplicationController
   def send_email
      NotifyUsers.perform_async
         flash[:notice] = "Mail is being delivered"
         redirect_to root_path
      end
   end
end

Conclusion

  • No need to wait for a response after clicking a link to do a big stuff
  • Sidekiq has client-side middleware which runs before a job is inserted into Redis
  • It has server-side middleware which runs before the job is being processed. This middleware retry jobs, log them and handle exceptions

SEE ALSO: How to Install and Configure Redis-Server on Centos/Fedora Server

Sidekiq handles the processing of the jobs after they’re pulled from Redis and multithreaded behavior.

It is also providing a web interface there are a couple of gems that we need to add to the gem file too. To visit the web interface just go to the /sidekiq path

It tells us how many jobs have been processed, the number of failures, the currently-active workers and the number of jobs in queues.

Like this blog? I’d love to hear about your thoughts on this. Thanks for sharing your comments.

Download responsive Web Templates for FREE

We at Andolasoft are delighted to release a collection of responsive web templates for free usage. You can download and use them absolutely FREE (We don’t ask for any Credit Card) for your website. These web templates are fully responsive such that even a mobile reader gets best user experience. You can download free templates/themes by visiting following linkshttps://www.andolasoft.com/ebook/

It is true that to create a website you need to have lot of skills and energy. If you are not so good with HTML, CSS or web designing, our website templates will be perfect solution for you. We can provide you the HTML of the template you are interested with.

We’re sure you will find these templates useful regardless if you’re a newbie or a pro webmaster. However, you are free to alter templates to suit your needs and apply to your personal or commercial websites without any restriction.

What are you waiting for? Go and get from the pool:

education1

mobile


web_software

You can checkout some of our cool free apps. Feel free to share your opinions in the comments section below:

Memcached Vs Redis, Which One to Pick for Large Web App?

Introduction:

MemcacheD is easy yet powerful. It’s manageable design promotes fast deployment, ease of exaggeration, and solves many problems related to large data caches. It has its inbuilt APIs which provide a very large hash table distributed across multiple machines & uses internal memory management which is more efficient in the simplest use cases because it consumes comparatively less memory for metadata. MemcacheD supports only String data type which are ideal for storing read-only data.

Memcached is a volatile in-memory key-value origin. It is rude, multi-threaded and used primarily for caching objects.

Redis is an open source in-memory data structure store which also can be used as a database as well as caching. It supports almost all types of data structures such as strings, hashes, lists, sets, sorted sets with range queries, bitmaps, hyperloglogs and geospatial indexes through radius queries. Redis also can be used for messaging system used as pub/sub.

Internal Architecture:

Internal Architecture


Here are the key points to consider,

Installation:

Installing Redis is so much easier. No dependencies required.

Memory Usage:

MemcacheD’s internal memory supervision, while not exactly a substitute to Redis; Is more efficient because it consumes comparatively less memory resources for metadata. For easy key-value pairs, MemcacheD is more memory efficient than Redis. Redis is more memory efficient, only after you use Redis hashes.

Persistence:

If you are using MemcacheD, data might be lost with a restart and rebuilding cache is a costly process. On the other hand, Redis can handle persistent data. By default it syncs data to the disk at least every 2 seconds, offering optional & tuneable data persistence meant to bootstrap the cache after a planned shutdown or an unintentional failure. While we tend to regard the data in caches as volatile and transient, persisting data to disk can be quite valuable in caching scenarios.

Replication:

MemcacheD does not support replication, whereas Redis supports master-slave replication. It allows slave Redis servers to be the exact copies of master servers. Data from any Redis server can replicate to any number of slaves. Replication can be used for implementing a cache setup that can withstand failures and find the maintenance for uninterrupted facilitation to the application.

Storage type:

MemcacheD stores variables in its memory & retrieves any information directly from the server memory instead of hitting the database again. On the other hand, Redis is like a database that resides in memory. It executes (reads and writes) a key/value pair from its database to return the result set. Developers use Redis for real-time metrics & analytics too.

Read/Write Speed:

MemcacheD is very good to handle high traffic websites. It can read lots of information at a time and give you back at a great response time. Redis can neither handle high traffic on read nor heavy writes.

Data Structure:

MemcacheD uses strings and integers in its data structure. Hence, everything you save can either be one or the other. With integers, the only data manipulation you can do is adding or subtracting them. If you need to save arrays or objects, you will have to serialize them first and then save them. To read them back, you will need to un-serialize.

In comparison Redis has stronger data structures, which can handle not only strings & integers but also binary-safe strings, lists of binary-safe strings, sets of binary-safe strings and sorted sets.

Key Length:

MemcacheD’s key length has a maximum of 250 bytes, whereas Redis has a maximum of 2GB.

Here is the benchmarking result by DB-Engines, which clearly shows the leader.

Conclusion:

Use Redis, if you need to do operations on cached datasets at once or need to spread one enormous cache over a geographically challenged area. Read-write splitting against caching will enormously help performance and alleviate the cache connection starvation.

On the other hand, you might want to stick to Memcached for its simplicity, reliability and speed.

SEE ALSO: How to Install and Configure Redis Server on Centos/Fedora Server

If you’re thinking anything on Ruby on Rails, get in touch with Andolasoft’s experts. Let’s convert your idea into an App.

Have something to add to this topic? Share it in the comments.