Key Difference Between ReactJS And React Native

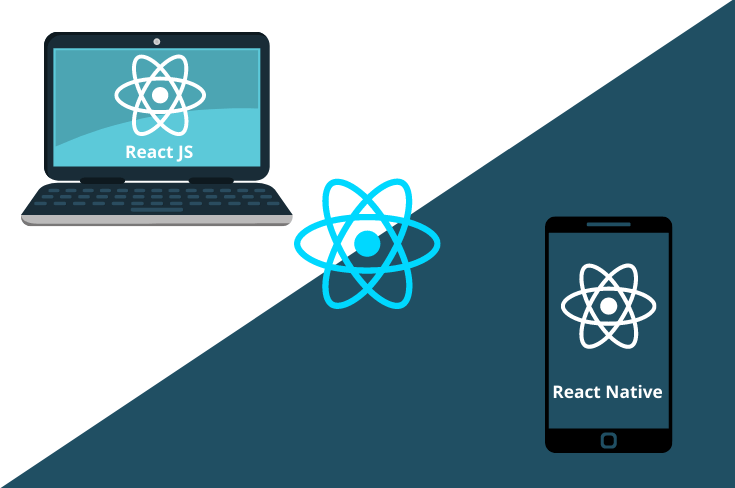
ReactJS and React Native are two leading JavaScript frameworks that allow users to build mobile user interfaces (MUI). They both provide developers with an opportunity to quickly prototype mobile apps and manage complexity as projects grow in scope. Both ReactJS and React Native are used to create native-like apps. However, there are certain differences between the two. Let me explain one by one

What is ReactJS?

React.JS often referred to as React or ReactJS is a JavaScript library responsible for building a hierarchy of UI components or in other words, responsible for the rendering of UI components. It provides support for both front-end and server-side.

Advantages of ReactJS

  1. Easy to learn and use: ReactJS is much easier to learn and use. Any developer who comes from a JavaScript background can easily understand and start creating web apps using react.
  2. Creating dynamic web applications becomes easier: To create a dynamic web application specifically with HTML was tricky, which requires complex coding, but ReactJS solved that issue and makes it easier. It provides less coding and gives more functionality.
  3. Reusable components: ReactJS web application is made up of multiple components, and each component has its logic and controls. These components can be reused wherever needed. The reusable code helps to make your apps easier to develop and maintain.
  4. Performance enhancement: ReactJS improves performance due to virtual DOM. The React Virtual DOM exists entirely in memory and is a representation of the web browser’s DOM. Due to this, when we write a react component, we do not write directly to the DOM. Instead, we are writing virtual components that will turn into the DOM, leading to smoother and faster performance.
  5. The support of handy tools: ReactJS supports a handy set of tools which make the task of the developers understandable and easier.

What is React Native?

React Native is an open-source JavaScript framework used for developing a mobile application for iOS, Android, and Windows. It uses only JavaScript to build a cross-platform mobile app. React Native is the same as react, but it uses native components instead of using web components as building blocks. It targets mobile platforms rather than the browser.

Facebook developed the React Native in 2013 for its internal project Hackathon. In March 2015, Facebook announced that React Native is open and available on GitHub.

Advantages of React Native

There are several advantages of React Native for building mobile applications. Some of them are given below:

  1. Cross-Platform Usage: It provides the facility of “Learn once write everywhere.” It works for both platform Android as well as iOS devices.
  2. Class Performance: The code written in React Native is compiled into native code, which enables it for both operating systems as well as it functions in the same way on both the platforms.
  3. JavaScript: JavaScript knowledge is used to build native mobile apps.
  4. Community: The large community of ReactJS and React Native helps us to find any answer we require.
  5. Hot Reloading: Making a few changes in the code of your app will be immediately visible during development. If the business logic is changed, its reflection is live reloaded on screen.
  6. Improving with Time: Some features of iOS and Android are still not supported, and the community is always inventing the best practices.
  7. Native Components: We will need to write some platform specific code if we want to create native functionality, which is not designed yet.
  8. Existence is Uncertain: As Facebook develops this framework, its presence is uncertain since it keeps all the rights to kill off the project anytime. As the popularity of React Native rises, it is unlikely to happen.

Disadvantages of React Native

  1. React Native is still new and immature: React Native is a newbie in Android and iOS programming languages and is still in its improvement stage, which can have a negative impact on the apps.
  2. Learning is tough: React Native is not easy to learn, especially for a fresher in the app development field.
  3. Lacks the Security Robustness: React Native is a JavaScript library and open-source framework, which creates a gap in the security robustness. When you are creating banking and financial apps where data is highly confidential, experts advise not to choose React Native.
  4. Takes More Time to Initialize: React Native takes a lot of time for initializing the runtime even for the hi-tech gadgets and devices.

ReactJS vs React Native

ReactJS

React Native

ReactJS initial release was in 2013. React Native initial release was in 2015.
Used for developing web applications. Used for developing mobile applications.
Can be executed on all platforms. Not platform independent. It takes more effort to be executed on all platforms.
Uses React-router for navigating web pages. Built-in navigator library for navigating mobile applications.
Uses HTML tags. Does not use HTML tags.
Use code components, which saves a lot of valuable time. Reuse React Native UI components and modules which allow hybrid apps to render natively.
Provides high security. Provides low security in comparison to ReactJS.
The Virtual DOM renders the browser code. Native uses its API to render code for mobile applications.

Which is better, React or React native?

Both ReactJS and React Native are important pillars for app and web development, and due to their flexible functionalities and an evolving Eco-system of libraries, they are gaining momentum with each passing day.

While ReactJS is basically a JavaScript library and React Native is the entire framework, the former is the heart of the latter, and compliments each other.

If ReactJS is optimal for creating apps with high functionality and complex calculations, then React Native is ideal to give a native feeling to your mobile apps.

Conclusion

React is a framework for building applications using JavaScript. React Native is an entire platform allowing you to build native, cross-platform mobile apps, and React.JS is a JavaScript library you use for constructing a high performing UI layer.

React.JS is the heart of React Native, and it embodies all react principles and syntax, so the learning curve is easy. The platform is what gave rise to their technical differences. Like the browser code in React is rendered through Virtual DOM while React Native uses Native API’s to render components on mobile.

So both the framework has huge market demand for web and mobile application development. We have also expertise in developing application in react and react native. If you have any quarries on these two framework then please book a free consultation or if you are looking to develop application on these two framework then you are in the right place. Contact us now

How To Manage API Request with AXIOS on a React Native App

APIs can make your life a whole lot easier. With an API, you can send requests to other services and get responses without having to build those requests and responses yourself. But building an API isn’t as simple as it sounds. It requires careful planning, testing, and debugging.

If you’re building an API for the first time, it can feel like an impossible mountain to climb. That’s where APIs like Axios come in. It has a great API and lots of helpful features. Here in this article you’ll understand how to use Axios to manage API requests in your React Native app.

What is AXIOS?

Axios is one of the easiest HTTP clients to learn and use. Making an API request is as simple as passing a configuration object to Axios or invoking the appropriate method with the necessary arguments. You will learn the basics of Axios in this section.

Configuring Axios

Type following command on terminal window to install Axios:

NPM Install Axios

How to make requests to an API using Axios

Making a call to an API using Axios, you can pass a configuration object to Axios or invoke a method for the corresponding CRUD operations.

Never miss an update from us. Join 10,000+ marketers and leaders.

For example, you can make a GET request to the /api/users endpoint in one of the following two ways:

[code language=”css”]</pre>
import axios from ‘axios’;
const baseUrl = ‘https://reqres.in’;
// Passing configuration object to axios
axios({
method: ‘get’,
url: `${baseUrl}/api/users/1`,
}).then((response) => {
console.log("<<<<<< Passing configuration object to axios >>>>>>", response.data.data);
});

// Invoking get method to perform a GET request
axios.get(`${baseUrl}/api/users/1`).then((response) => {
console.log("<<<<<< Invoking get method to perform a GET request >>>>>>", response.data.data);
});
[/code]

There are several other fields such as baseURL, transformRequest, transformResponse, and headers, among others, which you can include in the configuration object you pass to Axios.

[code language=”css”]</pre>
// Passing configuration object to axios
const fetchUserFirst = async () => {
const configurationObject = {
method: ‘get’,
url: `${baseUrl}/api/users/1`,
};
const response = await axios(configurationObject);
console.log("<<<<<< Fetch User First >>>>>>", response.data.data);
};

// Invoking get method to perform a GET request
const fetchUserSecond = async () => {
const url = `${baseUrl}/api/users/2`;
const response = await axios.get(url);
console.log("<<<<<< Fetch User Second >>>>>>", response.data.data);
};
[/code]

How to make multiple concurrent API requests using Axios

We can use the Promise.all or Promise.allSettled method of the Promise API with Axios to make multiple concurrent API requests from a React Native application.

[code language=”css”]
const concurrentRequests = [
axios.get(`${baseUrl}/api/users/1`),
axios.get(`${baseUrl}/api/users/2`),
axios.get(`${baseUrl}/api/users/3`),
];
// Using Promise.all
Promise.all(concurrentRequests)
.then((result) => {
console.log(result);
})
.catch((err) => {
console.log(err);
});
// Using Promise.allSettled
Promise.allSettled(concurrentRequests)
.then((result) => {
console.log(result);
})
.catch((err) => {
console.log(err);
});
[/code]

How to abort network request in Axios

Axios provides functionality for aborting network requests. A typical use case of this feature in React Native is the cancellation of network requests in the use effect hook when a component is unmounted while data is still in flight.

[code language=”css”]
useEffect(() => {
const source = axios.CancelToken.source();
const url = `${baseUrl}/api/users/${userId}`;
const fetchUsers = async () => {
try {
const response = await axios.get(url, { cancelToken: source.token });
console.log(response.data);
} catch (error) {
if(axios.isCancel(error)){
console.log(‘Data fetching cancelled’);
}else{
// Handle error
}
}
};
fetchUsers();
return () => source.cancel("Data fetching cancelled");
}, [userId]);
[/code]

How to create an instance of Axios

You can also create an instance of Axios with a custom configuration. Axios will merge the configuration object passed while creating the instance with the configuration passed to the instance method:

[code language=”css”]
const axiosInstance = axios.create({ baseURL: ‘https://reqres.in/’ });
axiosInstance.get(‘api/users/1’).then((response) => {
console.log(response.data);
});
[/code]

How to make GET request using Axios in React Native

Make a GET request to the /api/users endpoint to retrieve a user and store the user ID in state as shown in the code snippet below. You can change the user ID inside the onPress event handler attached to the Load User button. Changing the user ID will trigger a GET request to the API inside the useEffect hook.

After triggering a network request, we display a loading indicator on the screen. If we fetch the data successfully, we update state and remove the loading indicator. If we fail to retrieve the data for some reason, we stop the loading indicator and display an appropriate error message.

We abort the network request in the clean-up function if the user decides to close the app before getting a response from the server. Check the return value of the effect function in the useEffect hook. Following is the code in the App.js component:

[code language=”css”]
import axios from "axios";
import React, { useState, useEffect } from "react";
import {
StyleSheet,
Text,
ScrollView,
View,
Button,
Image,
Platform,
} from "react-native";
import Constants from "expo-constants";
const baseUrl = "https://reqres.in";
function User({ userObject }) {
return (
<View>
<Image
source={{ uri: userObject.avatar }}
style={{ width: 128, height: 128, borderRadius: 64 }}
/>
<Text style={{ textAlign: "center", color: "white" }}>
{`${userObject.first_name} ${userObject.last_name}`}
</Text>
</View>
);
}
export default function App() {
const [userId, setUserId] = useState(1);
const [user, setUser] = useState(null);
const [isLoading, setIsLoading] = useState(false);
const [hasError, setErrorFlag] = useState(false);
const changeUserIdHandler = () => {
setUserId((userId) => (userId === 3 ? 1 : userId + 1));
};
useEffect(() => {
const source = axios.CancelToken.source();
const url = `${baseUrl}/api/users/${userId}`;
const fetchUsers = async () => {
try {
setIsLoading(true);
const response = await axios.get(url, { cancelToken: source.token });
if (response.status === 200) {
setUser(response.data.data);
setIsLoading(false);
return;
} else {
throw new Error("Failed to fetch users");
}
} catch (error) {
if(axios.isCancel(error)){
console.log(‘Data fetching cancelled’);
}else{
setErrorFlag(true);
setIsLoading(false);
}
}
};
fetchUsers();
return () => source.cancel("Data fetching cancelled");
}, [userId]);
return (
<ScrollView contentContainerStyle={styles.container}>
<View style={styles.wrapperStyle}>
{!isLoading && !hasError && user && <User userObject={user} />}
</View>
<View style={styles.wrapperStyle}>
{isLoading && <Text> Loading </Text>}
{!isLoading && hasError && <Text> An error has occurred </Text>}
</View>
<View>
<Button
title="Load user"
onPress={changeUserIdHandler}
disabled={isLoading}
style={styles.buttonStyles}
/>
</View>
</ScrollView>
);
}
const styles = StyleSheet.create({
container: {
flex: 1,
backgroundColor: "dodgerblue",
alignItems: "center",
justifyContent: "center",
marginTop: Platform.OS === "ios" ? 0 : Constants.statusBarHeight,
},
wrapperStyle: {
minHeight: 128,
},
buttonStyles: {
padding: 100,
},
});
[/code]

How to make a POST request

POST is the HTTP method you use to send data to the server for updating or creating a resource. Making a POST request in Axios is similar to making a GET request. Most of the time, POST requests are made with user-generated data submitted using a form. Data requires validation on the client side before it is submitted.

Two main React packages for managing forms are Formik and React Hook Form. React Native form for the user’s full name and email in the code snippet below. Both TextInput components are controlled components.

After clicking the submit button, the TextInput fields and the submit button are disabled before you display a message to show you are creating the resource. Disabling the submit button ensures the user doesn’t make multiple submissions. After successfully submitting a POST request, you display a success message to the user:

[code language=”css”]
import axios from "axios";
import React, { useState, useEffect } from "react";
import {
StyleSheet,
Text,
ScrollView,
View,
Button,
Image,
Platform,
} from "react-native";
import Constants from "expo-constants";
const baseUrl = "https://reqres.in";
function User({ userObject }) {
return (
<View>
<Image
source={{ uri: userObject.avatar }}
style={{ width: 128, height: 128, borderRadius: 64 }}
/>
<Text style={{ textAlign: "center", color: "white" }}>
{`${userObject.first_name} ${userObject.last_name}`}
</Text>
</View>
);
}
export default function App() {
const [userId, setUserId] = useState(1);
const [user, setUser] = useState(null);
const [isLoading, setIsLoading] = useState(false);
const [hasError, setErrorFlag] = useState(false);
const changeUserIdHandler = () => {
setUserId((userId) => (userId === 3 ? 1 : userId + 1));
};
useEffect(() => {
const source = axios.CancelToken.source();
const url = `${baseUrl}/api/users/${userId}`;
const fetchUsers = async () => {
try {
setIsLoading(true);
const response = await axios.get(url, { cancelToken: source.token });
if (response.status === 200) {
setUser(response.data.data);
setIsLoading(false);
return;
} else {
throw new Error("Failed to fetch users");
}
} catch (error) {
if(axios.isCancel(error)){
console.log(‘Data fetching cancelled’);
}else{
setErrorFlag(true);
setIsLoading(false);
}
}
};
fetchUsers();
return () => source.cancel("Data fetching cancelled");
}, [userId]);
return (
<ScrollView contentContainerStyle={styles.container}>
<View style={styles.wrapperStyle}>
{!isLoading && !hasError && user && <User userObject={user} />}
</View>
<View style={styles.wrapperStyle}>
{isLoading && <Text> Loading </Text>}
{!isLoading && hasError && <Text> An error has occurred </Text>}
</View>
<View>
<Button
title="Load user"
onPress={changeUserIdHandler}
disabled={isLoading}
style={styles.buttonStyles}
/>
</View>
</ScrollView>
);
}
const styles = StyleSheet.create({
container: {
flex: 1,
backgroundColor: "dodgerblue",
alignItems: "center",
justifyContent: "center",
marginTop: Platform.OS === "ios" ? 0 : Constants.statusBarHeight,
},
wrapperStyle: {
minHeight: 128,
},
buttonStyles: {
padding: 100,
},
});
[/code]

How to make a DELETE request

DELETE requests using Axios the same way you make POST and PUT requests. DELETE request will delete a resource from the server side. You can replace the onSubmitFormHandler of the code for making a POST request with the event handler below to make a DELETE request.

[code language=”css”]
const onSubmitFormHandler = async (event) => {
if (!fullName.trim() || !email.trim()) {
alert("Name or Email is invalid");
return;
}
setIsLoading(true);
try {
const response = await axios.delete(`${baseUrl}/api/users/2`, {
fullName,
email,
});
if (response.status === 204) {
alert(` You have deleted: ${JSON.stringify(response.data)}`);
setIsLoading(false);
setFullName(”);
setEmail(”);
} else {
throw new Error("Failed to delete resource");
}
} catch (error) {
alert("Failed to delete resource");
setIsLoading(false);
}
};
[/code]

How to make a PUT request

Updating a resource requires either the PUT or PATCH method. If a resource exists, using the PUT method completely overwrites it, and creates a new resource if it doesn’t. PATCH makes partial updates to the resource if it exists and does nothing if it doesn’t.

Making a PUT request to an API is similar to making a POST request. The only difference is the configuration object passed to Axios, or the HTTP method needed to invoke to make a PUT request to the API. Replace the onSubmitFormHandler of the POST request with the code below to make a PUT request.

[code language=”css”]</pre>
const onSubmitFormHandler = (event) => {
if (!fullName.trim() || !email.trim()) {
alert("Name or Email is invalid");
return;
}
setIsLoading(true);
const configurationObject = {
url: `${baseUrl}/api/users/2`,
method: "PUT",
data: { fullName, email },
};
axios(configurationObject)
.then((response) => {
if (response.status === 200) {
alert(` You have updated: ${JSON.stringify(response.data)}`);
setIsLoading(false);
setFullName("");
setEmail("");
} else {
throw new Error("An error has occurred");
}
})
.catch((error) => {
alert("An error has occurred");
setIsLoading(false);
});
};
[/code]

How to handle errors

React-error-boundary (Simple reusable React error boundary component) is a simple reusable component based on React error boundary API that provides a wrapper around your components and automatically catches all errors from the children’s components hierarchy, and also provides a great way to recover your component tree. Create an Errorhandler component like the following code snippet.

[code language=”css”]</pre>
import * as React from "react";
import { ErrorBoundary } from "react-error-boundary";
import { View, StyleSheet, Button } from "react-native";
import { Text } from "components";
const myErrorHandler = (error: Error) => {
// Do something with the error
function ErrorFallback({ resetErrorBoundary }) {
return (
<View style={[styles.container]}>
<View>
<Text> Something went wrong: </Text>
<Button title="try Again" onPress={resetErrorBoundary} />
</View>
</View>
);
}
export const ErrorHandler = ({ children }: { children: React.ReactNode }) => (
<ErrorBoundary FallbackComponent={ErrorFallback} onError={myErrorHandler}>
{children}
</ErrorBoundary>
);
const styles = StyleSheet.create({
container: {
flex: 1,
flexDirection: "column",
alignItems: "stretch",
justifyContent: "center",
alignContent: "center",
paddingHorizontal: 12,
},
});
[/code]

Here you can find the sample code in this Github repository

Best Practices for using AXIOS

Global config

Set up a global configuration that handles all application requests using a standard configuration that is set through a default object that ships with Axios. This object contains:

    • baseURL: A relative URL that acts as a prefix to all requests, and each request can append the URL
    • headers: Custom headers that can be set based on the requests
    • Timeout: The point at which the request is aborted, usually measured in milliseconds. The default value is 0, meaning it’s not applicable.
    • With Credentials: Indicates whether or not cross-site Access-Control requests should be made using credentials. The default is false.
    • Response Type: Indicates the type of data that the server will return, with options including json (default), arraybuffer, document, text, and stream.
    • Response Encoding: Indicates encoding to use for decoding responses. The default value is utf8.
    • xsrfCookieName: The name of the cookie to use as a value for XSRF token, the default value is XSRF-TOKEN.
    • xsrfHeaderName: The name of the HTTP header that carries the XSRF token value. The default value is X-XSRF-TOKEN.
    • maxContentLength: Defines the max size of the HTTP response content in bytes allowed
    • maxBodyLength: Defines the max size of the HTTP request content in bytes allowed

Most of the time, only be using baseURL, header, and maybe timeout. The rest of them are less frequently needed as they have smart defaults, but it’s nice to know they are there in case you need to fix up requests.

Are you looking for a React Native developer

Contact Us

This is the DRYness at work. For each request, we don’t have to repeat the baseURL of our API or repeat important headers that we might need on every request.

Custom instance

Setting up a “custom instance” is similar to a global config, but scoped to specified components so that it’s still a DRY technique, but with hierarchy. Set up a custom instance in a new file (Ex: authAxios.js) and import it into the “concern” components.

[code language=”css”]
// authAxios.js
import axios from ‘axios’;
const customInstance = axios.create ({
baseURL : ‘https://axios-app.firebaseio.com’
})
customInstance.defaults.headers.post[‘Accept’] = ‘application/json’
// Or like this…
const customInstance = axios.create ({
baseURL : ‘https://axios-app.firebaseio.com’,
headers: {‘Accept’: ‘application/json’}
})
[/code]

Then import this file into the “concern” components:

[code language=”css”]

// form.js component import from our custom instance
import axios from ‘./authAxios’;
export default {
methods : {
onSubmit () {
axios.post(‘/users.json’, formData)
.then(res => console.log(res))
.catch(error => console.log(error))
}
}
}
[/code]

Axios Verbs

Group the Axios HTTP verbs, like GET, POST, DELETE, and PATCH, in the base config file, as below.

[code language=”css”]</pre>
export function getRequest(URL) {

return axiosClient.get(`/${URL}`).then(response => response);

}

export function postRequest(URL, payload) {

return axiosClient.post(`/${URL}`, payload).then(response => response);

}

export function patchRequest(URL, payload) {

return axiosClient.patch(`/${URL}`, payload).then(response => response);

}

export function deleteRequest(URL) {

return axiosClient.delete(`/${URL}`).then(response => response);
<pre>}
[/code]

Now import the custom functions directly wherever needed to make an API request, as in the code below.

[code language=”css”]</pre>
import { getRequest } from ‘axiosClient’;

async function fetchUser() {

try {

const user = await getRequest(‘users’);

} catch(error) {

//Log errors

}
<pre>}
[/code]

Interceptors

  • Interceptors helps with cases where the global config or custom instance might be too generic, in the sense that if you set up a header within their objects, it applies to the header of every request within the affected components. Interceptors have the ability to change any object properties on the fly. For instance, we can send a different header based on any condition we choose within the interceptor.
  • Interceptors can be in the main.js file or a custom instance file. Requests are intercepted after they’ve been sent out and allow us to change how the response is handled.

[code language=”css”]
// Add a request interceptor
axios.interceptors.request.use(function (config) {
// Do something before request is sent, like we’re inserting a timeout for only requests with a particular baseURL
if (config.baseURL === ‘https://axios-app.firebaseio.com/users.json’) {
config.timeout = 4000
} else {
return config
}
console.log (config)
return config;
}, function (error) {
// Do something with request error
return Promise.reject(error);
});
// Add a response interceptor
axios.interceptors.response.use(function (response) {
// Do something with response data like console.log, change header, or as we did here just added a conditional behaviour, to change the route or pop up an alert box, based on the reponse status
if (response.status === 200 || response.status 201) {
router.replace(‘homepage’) }
else {
alert(‘Unusual behaviour’)
}
console.log(response)
return response;
}, function (error) {
// Do something with response error
return Promise.reject(error);
});
[/code]

Conclusion

For most of your HTTP communication needs, Axios provides an easy-to-use API in a compact package.

There are some alternative libraries for HTTP communication, such as ky, a tiny and elegant HTTP client based on window.fetch; superagent, a small, progressive client-side HTTP request library based on XMLHttpRequest.

But Axios is a better solution for applications with a lot of HTTP requests and for those that need good error handling or HTTP interceptions.

We at Andolasoft has long expertise on API Request solution with AXIOS on a React Native App. We have highly experienced React Native and React developers to help you for the same. Book a free consultation on your issues.
An Introduction To BuildContext In Flutter and It’s Importance?

BuildContext is the object that stores information about the current build. It provides information such as the minimum and maximum supported Flutter version, the device’s screen size and pixel density, the currently active theme, and more.

The BuildContext is the set of inputs that Flutter uses to create an instance of a widget. It includes properties on the Android and iOS platforms, as well as properties related to the current device and environment.

It can be used to customize the behavior and appearance of your widget, but it’s important to understand how it works in order to avoid any issues.

For instance, you can use BuildContext.host () to get a string that specifies the current app’s host name. You can also use BuildContext.local (context).emulator so you can set up an emulator for testing your app on different devices without needing to change settings in Android Studio every time you want to switch emulators.

Flutter is one of the hottest technologies for cross-platform mobile development. It has been described as a new contender in the app development industry, competing with traditional frameworks like React Native and Xamarin.

Flutter builds on Google’s own Dart programming language and provides a library of scalable, customizable UI widgets to help developers build beautiful native interfaces that run across all platforms. It has been designed to help developers build high-quality, natively compiled apps that run on both Android and iOS from one codebase.

Never miss an update from us. Join 10,000+ marketers and leaders.

What is a BuildContext?

The BuildContext is a locator that is used to point the location of the widget in the widget tree.

In Flutter we have to create widgets through the build method & we have to pass the BuildContext as an argument to the build method.

Each BuildContext is different for every widget. Each widget you create has its own BuildContext and they can locate themselves in the widget tree or reach out to the nearest widget.

This is how we create a widget

[code language=”css”]
Widget build (BuildContext context)=&gt; MyAwesomeWidget();
[/code]

Flutter widget tree

Everything in Flutter is a widget. Whether it is a container, providers, text, button, image etc. everything is a widget, whether it reflects the UI in the app or not.

The UI or display in Flutter comprises stacks of widgets popularly called a widget tree. Each component is responsible for a small unit of the entire UI.

Flutter widget tree

The above image is an example of a widget tree in Flutter. We can observe that every widget has its own place in the widget tree i.e. the Button widget is under column widget.

Widgets are only visible to its BuildContext or to its parent’s BuildContext. That means we can locate the parent widget from the child widget. For the above image tree structure we can get Scaffold from Container by going up:

[code language=”css”]
context.ancestorWidgetOfExactType(Scaffold)
[/code]

You can also locate a child widget from a parent widget and for that, we use Inherited Widgets.

There are three main trees in Flutter:

  1. Widget
  2. Element
  3. Render

Widget

Widgets are immutable, they represent the structure for RenderObjects Fluorescence is optimized, which can easily create and destroy widgets without any significant performance implications.

The same can’t be said for RenderObjects.

Element

In the middle of Widgets and RenderObjects sits elements. These act as the glue between the immutable widget layer and the mutable render layer.

As the configuration of a widget changes (for example, the user calls the set state that triggers a rebuild), the element notices incoming changes and says to the corresponding render object,

“Hey! Please update. ”

Render

RenderObjects are what the visual pieces on the screen correspond to. Their purpose is to define areas on the screen regarding their spatial dimensions. They are referenced by the element. As a consequence we are dealing with another (third) tree here: the RenderObjects together form a tree which is called Render Tree whose root node is a RenderView (being a variant of a RenderObject). The RenderObject, on the other hand, are mutable objects that do the heavy lifting of turning the configuration supplied from widgets into pixels users can see and interact with on the screen.

Unlike widgets that are cheap and can safely be created and destroyed without any significant performance implications, the same cannot be said for RenderObjects.

For this reason, whenever the configuration of a widget changes, the framework looks at the change and updates the associated RenderObject instead of creating a new one each time.

Conclusion

Understanding BuildContext is very crucial to develop applications in Flutter. This improves our knowledge on how Flutter works and helps to build apps confidently.

BuildContext is a facade that provides a consistent API for implementing custom layouts and animations. The code is platform-specific, but the abstraction weaves some of the underlying platform-specific logic out of sight. BuildContext also helps reduce the need to know about the underlying platform details when implementing custom layouts and animations.

I’ve worked with the team at Andolasoft on multiple websites. They are professional, responsive, & easy to work with. I’ve had great experiences & would recommend their services to anyone.

Ruthie Miller, Sr. Mktg. Specialist

Salesforce, Houston, Texas

LEARN MORE

Flutter is an open-source mobile app SDK that is used to make a high-quality app with a beautiful and consistent user experience. Unlike native mobile development, Flutter does not require that an app has a single, complete codebase but instead lets you mix and match code for different platforms. It also provides a rich set of pre-built widgets and allows for shared state.

The BuildContext is the context in which the Flutter app is running and is used for determining where to find resources and strings. It can be thought of as the environment in which the app is being used. Flutter provides an abstract class called BuildContext that handles the loading of resources, without requiring the developer to use hardcoded paths. This abstraction is one of the things that makes flutter so easy to use.

Flutter provides a set of high-level classes to help flutter developers build reactive user interfaces. Are you looking to develop an application in flutter framework? Let’s discuss

10 Popular Cross Platform Framework For App Development In 2022

Digital presence has become an important step to growing your business. It doesn’t matter in what sector or what scale your business belongs to, the thing that only matters is your online presence. With the Cross-Platform Frameworks, it has become a lot easier to grow your online presence and reach out to a target audience.

According to a report, 6 out of 10 small businesses are serving online. 47% of customers look for the online presence of the businesses from where they are planning to buy to check the reviews and recommendations.

In such a scenario the business can’t afford to lose its online presence on platforms like Apple App Store and Google Play Store. In a report by TrendForce, the global market share of mobile is valued at 1.39 billion in 2022, which will be a 3.8% yearly growth.

Business wants to penetrate deeper into the markets by developing highly intuitive and engaging mobile applications and increased revenue.

In today’s rapidly advancing technology, you need a strong Cross-Platform framework to develop a secure and user-friendly application.

Our many international clients demand cross-platform application development, as this helps them to get larger benefits in their business and helps them to save a large amount.

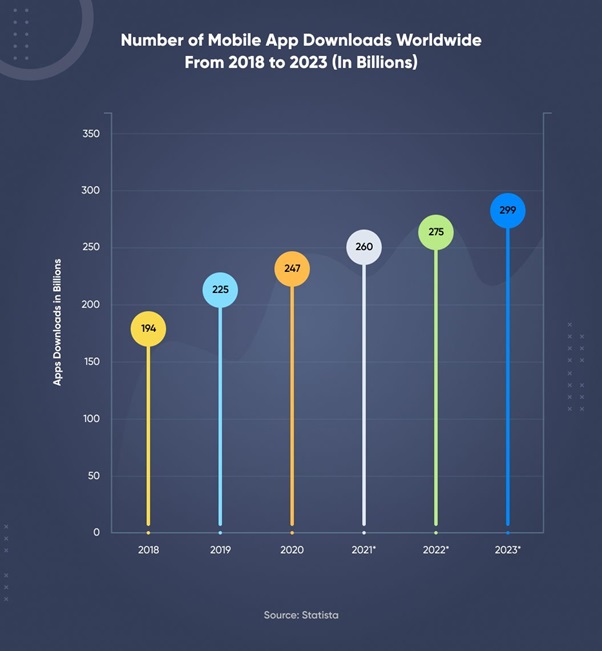
It is estimated that in 2023, the total number of application downloads will be 299 billion, up from the approx 247 billion global application downloads in 2020.

Mobile App Downloads(Source: Statista)

What is Cross-Platform Application Development?

A Cross-Platform Application development aims to create a single application that runs identically on various platforms. It uses platform-agnostic technology like HTML and CSS that helps businesses to cover many end devices at a very minimal price.

Cross Platform Mobile App

It is one of the popular methods used for application development. Many top mobile application development companies unlike Andolasoft use this framework.

Difference between Native and Cross-Platform App Development

As there are two app-building approaches to develop mobile solutions, i.e. – Native and Hybrid/ Cross-Platform.

Both have their benefits and challenges that will be suitable for your project depending on your needs and scenario.

The Native development relies on the programming languages and tools that are designed particularly for one platform. These are designed for a particular device and operating system.

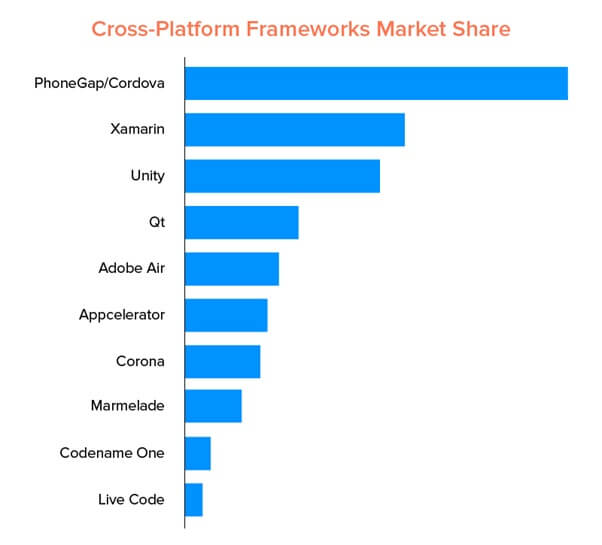
Cross Platform Frameworks(Source: Appinventiv)

Whereas the Cross-Platform development aims to develop a single application that will run identically on various platforms. It ensures hassle-free implementation, affordable production, and robust functionality.

Why Choose Andolasoft Cross-Platform Application Development?

Mobile applications have become an important element in growing your business. It is because of the growing number in the digital customer base. With mobile applications, businesses can grow rapidly by developing an instant connection with the target customers.

We at Andolasoft are experts in developing cross-platform applications in platforms like Flutter, Xamarin, PhoneGap, and more.

We have worked with many customers in various domains such as retail, hospitality, education, Fintech, and more. Our experienced mobile app developers convert your ideas into reality by using the latest tech stacks.

Never miss an update from us. Join 10,000+ marketers and leaders.

In this blog, I have listed the top 10 cross-platform app development frameworks that you can use in your business mobile application development.

Here you go,

1. Ionic:

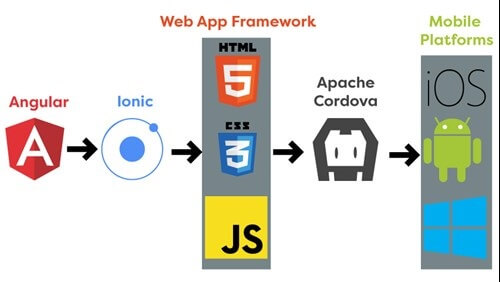
Ionic is one of the best hybrid application frameworks because it bridges the properties that are in demand. It allows the developers to use a combination of languages, such as HTML5, CSS, Cordova, and JavaScript to access the native platform controllers.

Features:

  • It is an Open Source front-end framework. It allows alterations of the code structure that is suitable for each developer and saves lots of time.
  • It is based on AngularJS, which makes it easier to offer extensions to HTML’s Syntax, with core functionalities to imbibe the most useful yet attractive features and components in your applications.
  • The ionic framework uses Cordova plugins that enable access to devices with inbuilt features that include GPS, Camera, and Audio Recorder. It is one of the major benefits of Cross-platform development tools.
  • Ionic (mobile app framework) gives a native-like feel to the application which makes it the favorites among developers. With this framework, the developers can perform perfectly on various platforms.

Ionic (Source: Ukad group)

Benefits:

  • In the Ionic framework, you can get access to many ready-to-use UI components.
  • The developers should know Angular, CSS, HTML, and JavaScript to develop applications using Ionic.
  • The Ionic framework is mostly designed for mobile OS because it is based on the SAAS UI framework.
  • As it is an Open- Source- front-end framework, it enables the developers to change the code according to their requirements.

Challenges:

  • It consists of several unstable native plugins
  • Applications that have lots of graphics and animations are not suitable to develop using the Ionic framework.
  • With the Ionic framework, debugging becomes quite difficult

Developers Tool:

  • Firebase
  • Visual Studio Code
  • Ionic app flow

Are you looking for an Ionic developer

Contact Us

2. React Native:

When you talk about a Cross-platform framework, it is difficult to not include React Native language. It is a framework, built on JavaScript. It is used to write neat code and gives a Native -like feel to your mobile application, which works easily on both iOS and Android.

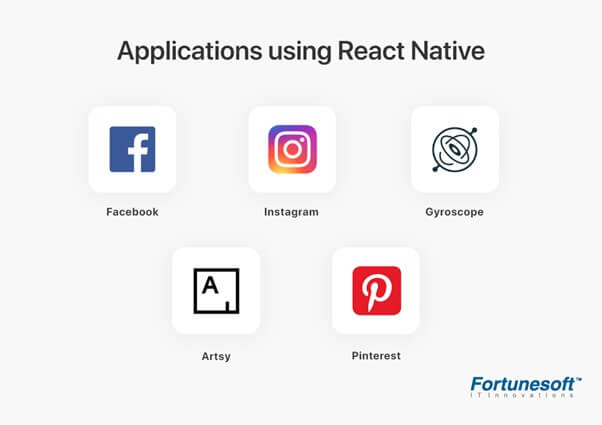
React Native(Source: Fortunesoft)

Features:

  • React Native is an Open- Source cross Platform app framework, the same as ionic, for which it has a large community of support that helps in supporting and fixing the bugs, improving and introducing more advanced features.
  • It requires one-time coding to develop applications for diverse platforms like iOS and Android.
  • React Native framework is highly compatible with third-party plugins like Google Maps.
  • It focuses on UI to a greater extent rendering a highly responsive interface. The React Native language eliminates the time taken for loading and delivers a smooth interface for the applications.

Benefits:

  • React Native focuses on the UI, which enables the developers to create a highly responsive UI interface.
  • It is a leading cross-platform mobile application development framework, the developers need to code only once in React native. With the one-time coding, the application can run on diverse mobile OS platforms like iOS and Android.
  • It has a large developer community that helps the developers to get adequate support in times of distress during application development projects.
  • It is compatible with all the leading third-party plugins like Google Maps.
  • You can develop mobile applications for different iOS and Android platforms like macOS, tvOS and Android TV, etc. Also, React Native can be instrumental to develop immaculate applications for Windows and UWP.

Challenges:

  • Lots of performance issues were observed during the React Native Development.
  • With the abstraction layer present in this framework, if any bug occurs then it can cause an unexpected bug in the whole application

Developers Tool:

  • JS Editor
  • Emulator, Android Studio, SDK
  • Xcode

Are you looking for a React Native developer

Contact Us

3. Flutter:

Flutter framework has created a different image in the present-day market. As it is an Open-Source- cross- Platform app framework that was first released in May 2017 by Google.

Features:

  • Flutter programming Language promotes portable GPU that renders UI power which allows it to work on the latest interfaces.
  • It does not require updating the UI contents manually, because it holds a reactive framework. The Flutter App Developers only need to update the variables and the UI changes get visible after that.
  • With the Flutter framework, the developers can automatically remake a widget tree and comprehend its cost adjustments.
  • The Flutter mobile application development language has an inbuilt graphic engine. This makes it easy for the developers as they wouldn’t have to make any separate interfaces for iOS and Android.

Benefits:

  • As flutter has an inbuilt graphic engine, the developers don’t have to create separate interfaces for iOS and Android.
  • Using Dart, the developers get to write more structured programming codes. This makes it easier to maintain synchronized hierarchical structures even when writing complex applications.
  • The Flutter Cross-Platform app framework uses GPUs that enable UI power. This makes it easier for the developers to work on the latest interfaces.

Challenges:

  • Not stable
  • Lacks several advanced features
  • Comparatively new dart
  • The dart has few features and the existing ones are not properly refined.

Developer’s tool:

  • VS Code
  • Emacs
  • Android Studio

Are you looking for a Flutter developer

Contact Us

4. Xamarin:

Xamarin was developed as an independent platform, which was developed in the year 2011, before being acquired by Microsoft. As it is an Open- Source Cross-Platform applications framework that has characteristics that make it unique from other applications.

Features:

  • The application developed on the Xamarin Framework are developed using c# which is a modern class platform application development language with the leverage to Objective-C and Java.
  • It supports a direct inclusion of Objective-C, C++ libraries, and Java. It allows the developers to reuse third-party codebases that are encrypted in Java, C++, and Java.
  • It reduces the cost and time of mobile app development, for it supports the WORA (write once, Run anywhere) and has various class libraries.
  • It offers robust compile-time checking. With this facility, the developers witness fewer run-time errors and get well-functioning applications.

Benefits:

  • It uses C# along with with.NET framework for mobile application development for any platform.
  • It provides continuously improved performance to match the native development standards.
  • With the Xamarin framework, you can get lots of learning resources
  • It offers an optimal user experience because of its UI-specific elements.

Challenges:

  • It faces many compatibility issues, using third-party tools and libraries.
  • There is a need for basic knowledge of native languages to use this framework.
  • It offers limited access to Open Source libraries.

Are you looking for a Xamarin developer

Contact Us

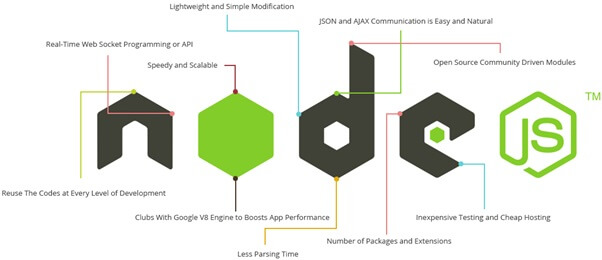
5. NodeJS:

NodeJS framework is one of the incredible cross-platform frameworks used for developing cross-platform applications. However, the NodeJS framework is a JavaScript runtime framework developed on the Chrome V8 JavaScript engine.

NodeJS

It is an open-source environment that supports the development of server-side and scalable networking applications.

Features:

  • The entire NodeJS API is asynchronous, it signifies that these are non-blocking in nature, which defines the servers are based on the NodeJS and it doesn’t essentially wait for the data from APIs.

It automatically moves on to another API after calling it, which works as a notification mechanism for NodeJS. It allows the server to get a response from the previous API.

  • JS library is very much speedy in its code execution process, as it is built on Chrome’s V8 engine.
  • It does not buffer, however, it outputs the data in chunks.
  • It delivers smooth and perfectly functioning applications. NodeJS uses a single-threaded model with the event looping functionality. This mechanism enables the server to reply in a non-blocking format, making them more scalable.

 Benefits:

  • JS framework has a large developers community
  • It reduces the response time for slow requests and every developer can execute the database queries simultaneously.
  • V8 engine present in NodeJS is the fastest dynamic language interpreter, which is constantly pushing the boundaries.
  • NodeJS offers a smooth and even application because it uses a single-threaded model.

Challenges:

  • Excessive memory usage
  • Unresponsive applications, such as hanging or looping
  • Bad performance
  • Various functional issue

Developer’s Tool:

  • io
  • PM2
  • Babel
  • JS
  • Meteor

Are you looking for a NodeJS developer

Contact Us

6. PhoneGap:

PhoneGap (Cordova) is an impeccable cross-platform framework used for mobile application development. It uses HTML5, CSS and JavaScript. It offers cloud solutions to developers by providing them the choice for sharing the application in the development process to get feedback from many other developers.

PhoneGap(Source: PhoneGap)

Features:

  • It enables the developers to develop cross-platform applications by using the existing web technologies like CSS3, HTML5, and JavaScript.
  • It supports the use of a single code base to develop applications for various platforms like iOS, Android, Blackberry, and Windows Phone.
  • As it uses an architecture that is plugin-able. This makes it possible to access all the native device APIs and it can be extended in a modular way.

Benefits:

  • It allows the users to use embedded payment systems like App Store and Google Play Store through the PhoneGap Cross-Platform App framework.
  • It provides the luxury to use JavaScript and other libraries like Sencha Touch, MooTools, etc. to manage all the interactions in the applications.
  • The applications that are developed with PhoneGap run very consistently on every leading OS platform that shows very minimal differences.

Challenges:

  • It is not suitable for an app that has several graphic elements
  • PhoneGap framework lacks descriptive documentation which is crucial for application development
  • It lacks support for plugins that have hooks.
  • PhoneGap language cannot be used for gaming applications.

Are you looking for a PhoneGap developer

Contact Us

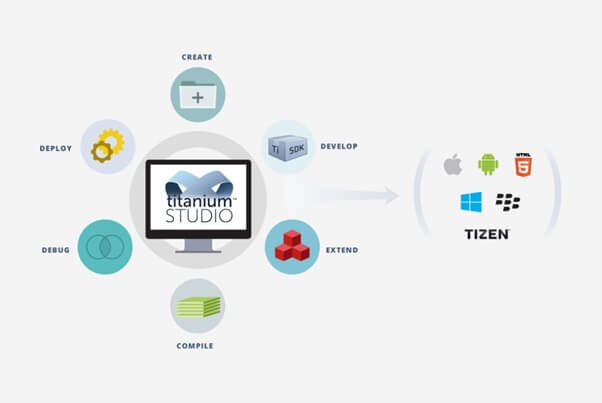
7. Appcelerator Titanium:

Appcelerator Titanium is an Open-Source Cross-Platform application native app development framework. It was developed in 2008. Its core features are, it includes API to access native UI, many device functionalities, and MVC framework functionality.

Titanium(Source: third rock techno)

Features:

  • It offers various tools that are used for rapid application development. It indicates that a prototype can be developed within very little time and effort that evaluates the users to interact with UI.
  • It processes pre-built connectors that are available for MS azure, Salesforce, MS SQL, the list is however very long.
  • It consists of ArrowDB- a scheme-less data store that allows developers to deploy several data models without putting any extra effort into setup.

Benefits:

  • It has a pre-built connector for Box, MSSQL, MS Azure, and Salesforce
  • It has various tools that make the development process faster.

Challenges:

  • Application Complexity increases
  • It limits the flexibility, as strange bugs and limitations increase.

Developer’s Tool:

  • Appcelerator CLI
  • Amplify

Are you looking for an Appcelerator developer

Contact Us

8. Sencha Touch:

The Sencha Touch helps to accelerate the hardware techniques. If you are looking for inbuilt Cordova integrations, then the Sencha touch cross-platform application works best.

Sencha(Source: i95Dev)

Features:

  • It is famous to develop built-in native-looking themes for many, major platforms like Blackberry, iOS, Android, windows phone, etc.
  • It supports Cordova integration for the Native API access including the packaging.
  • It provides code compatibility between old and new ones.
  • It comes with 50+ built-in UI widgets. It also has several collections of rich UI like Forms, Menus, carousels, and toolbars, etc., that are specifically developed for mobile platforms.

Benefits:

  • It consists of more than 50 in-built and customized UI designs along with a rich UI collection.
  • It supports Cordova integrations, which makes it a lot easier to access the native APIs including the packaging.
  • It provides an impressive backend data package

Challenges:

  • The API designed with Sencha Touch does not give access to the contact, camera, and accelerometer of the device
  • It doesn’t allow push notification

Developer’s tools:

  • App Inspector for Sencha

Are you looking for a Sencha developer

Contact Us

9. Corona SDK:

If you want to develop immaculate two-dimensional mobile applications for various leading platforms, then Corona SDK is the right choice. It is an open-source- cross-platform application framework that renders 10X faster mobile games and better application development services.

Corona SDK(Source: Arpatech)

Features:

  • It is a multi-faceted and lightweight programming language LUA.
  • It is used to develop gaming applications for various platforms like desktop, connected TV, iPad, etc.

Benefits:

  • It offers several plugins for media, analytics, in-app advertising, and several other things.
  • The developers can see the code changes in real-time as the cross-platform app framework responds to instant changes.
  • As it is based on the programming language LUA, it makes the framework more powerful and fast.

Challenges:

  • As it uses the Programming language LUA, which is a scripting language, for which you won’t be writing the native language
  • You won’t get the facility to use advanced and luxury technology

Developer’s Tool:

  • Xcode
  • Android Studio Project

Native Script:

Native Script is an amazing free Cross- platform Framework, which is based on JavaScript. It will not be wrong to say that NativeScript is a preferable choice for many developers who want a WORA functionality.

Features:

  • NativeScript offers accessible, beautiful, and platform-native UI, and without the web views. Developers are required to define once and this let’s the NativeScript runs everywhere
  • The NativeScript developers get complete web resources which come with loaded Plugins for every kind of solution.

Benefits:

  • NativeScript developers can write the platform based APIs in JavaScript only.
  • It supports components like AndroidArsenal, Cocoapods and calls these native methods from libraries.
  • It comes with all types of Plugins that eliminates the use of any third-party Plugins
  • It is a beautiful platform Native UI that can be accessed without the web views.

Challenges:

  • The NativeScript apps are larger than native apps
  • It has some buggy open source Plugins

Developer’s Tools:

  • CLI NativeScript

FAQ:

1. What frameworks are used for cross-platform development?
There are several frameworks used for cross-platform web development. Some of the popular cross platform frameworks are :

  • React Native
  • Flutter
  • Xamarin
  • Ionic
  • PhoneGap

2. How does a cross platform framework work?
A cross-platform framework helps to develop apps that are more compatible with major OS: iOS, android, windows, MacOS and windows. It is an alternative to many native app developments.  It uses one app code for different platforms.

3. How does a business benefit through cross- platform app development?
A business can benefits through cross platform app development in any ways such as:

  • Save lots of time and money
  • It provides high security and authentication
  • Cross platform allows automatic update

4. What the challenges are of cross platform application development?
The major challenge faced by developing a multi-platform application development framework is “how to manage the codebase”. As each platform needs a unique code, which means separate development and extra time required for each platform.

I’ve worked with the team at Andolasoft on multiple websites. They are professional, responsive, & easy to work with. I’ve had great experiences & would recommend their services to anyone.

Ruthie Miller, Sr. Mktg. Specialist

Salesforce, Houston, Texas

LEARN MORE

Conclusion:

The above-mentioned list defines the top cross-platform application frameworks, which play a vital role in redefining your app development process.

I think now it will lot easier for you to choose the right platform for your application development after knowing the top ten cross-platform frameworks features.

You can seek the help of an expert mobile application development company, like Andolasoft. We hold 13 years of experience in application development. Our dedicated developers work effortlessly to provide a better cross-platform application that will fulfill all your requirements. If you are planning to develop a cross-platform mobile application for your business or you have ideas, then feel free to discuss them with us. We are here to help you with your quires.

Share your comments below if you have more information on cross-platform application frameworks.

Best Android Frameworks To Succeed In Mobile App Development

Mobile application development using web technologies has revolutionized the mobile development market. This is because this type of technology allows you to take advantage of the best features of native development, in addition to all the power and facilities that web technology offers.

Choosing the right IDE to develop an Android application can not only make the difference between obtaining a quality product or an inferior one but also a developer may find that his life is made easier depending on the choice he makes, having a frustrating or fluid and agile experience according to the option he opts for.

Without much ado, let’s take a rundown at some of the recommended Android Frameworks to build enterprise-grade mobile applications.

Best Android Frameworks Succeeding In Developing Robust Mobile Apps

1. PHONEGAP

PhoneGap belongs to Adobe Systems and is an open-source distribution of Cordova and as its entirely open-source, its one of the most trending Android all development frameworks feasible to build hybrid applications.

Never miss an update from us. Join 10,000+ marketers and leaders.

The platform facilitates multi-platform applications to be developed using HTML5, CSS3 and JavaScript web technology and makes use of an API that allows access to system hardware elements such as the camera, storage, accelerometer, etc.

It allows integration with other frameworks such as jQuery Mobile, etc. one of the best parts is that it provides ease to developers while programming as it offers no more complex and tough text commands to understand and interpret.

Unlike other frameworks mentioned below that deal with the interface part, PhoneGap / Apache Cordova is in charge of integrating into the mobile operating system and giving access to its services.

So you’ll probably use it alongside one of these frameworks, which in many cases only offers the HTML, CSS, and JavaScript part of the user interface.

Next, when it comes to alignment and working in sync, the desktop apps built run smooth and parallel likewise PhoneGap’s mobile apps. Undoubtedly, it’s a ‘wrapper and packer’ framework as it incorporates a multiplicity of other distinct frameworks.

[Cordova vs PhoneGap:

The primary difference between these two frameworks is that PhoneGap has access to the Adobe Creative Cloud compilation service allowing the application to be compiled for the desired operating system and independent of the operating system where it is developed.]

2. IONIC

Licensed under MIT, Ionic is one of the most famous frameworks for developing cross-platform applications. In the beginning, Ionic used the AngularJS framework and PhoneGap for the integration part with mobile platforms.

However, in its latest versions, it has been incorporating new Front-End frameworks to develop enterprise-grade mobile applications. Currently, it allows its development with the most famous platforms of Angular, React, Vue.JS.

Ionic integrates a design layer with CSS styles and resources such as icons, etc. These styles can be adapted to the design standards of the Android and iOS platforms. Another of its many advantages is that Ionic has its own development IDE that will facilitate the design and programming of applications.

Using a single codebase, it offers high performance and optimization and is well-liked for its diversity in providing distinct features and functionalities while building Android mobile apps.

[Prefer Reading: “How Business Android Apps are beneficial for Entrepreneurs?”]

3. CORONA SDK

Corona SDK was created at Corona Labs Inc., by Walter Luh. The software helps create applications for devices such as iPhone, iPad, Android, etc.

It is said to be very easy to use software where it consumes comparatively less time and effort. Corona SDK integrates Lua layered over C ++ / OpenGL. The software runs on major operating systems like; Mac OS, Windows, Nook, Kindle Fire and Android.

It empowers quick mobile app development with its dynamic APIs and real-time quality checks/testing and makes it a perfect fit for all-purpose development and gaming.

Let’s check out some of the main features of Corona SDK which make it capable to be added in this list of top frameworks for mobile app development.

  • The patented OpenGL-ES rendering engine enables full acceleration of graphics hardware, including sprites that animate at full GPU speed.
  • The transition library allows the interpolation of the position, rotation, alpha, or any other property of Corona sprites.
  • Compatible with native iPhone and Android user interface. Developers can access iPhone native text features, including all fonts, multi-line fields, and keyboard input.
  • Corona-built applications start smaller than 400 KB.
  • The subscription-based purchase model allows users to have new updates as soon as they are rolled out.

Corona SDK is 100% free to use, simple to set up, and actionable to perform, offering recreation to your customized Android mobile apps.

4. REACT NATIVE

React Native is a framework for creating hybrid applications that are based on JavaScript and a set of components of the ReactJS framework.

Currently, it is also one of the most famous mobile app development frameworks and has a large development community. It is part of very powerful and well-known applications, such as Facebook, Pinterest, Skype, or Instagram.

With the power of code re-usability, React Native enhances the swiftness of app development and saves resource costs where only a team of adept developers can handle a React Native project saving many times efforts of development and maintenance.

Your Android app ventures to develop successful mobile applications seem effortless when done with ReactNative. With rendering to local stage UI, the platform aids your app to use similar local stage APIs without much preparation.

Ignoring a few of its drawbacks, it is one of the robust frameworks adopted by maximum developers as a feasible choice in mobile app development. Its server-side rendering makes it a good fit to be well integrated with other platforms with its view in layers feature.

Indeed, it’s a perfect choice to build a secure, scalable, and performant app that derives customer and user satisfaction both with the virtual DOM that offers great user-experience and productivity along.

[Prefer Reading: “Top 6 Reasons for Native Mobile App for your Business”]

5. XAMARIN

Xamarin as a product is a set of multiplatform development tools that allow the development of native applications with the same language.

It is a tool that allows cross-platform app development to go seamlessly. This is how it solves problems that many developers encounter when developing applications, such as different forms of language depending on the platform to which the application is directed.

With Xamarin this is resolved since it allows you to design for all 3 platforms (iOS, Android, and Universal Windows) using the shared code commonly known as C #. Xamarin allows application logic to be shared between different operating systems, duplicating only the user interface.

Xamarin gives us the possibility to have a shared codebase that contains business entities, business logic, access to services, etc., and simply have different code for the user interface details for the client layer on each platform. Basically, it’s like developing at the same time for all platforms, so we minimize development times.

Xamarin we can reuse the code by 75-85% according to official sources.

A notable advantage of Xamarin is that the applications we develop with this tool will be 100% native, which means that we will have all the libraries and features that characterize each of the platforms individually.

One can learn more about Xamarin from XamarinUniversity via updated information and videos that allow you to always be up-to-date, as well as share experiences and learn from colleagues and experts.

6. NATIVESCRIPT

NativeScript enables the development of native applications using JavaScript and TypeScript.

It also allows development through the Angular Framework, and in its latest version the possibility of developing through the Vue.js Framework has also been incorporated.

NativeScript generates truly native applications, using the same APIS that you would have available from Android Studio (native development environment for Android) and XCode (Apple IDE for native development in iOS).

I’ve worked with the team at Andolasoft on multiple websites. They are professional, responsive, & easy to work with. I’ve had great experiences & would recommend their services to anyone.

Ruthie Miller, Sr. Mktg. Specialist

Salesforce, Houston, Texas

LEARN MORE

It even allows access to third-party native libraries, thus providing greater capabilities regarding the performance and capabilities of applications. Its biggest drawback is that the development of user interfaces is more complex (it is XML, not HTML), as well as the necessary abstractions to access the native code independently of the system.

7. JQUERY MOBILE

JQuery mobile has a long experience in the world of creating hybrid applications. It only integrates the jQuery framework based on JavaScript; however, it enables you to concrete and structure a highly responsive and intuitive site or application to take a shot at a tablet or a cellphone.

Your learning curve is very low, especially if you already have knowledge of jQuery and JavaScript. It has been left a little behind in terms of power and design when compared to the rest of the new frameworks introduced in the market, but also jQuery Mobile can be used in parallel with other design frameworks such as Bootstrap, Materialize, etc.

It is always a good option for a hybrid application interface development, but it will surely be necessary to use another series of libraries or plugins to improve its design or functionalities since it does not contain a design thought in the design standards of current mobile platforms.