The Best Practices for Rails App Development

“Rails” is an amazing framework to develop web applications quickly through its inbuilt helper libraries. However, there are certain best practices that you should follow to get your rails app perform better.

Conventional programming methods:

Most developers love to place the logic inside the controller and use the model for the “Active Record” operation only.

This leads to a “Fat controller and skinny model” interface which eventually kills an app’s performance and looses the maintainability of the code. This way, application stops responding when the load is high.

What should be the best practices?

Below, I have mentioned some of the most essential and useful practices that should be followed by every Ruby on Rails developer.

Fat Model, Skinny Controller

Write all the non-response-related logics inside the model with nice and testable methods; and don’t forget to use comments.

You should follow the Ruby on Rails motto i.e. “Fat Model, Skinny Controller”. Because the “skinny” controller offers a nice interface between the view and model.

By moving any logic that isn’t about the response (for example, setting a flash message, or choosing whether to redirect or render a view) to the model instead of the controller, not only you can reuse the codes where

possible but you’ve also made it possible to test your code.

Reusable Scopes

A scope is a set of constraints on database interactions (such as a condition, limit, or offset) that are chainable and reusable.

Let’s see a simple example:

[sourcecode language=”plain”]
def index
@paid_users= User.where(“is_active=? AND is_paid=?”,true, true).order(“name”)
@unpaid_users= User.where(“is_active=? AND is_paid=?”, true, false).order(“name”)
[/sourcecode]

You can change it to this:

[sourcecode language=”plain”]
def index
@paid_users= User.paid.all
@unpaid_users= User.unpaid.all
end[/sourcecode]

Then, you can move the logic to your User model, where it might look like this:

[sourcecode language=”plain”]
scope :paid, lambda { where(“is_active=? AND is_paid=?”,true, true).order(“name”) }
scope :unpaid, lambda { where(“is_active=? AND is_paid=?”,true, false).order(“name”) }
[/sourcecode]

Using the methods User.paid.all and User.unpaid.all, we’ve not only made it simpler to test our code, but also made it possible to reuse that same set of conditions in another location.

You should avoid the use of default_scope because:

  1. You can’t override default scope
  2. default_scope will affect your model initialization

Package Your Code into Gems and Plugins

Writing a particular set code more than once for different applications is exhausting as well as redundant, hence, it is advisable to create a plugin or gem to use it further. It will save your development time and effort.

Manage Your Attribute Access

While creating or updating an object, Rails app usually assigns every attribute without checking the data. Validation only prevents the bad data but doesn’t exactly prevent it from overwriting an attribute that we don’t want to change.

To solve this issue, ActiveRecord is implemented which uses two methods: attr_protected and attr_accessibile.

Using attr_protected, you can declare a blacklist of variables you don’t want to be assigned and using attr_accessible, you can declare a list of variables that can be assigned.

By implementing above steps, you could prevent any mass assignment that could occur via your application’s forms; because if the form does not have the field for a given attribute, doesn’t mean a hacker can’t add it to the request.

From a security perspective, using attr_accessible and attr_protected forces you to think about what should be editable and how to protect the ways in which your class’s attributes are set.

Use Non-database-backed Models

In Rails app, Model is not restricted to associate with table. To organize application logic, write it down by creating a new model.

Virtual Attributes

If you are manipulating data before passing it to a model, use virtual attributes instead.

Virtual attributes are a simple own getter and setter methods.

For example
To set a user’s name:

[sourcecode language=”plain”]
@user = User.new(params[:user])
@user.first_name, @user.last_name = params[:user][:name].split(" ", 2)
[/sourcecode]

By using virtual method inside the model

[sourcecode language=”plain”]
def name=(value)
self.first_name, self.last_name = value.to_s.split(“ ”, 2)
end[/sourcecode]

Whenever you set the name attribute, your model will automatically set the first_name and last_name attributes for you, even though name doesn’t exist in the database.

Use Translations

Rails i18n framework makes it easy to declare the map of an abstract context to a string.

All you need to do is maintain a YAML file of translations, and use I18n.t / t in your code where there is data shown to the use.

I18n is useful to avail your app to more locales.

Using of after_commit callback

Use “after_commit” instead of using after_create/after_update/after_destroy callbacks to start background processes. Because, in relational database, several operations are wrapped in one unit and pass or fail of transaction depends upon all the operations.

If you use after_create/after_update/after_destroy in first model and if any error occurs in the second model then the background process will raise NotFoundError.

Use select in ActiveRecord association

Use select with has_many and belongs_to on Active Record Associations to speed up the query.

For example:

[sourcecode language=”plain”]
class Patient < ActiveRecord::Base
belongs_to :physician, :select => ‘id,name, surname’
end

class Physician < ActiveRecord::Base
has_many :patients, :select => ‘id,name, physician_id’
end
[/sourcecode]

Fix N+1 Queries

N+1 Queries is a serious database performance problem. Use “Bullet” gem to avoid N+1 query problem

Conclusion:

Employing the above mentioned Rails best practices would keep the code cleaner and reusable.

The application performance would increases tremendously and the maintenance of the code will be easier.

Why Rails Framework is Popular Among Ruby Developers?

Most companies whether it’s a start-up or an established enterprise have evidently landed to the conclusion that Ruby on Rails is the most viable option for rapid and cost efficient web app development.

Ruby on Rails or simply called ‘Rails’ is an open-source, full-scale multilevel web app framework that implements MVC development architecture for the Ruby programming language and is supported by a strong community around it.

Several reasons lie to use Ruby on rails, the main one is that it is a better choice than any other tools. However, before proceed forward let’s have a quick look on:

What Is Ruby On Rails?

Ruby is a dynamic, general purpose, interpreted language used for object oriented programming. The Framework has simple coding that a non-technical person can understand to some extent.

Developing new software using Ruby seems to be bit tedious. Rails, a special tool, was developed to optimize the development process.

Rails is the web development framework which is written in the Ruby language. After 9 years of development, Ruby was introduced.

Never miss an update from us. Join 10,000+ marketers and leaders.

With this development the ruby on rails developers can easily makes the web app programming.

Ruby on Rails(Source: Clariontech)

Let’s take a quick look on the features of ROR:

Mature Framework

Ruby on Rails was first released in 2003, which possessed several large and actively maintained APIs that make application development faster, easier and more manageable. One of the best examples is CSRF (Cross Site Request Forgery) protection; using which, you don’t have to do anything to add CSRF. Active Record is an extremely powerful feature in terms of building usable data models.

MVC Architecture:

With Ruby on Rails development is based on the model, controller and view pattern, widely used web application architecture. Therefore, developers using other MVC framework languages can find Ruby on Rails to be more user-friendly.

By using Ruby on Rails architecture, you can get separate codes for different functions, i.e. data layer, presentation layer, and can maintain a resource layer.

Generators/Scaffolding:

It’s a rapid prototyping tool; Rails’ scaffold will generate a starting point that allows us to list, add, remove, edit, and view things. It will explain the command, the model name and related database table, naming conventions, attributes and types.

The generated script will produce files of Ruby code that the application can use to interact with the database. It is somewhat less convenient than dynamic scaffolding, but gives the programmer the flexibility of modifying and customizing the generated APIs.

Gems/Plugin:

Ruby gems are highly portable chunks of Ruby code that can be used inside any Ruby script or application.

Rails plugins have the flexibility to hook into every part of Rails, including generators, rake tasks and tests/specs. Rails-specific features cannot be used with other Ruby frameworks like Merb, Sinatra, etc.

Active Record ORM:

Object-Relational Mapping (ORM) is a technique that connects the rich objects of an application to tables in a relational database management system.

Active record pattern is an architectural pattern found in Ruby on Rails that stores its data in relational databases. It relies heavily on the naming in that it uses class and association names to establish mappings between respective database tables and foreign key columns.

Integrated Testing Tools:

Rails features a convenient testing tool, for which, it automatically starts producing the skeleton test code in background whilst you are creating the application models and controllers.

Rails tests can also simulate browser requests and thus you can test your application’s response without having to test it over the browser.

Some convenient tools for testing Rails application:

  • Test Unit
  • RSpec
  • Cucumber
  • Mocha
  • Flexmock
  • Factory Girl

Version Control Systems:

There are numerous version control systems. CVS was the first system widely used in the open-source community. Several years ago, it was largely replaced by Subversion (SVN). And in early 2008, most of the Rails world moved to a newer version control system, called GIT.

I’ve worked with the team at Andolasoft on multiple websites. They are professional, responsive, & easy to work with. I’ve had great experiences & would recommend their services to anyone.

Ruthie Miller, Sr. Mktg. Specialist

Salesforce, Houston, Texas

LEARN MORE

Git is usually the best choice if you are new to Ruby, because nearly all code that you need to fetch as examples or libraries will be available via a GIT repository.

Conclusion

With Ruby on Rails providing a programming framework that includes reusable, easily configurable components commonly used for creating web-based applications, it is gaining traction with developers.

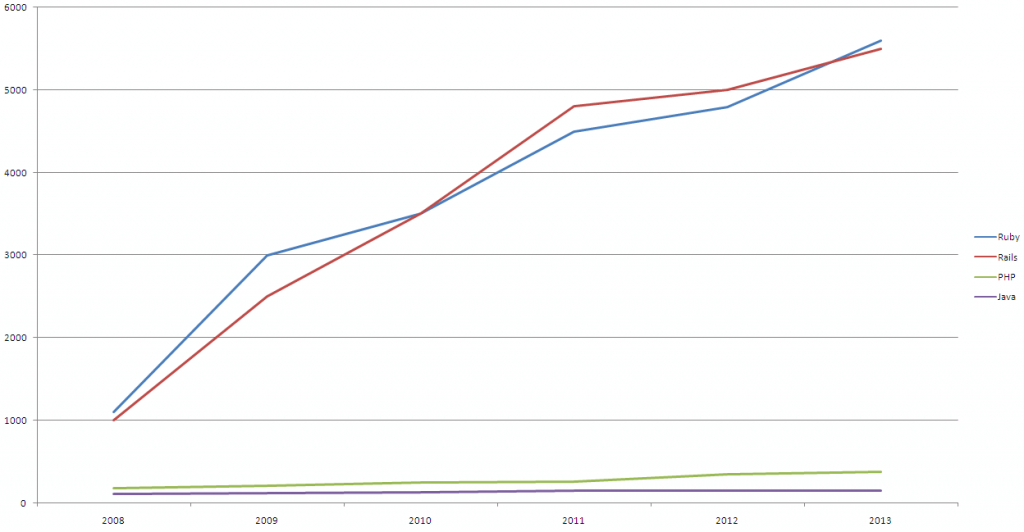
From the recent studies on the job growth trends, it is seen that Ruby on Rails developers are a very hot commodity. Ruby as the language of the cloud, the job market will continue to show high demand for the developers. It’s nearly impossible to be an unemployed Ruby on Rails developer.

RoR_graph_new1-1024x532 (1)

If you are in search of a dedicated developer, to create your ruby application, then contact us.

Our dedicated ruby developers will deliver a quick and efficient solution by developing a web application of your requirement.

How to Install & Configure Redis-Server on Centos/Fedora Server

‘Redis’ is an Open source key-value data store, shared by multiple processes, multiple applications, or multiple Servers. Key values are more complex types like Hashes, Lists, Sets or Sorted Sets.

Let’s have a quick look on the installation steps of “Redis

Here we go…

Step – 1

First of all we need to switch to superuser & install dependencies:

[code language=”html”]
su
yum install make gcc wget tcl
[/code]

Step-2
Download Redis Packages & Unzip. This guide is based on installing Redis 2.8.3:

[code language=”html”]
wget http://download.redis.io/releases/redis-2.8.3.tar.gz
tar xzvf redis-2.8.3.tar.gz
[/code]

Step-3
Compiling and Installing Redis from the source:

[code language=”html”]
cd redis-2.8.3
make
make install
[/code]

Step- 4

Starting Redis server by executing the following command without any argument:

[code language=”html”]
redis-server
[/code]

Step-5

Check if Redis is working. To check, send a PING command using redis-cli. This will return ‘PONG’ if everything is fine.

[code language=”html”]
redis-cli ping
PONG
[/code]

Step-6

Add Redis-server to init script. Create a directory to store your Redis config files & data:

[code language=”html”]
mkdir -p /etc/redis
mkdir -p /var/redis
[/code]

Also we need to create a directory inside “/var/redis” that works as data &  a working directory for this Redis instance.

[code language=”html”]
mkdir /var/redis/redis
[/code]

Step-7

Copy the template configuration file you’ll find in the root directory of Redis distribution into /etc/redis/

[code language=”html”]
cp redis.conf /etc/redis/redis.conf
[/code]

Edit the configuration file, make sure to perform the following changes:

  • Set daemonize to yes (by default it’s set to ‘No’).
  • Set the pidfile to /var/run/redis.pid
  • Set your preferred loglevel
  • Set the logfile to /var/log/redis.log
  • Set the dir to /var/redis/redis
  • Save and exit from the editor

Step-8 
Add the Redis init script.

[code language=”html”]
vi /etc/init.d/redis
[/code]

And paste the following codes to it

[code language=”html”]
#!/bin/sh
#
# chkconfig: 345 20 80
# description: Redis is an open source (BSD licensed), in-memory data structure store, used as database, cache and message broker.

# Source function library.
. /etc/init.d/functions

REDISPORT=6379
EXEC=/usr/local/bin/redis-server
CLIEXEC=/usr/local/bin/redis-cli

PIDFILE=/var/run/redis.pid
CONF="/etc/redis/redis.conf"

case "$1" in
start)
if [ -f $PIDFILE ]
then
echo "$PIDFILE exists, process is already running or crashed"
else
echo "Starting Redis server…"
$EXEC $CONF
fi
;;
stop)
if [ ! -f $PIDFILE ]
then
echo "$PIDFILE does not exist, process is not running"
else
PID=$(cat $PIDFILE)
echo "Stopping …"
$CLIEXEC -p $REDISPORT shutdown
while [ -x /proc/${PID} ]
do
echo "Waiting for Redis to shutdown …"
sleep 1
done
echo "Redis stopped"
fi
;;
restart)
stop
start
;;
*)
echo "Please use start or stop as first argument"
;;
esac
exit 0
[/code]

Save the file and exit from the editor.

Step-9
Give appropriate permission to the init script

[code language=”html”]
chmod u+x /etc/init.d/redis
[/code]

Step-10
To run the Redis server at startup we need to add it to the chkconfig list.

[code language=”html”]
chkconfig –add redis
chkconfig –level 345 redis on
[/code]

Step-11
Finally we are ready to start the Redis Server.

[code language=”html”]
/etc/init.d/redis start
[/code]

The redis server will start automatically on system boot.

Conclusion:

‘Redis’ also supports datatypes such as Transitions, Publish and Subscribe. ‘Redis’ is considered more powerful than ‘Memcache’. It would be smart to bring ‘Redis’ into practice and put ‘Memcache’ down for a while.

We provide one-stop solution by utilizing Redis server with Rails , PHP applications and deploy in cloud services such as AWS to make sure that the application is fully scalable.

You can also check the compression of Memcached vs Redis, to know more information on which one to pick for Large web apps?

Do you have anything to add here? Share your thoughts with comments.

It’s always pleasure to hear from you and for5 any assistance and support on AWS you can write us at info@andolasoft.com.

What new features you will get in the latest release of Rails4

Rails_4-300x137

Introduction:

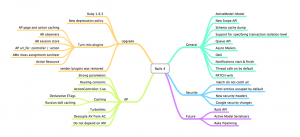
Finally, the most awaited Rails 4.0 version has been released by the Rails team on 25th of June. Rails 4 has got huge changes. There are tons of new features available, which can make your life as a Rails developer a lot easier. We will talk about the most exciting features in Rails 4 and why you should upgrade from Rails 3 version as soon as possible.

New features of Rails4

1. Ruby Versions

It is essential to note that Rails 4 would require Ruby 1.9.3 or higher, in fact Ruby 2.0.0 is recommended for your Rails 4 apps.

2. ‘Gemfile’

Rails now uses a ‘Gemfile’ in the application root to determine the gems you need for your app to start. This ‘Gemfile’ is processed by the Bundler gem, which then installs all the dependencies. It can also install all the dependencies locally to your app so that it doesn’t depend on the system gems.

Read Also: How to do tagging in Rails with gem ‘Acts_as_taggable_on’?

3. ‘Threadsafe’ by Default

Rails 4 will be thread-safe by default i.e. removing overhead and improving the performance on threaded servers, like thin and puma. You will have to ensure that your application and its dependencies are thread-safe, in other words, avoiding global state e.g. class or global variables.

4. No More vendor/plugins

Rails 4.0 will no longer support loading of plugins from vendor. You must replace any plugins by extracting them to gems and adding them to your ‘Gemfile’. If you choose not to make them gems, you can also move them into a different directory such as lib/my_plugin/* and add an appropriate initializer in config/initializers/my_plugin.rb.

5. New Testing Directories

The biggest change made to the testing of Rails 4 app is not the swapping of the testing framework, rather the testing folder structure. The test folder will now have a structure very similar to RSpec:

  • controllers:
  • fixtures
  • helpers
  • integration
  • mailers
  • models

Developers will no longer have to worry if the test is “functional” or a “unit”. The structure provides a clear separation of where the tests in your application should go.

6. Strong Parameters

In Rails 4, a new pattern has been introduced to secure your models from mass assignment. You can filter the parameters passed to your model in the controller instead of ‘whitelisting’ the attributes in your model using “attr_accessible”.

[sourcecode]class PostController < ApplicationController
def create
@post = Post.create(params[:user])
end
end[/sourcecode]

You can protect against unexpected input with declarations in the model using “attr_accessible”.

[sourcecode]attr_accessible :title, :description[/sourcecode]

In Rails 4, you don’t need to worry about unexpected input attributes in your model anymore.
Strong Parameters gem moves user input into the controller.

[sourcecode]class PostController < ApplicationController
def create
@post = Post.create(post_params)
end

private
def post_params
params.require(:post).permit(:title, :description)
end
end[/sourcecode]

The “params hash” in your controller is not a normal hash. It’s actually an instance of ActionController::Parameters, which exposes the “require” and “permit” methods.

The “require” method ensures that the specified key is available in the “params” hash, and raises an ActionController::ParameterMissing exception if the key doesn’t exist.

The “permit” method protects you from unexpected mass assignment.

7. Renamed Callbacks

Action callbacks in controllers are now renamed from *_filter to *_action

Example:

[sourcecode]before_filter :before_action
arround_filter :arround_action
after_filter :after_action[/sourcecode]

All existing *_filter methods will still work with no deprecation warnings. However, It would recommend to replace of *_filter calls to *_action

8. Rails 2 Model.find(:[all|:first:last]) syntax is now deprecated.

9. Deprecated dynamic finders

Rails 4 deprecates all dynamic finder methods (with the exception of find_by and find_by_…). Instead, you’ll use where

[sourcecode]find_all_by_… => where(…)
scoped_by_… => where(…)
find_last_by_… => where(…).last
find_or_initialize_by… => where(…).first_or_initialize
find_or_create_by… => where(…).first_or_create
find_or_create_by_…! => where(…).first_or_create![/sourcecode]

The deprecated finders gem will be included as a dependency in 4.0 and removed in 4.1. The gem, however, will be around and maintained until 5.0.

10. Queuing system

Rails4 added the support for a queue to run background jobs. The queuing API is very simple. The ActiveSupport::Queue class comes with a push method that accepts any object, as long as that object defines a run method.

Example
Let’s say that you have a job class TestJob that prints the name of an author

[sourcecode]class TestJob
def run
puts "I am running!"
end
end[/sourcecode]

You can queue a job to print “I am running!” in the background by pushing an instance of that class to Rails.queue:

[sourcecode]Rails.queue.push(TestJob.new)
"I am running!"[/sourcecode]

The job will run in a background thread and it will not block any of your operations.

11. Live Streaming

Live Streaming is a major new feature in Rails 4. It facilitates you to stream data to the browser. Enabling live streaming requires you to mix in the ActionController::Live class in your controller.

[sourcecode]class MyController < ActionController::Base
include ActionController::Live
def stream
response.headers[‘Content-Type’] = ‘text/event-stream’
100.times {
response.stream.write "hello world\n"
sleep 1
}
response.stream.close
end
end[/sourcecode]

It will stream the string “hello world” to your client 100 times.

You should take notice of following things

  • Manually close the stream after you are done streaming in the browser.
  • Headers must be written first before writing anything to the client.
  • You will need a concurrent Ruby web server, such as puma.io, Rainbow or Thin. Using the default ‘WEBrick’ server won’t work, since it buffers all the output. Also note that Unicorn won’t work either, since it kills the connection after 30 seconds.
  • All controllers that include ActionController::Live would be executed in another thread, so make sure your code is thread-safe.

12. Rails 4 and Hstore from Postgres 9.2

ActiveRecord in Rails 4 will now support the PostgreSQL hstore extension. This database extension allows a new data type for a column in PostgreSQL called ‘hstore’ which effectively represents a string-only hash. For most purposes this would be similar to serializing data in a text column, but the fact that this is now a native datatype, it would grant a huge performance boost and the capability to query against it directly. You can now have a hint of a schema-less database available to your application without needing to perform a full upgrade to MongoDB, CouchDB, Riak or other similar schema-less data store.

13. Cache Digests (Russian Doll Caching)

Make it super easy to do Russian Doll-caching through key-based expiration with automatic dependency management of nested templates

14. Turbolinks

Now you can speed-up the client-side with ‘Turbolinks’. It essentially turns your app into a single-page ‘JavaScript’ application in terms of speed, but with none of the developmental drawbacks (except, maybe, compatibility issues with some existing JavaScript packages).

15. Routing Concerns

In Rails 4, routing concerns has been added to the router. The basic idea is to define common sub-resources (like comments) as concerns and include them in other resources/routes.

16. Rails3 code

[sourcecode]resources :posts do
resources :comments
end
resources :articles do
resources :comments
resources :remarks
end[/sourcecode]

In rails4 the concern routes will only be included within a resource by passing it to the routing option :concerns. The :concerns option can accept one or more concerns.

[sourcecode]concern :commentable do
resources :comments
end
concern :remarkable do
resources :remarks
end
resources :posts, :concerns, :commentable
resources :articles, :concerns =>[:commentable, :remarkable][/sourcecode]

Why we should upgrade to rails4?

Rails4 is recommended to be used with Ruby 2.0.0. It stopped supporting Ruby 1.8.x after Rails 3.2. Ruby 1.9.2+ will be supported until Rails 5 is released!

Aware of any other not-so-obvious features? Please post it in the comments below.

How to configure Rails application with Puma and Ngnix on CentOS

Rails__new_0912

Puma is a multi-threaded high performance web server written in Ruby. Currently it is very popular in market as a ruby application server. We can use it for any kind of ruby web application that supports rack. Here, I have mentioned detailed steps to help you configure Rails application with Puma and Nginx on CentOS.

Steps to install Puma:

We can install puma via RubyGems.

1. Append the below line to your Gemfile, if you have Rails 3.0 or above:

[sourcecode]gem ‘puma’, ‘~> 2.0′[/sourcecode]

2. Then we have to issue the below command to install puma

[sourcecode]# bundle install[/sourcecode]

3. Now you can run your application with puma using the below command

[sourcecode]# RAILS_ENV=production bundle exec puma -e production –b unix:///var/run/my_app.sock[/sourcecode]

You should see the following outcomes:

[sourcecode]Puma 2.0.1 starting…
* Min threads: 0, max threads: 16
* Environment: production
* Listening on unix:///var/run/my_app.sock
Use Ctrl-C to stop[/sourcecode]

4. Press Ctrl-C and stop the process for now. We will start the server again after installation and configuration of ‘Ngnix’.

Steps to Install Ngnix:

1. To install Nginx on CentOS type below commands

[sourcecode]# wget http://nginx.org/packages/centos/6/noarch/RPMS/nginx-release-centos-6-0.el6.ngx.noarch.rpm
# rpm -ivh nginx-release-centos-6-0.el6.ngx.noarch.rpm
# yum install nginx[/sourcecode]

Configuring Ngnix:

1. First we have to create a virtual host file

[sourcecode]#vi /etc/nginx/conf.d/my-NewProject.conf[/sourcecode]

2. Now add the below line to your config file (Change fields as your requirement)

[sourcecode]upstream my_app
{
server unix:///var/run/my_app.sock;
}
server {
listen 80
server_name www.example.com; # change to match your URL
root /var/www/html/my_app/public; # I assume your app is located at this location
location / {
proxy_pass http://my_app; # match the name of upstream directive which is defined above
proxy_set_header Host $host;
proxy_set_header X-Forwarded-For $proxy_add_x_forwarded_for;
}
}[/sourcecode]

3.Then we have to restart the Ngnix

[sourcecode]#service nginx restart[/sourcecode]

4.After restarting the Ngnix we need to again start puma

[sourcecode]# cd /var/www/html/my_app/
# RAILS_ENV=production bundle exec puma -e production -b unix:///var/run/my_app.sock
Puma 2.0.1 starting…
* Min threads: 0, max threads 16
* Environment: production
* Listening on unix:///var/run/my_app.sock
Use Ctrl-C to stop</pre>
<pre>[/sourcecode]

Now you will be able to browse your application.

Type the Server Name you mentioned on your virtual host configuration.

For example: http://www.example.com

How to run Puma as a demon:

1. If you want to run puma as a foreground process (daemon) then start puma with –d option with the following command

[sourcecode]# RAILS_ENV=production bundle exec puma -e production -d -b unix:///var/run/my_app.sock[/sourcecode]

2.To verify whether puma is running or not we have to issue the below command

[sourcecode]# ps aux | grep puma
root  19119 13.1  1.3  43276 27792 ?   Sl   21:02   0:01 ruby /usr/local/rvm/gems/ruby-1.9.3-p0@tapas1/bin/puma -e production -d -b unix:///var/run/my_app.sock[/sourcecode]

Finally-steps to stop and restart our puma server

‘pumactl’ is a command line that helps to stop and restart the application server. It takes parameter from the file where we store the puma process state.

1.Currently we have to kill the running process of puma by issuing following command.

[sourcecode]pkill –f puma[/sourcecode]

2. You can again verify the process is running or not by issuing the following command:

[sourcecode]# ps aux | grep puma[/sourcecode]

3.Then start the puma with –S option

[sourcecode]RAILS_ENV=production bundle exec puma -e production -d -b unix:///var/run/my_app.sock -S /var/run/my_app.state –control ‘unix:///var/run/my_app_ctl.sock'[/sourcecode]

4.Now puma would generate the file /var/run/my_app.state like below content:

[sourcecode]pid: 20937
config: !ruby/object:Puma::Configuration
options:
:min_threads: 0
:max_threads: 16
:quiet: true
:debug: false
:binds:- unix:///var/run/my_app.sock
:workers: 0
:daemon: true
:worker_directory: /var/www/html/my_app/
:environment: production
:state: /var/run/my_app.state
:control_url: unix:///var/run/my_app_ctl.sock
:control_auth_token: c0c3983017b972da3318a33349e8ee
[/sourcecode]

5.Now, you can restart and stop your application with ‘pumactl’ using the file /var/run/my_app.state

a) To restart puma server issue the following command

[sourcecode]bundle exec pumactl -S /var/run/my_app.state restart[/sourcecode]

b) To stop the puma server issue the following command

[sourcecode]bundle exec pumactl -S /var/run/my_app.state stop[/sourcecode]

Following the above mentioned steps would result you with a clean configuration of Rails application with ‘Puma’ and ‘Nginx’.

Recommended Reading: New features of Rails4

Unveiling FeedZirra: Simplifying Feed Parsing in Your Rails Application

What is a Feed?

A feed is a data format which is used to provide frequent updates and latest contents to the users. A feed has no particular type; it could be news, latest technology, game, gadgets, sports etc. These feeds can be easily parsed into your Rails application to make it more useful for the users. The feed is build up with XML and has particular format type.

What is Feedzirra?

“Feedzirra” on the other hand is a feed library built on Ruby that is designed to get and update a number of feeds as fast as possible. This includes using “libcurl-multi” through the “curb” gem for faster http gets, and “libxml” through “nokogiri” and “sax-machine” for faster parsing.

Suppose you need to add some updated information to your Rails application from other feed site like ‘feedburner’, in such cases you can easily work it out by using the gem “feedzirra”.

Here are the steps to use ‘feedzirra’ in your Rails application.

Step-1

Add the gem ‘feedzirra’ in to your gem file.

[sourcecode language=”plain”]gem ‘feedzirra'[/sourcecode]

Run ‘bundle install’ to install the gem along with its dependencies.

Step-2

Modify your controller where you are fetching the feeds.

[sourcecode language=”plain”]require ‘feedzirra'[/sourcecode]

Step-3

Now, write the following code in your method in order to parse feeds from an external site.

[sourcecode language=”plain”]feed =Feedzirra::Feed.fetch_and_parse("http://feeds.feedburner.com/TechCrunch/gaming")
@entry = feed.entries
[/sourcecode]

Note: Here we are parsing the feeds from ‘feedburne’r site with updated information on gaming news.

Step-4

Now, open your view section and write the following code snippet to display the information regarding the feeds.

[sourcecode language=”plain”]<ul>
<%@entry.each do |t|%>
<li>
<%= link_to "#{t.title}", "#{t.url}",:target => "_blank" %>
<%=t.author%>
<%=t.content%>
<%=t.published%>
<%=t.categories%>
</li>
<%end%>
</ul>
[/sourcecode]

Note: The above code will display the feed title, author name, content, published date and category type. Clicking the feed title, will launch a new tab in browser and display the detail information of that feed.

Step-5

You can also fetch multiple feeds by writing the following code.

[sourcecode language=”plain”]feed_urls = ["http://feeds.feedburner.com/PaulDixExplainsNothing", "http://feeds.feedburner.com/trottercashion"]
feeds = Feedzirra::Feed.fetch_and_parse(feed_urls)
[/sourcecode]

Conclusion:

The FeedZirra gem empowers Rails developers to seamlessly integrate feed parsing capabilities into their applications. 

Are you looking for a Ruby on Rails developer

Contact Us

Whether you’re building a news aggregator, a blog reader, or a content recommendation system, FeedZirra simplifies the process of retrieving and presenting timely content from various sources. 

By harnessing the power of FeedZirra, you can enhance user engagement, keep your app’s content fresh, and deliver a more dynamic user experience.

Related Questions

Q1: What is the FeedZirra gem, and how does it simplify feed parsing in Rails applications?

The FeedZirra gem is a powerful tool in the Ruby ecosystem that provides a user-friendly way to parse RSS and Atom feeds. It abstracts the complexities of handling different feed formats, making it easier for developers to extract and utilize the content they need within their Rails apps.

Q2: How can I integrate the FeedZirra gem into my Rails application for parsing feeds?

To integrate the FeedZirra gem into your Rails app, start by adding it to your Gemfile with the following line: gem ‘feedzirra’. After running bundle install, you can fetch and parse feeds using the Feedzirra::Feed.fetch_and_parse method. This allows you to access the feed’s entries (articles) and display them in your app.

Q3: What are some of the advanced features offered by the FeedZirra gem for feed parsing in Rails?

The FeedZirra gem provides several advanced features, including access to various properties of feed entries such as publication date, author, summary, and content. It also offers automatic HTML content sanitization to ensure safe rendering. Additionally, you can implement caching to reduce the load on feed sources and optimize performance.

Q4: How does the FeedZirra gem benefit developers when integrating feed parsing into their Rails applications?

The FeedZirra gem brings several benefits to developers, including streamlined efficiency by handling the intricacies of feed parsing. It supports multiple feed formats (RSS and Atom), making it compatible with a wide range of sources. The gem’s simple API is designed for ease of use, catering to developers of various skill levels. Moreover, it provides customization options to tailor parsed feed content to suit your app’s design and requirements.

Q5: Can the FeedZirra gem be used to enhance user engagement and content freshness in Rails apps?

Absolutely. By utilizing the FeedZirra gem to parse feeds, you can enhance user engagement by providing fresh and relevant content from various sources. Whether you’re building a news aggregator, a blog reader, or a content recommendation system, integrating feed parsing into your Rails app with FeedZirra helps create a dynamic user experience that keeps users informed and engaged.