Key Difference Between ReactJS And React Native

ReactJS and React Native are two leading JavaScript frameworks that allow users to build mobile user interfaces (MUI). They both provide developers with an opportunity to quickly prototype mobile apps and manage complexity as projects grow in scope. Both ReactJS and React Native are used to create native-like apps. However, there are certain differences between the two. Let me explain one by one

What is ReactJS?

React.JS often referred to as React or ReactJS is a JavaScript library responsible for building a hierarchy of UI components or in other words, responsible for the rendering of UI components. It provides support for both front-end and server-side.

Advantages of ReactJS

  1. Easy to learn and use: ReactJS is much easier to learn and use. Any developer who comes from a JavaScript background can easily understand and start creating web apps using react.
  2. Creating dynamic web applications becomes easier: To create a dynamic web application specifically with HTML was tricky, which requires complex coding, but ReactJS solved that issue and makes it easier. It provides less coding and gives more functionality.
  3. Reusable components: ReactJS web application is made up of multiple components, and each component has its logic and controls. These components can be reused wherever needed. The reusable code helps to make your apps easier to develop and maintain.
  4. Performance enhancement: ReactJS improves performance due to virtual DOM. The React Virtual DOM exists entirely in memory and is a representation of the web browser’s DOM. Due to this, when we write a react component, we do not write directly to the DOM. Instead, we are writing virtual components that will turn into the DOM, leading to smoother and faster performance.
  5. The support of handy tools: ReactJS supports a handy set of tools which make the task of the developers understandable and easier.

What is React Native?

React Native is an open-source JavaScript framework used for developing a mobile application for iOS, Android, and Windows. It uses only JavaScript to build a cross-platform mobile app. React Native is the same as react, but it uses native components instead of using web components as building blocks. It targets mobile platforms rather than the browser.

Facebook developed the React Native in 2013 for its internal project Hackathon. In March 2015, Facebook announced that React Native is open and available on GitHub.

Advantages of React Native

There are several advantages of React Native for building mobile applications. Some of them are given below:

  1. Cross-Platform Usage: It provides the facility of “Learn once write everywhere.” It works for both platform Android as well as iOS devices.
  2. Class Performance: The code written in React Native is compiled into native code, which enables it for both operating systems as well as it functions in the same way on both the platforms.
  3. JavaScript: JavaScript knowledge is used to build native mobile apps.
  4. Community: The large community of ReactJS and React Native helps us to find any answer we require.
  5. Hot Reloading: Making a few changes in the code of your app will be immediately visible during development. If the business logic is changed, its reflection is live reloaded on screen.
  6. Improving with Time: Some features of iOS and Android are still not supported, and the community is always inventing the best practices.
  7. Native Components: We will need to write some platform specific code if we want to create native functionality, which is not designed yet.
  8. Existence is Uncertain: As Facebook develops this framework, its presence is uncertain since it keeps all the rights to kill off the project anytime. As the popularity of React Native rises, it is unlikely to happen.

Disadvantages of React Native

  1. React Native is still new and immature: React Native is a newbie in Android and iOS programming languages and is still in its improvement stage, which can have a negative impact on the apps.
  2. Learning is tough: React Native is not easy to learn, especially for a fresher in the app development field.
  3. Lacks the Security Robustness: React Native is a JavaScript library and open-source framework, which creates a gap in the security robustness. When you are creating banking and financial apps where data is highly confidential, experts advise not to choose React Native.
  4. Takes More Time to Initialize: React Native takes a lot of time for initializing the runtime even for the hi-tech gadgets and devices.

ReactJS vs React Native

ReactJS

React Native

ReactJS initial release was in 2013. React Native initial release was in 2015.
Used for developing web applications. Used for developing mobile applications.
Can be executed on all platforms. Not platform independent. It takes more effort to be executed on all platforms.
Uses React-router for navigating web pages. Built-in navigator library for navigating mobile applications.
Uses HTML tags. Does not use HTML tags.
Use code components, which saves a lot of valuable time. Reuse React Native UI components and modules which allow hybrid apps to render natively.
Provides high security. Provides low security in comparison to ReactJS.
The Virtual DOM renders the browser code. Native uses its API to render code for mobile applications.

Which is better, React or React native?

Both ReactJS and React Native are important pillars for app and web development, and due to their flexible functionalities and an evolving Eco-system of libraries, they are gaining momentum with each passing day.

While ReactJS is basically a JavaScript library and React Native is the entire framework, the former is the heart of the latter, and compliments each other.

If ReactJS is optimal for creating apps with high functionality and complex calculations, then React Native is ideal to give a native feeling to your mobile apps.

Conclusion

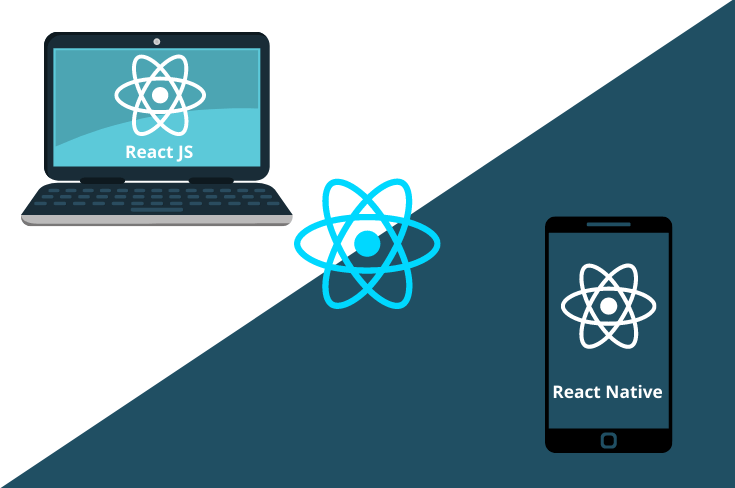
React is a framework for building applications using JavaScript. React Native is an entire platform allowing you to build native, cross-platform mobile apps, and React.JS is a JavaScript library you use for constructing a high performing UI layer.

React.JS is the heart of React Native, and it embodies all react principles and syntax, so the learning curve is easy. The platform is what gave rise to their technical differences. Like the browser code in React is rendered through Virtual DOM while React Native uses Native API’s to render components on mobile.

So both the framework has huge market demand for web and mobile application development. We have also expertise in developing application in react and react native. If you have any quarries on these two framework then please book a free consultation or if you are looking to develop application on these two framework then you are in the right place. Contact us now
An Introduction To BuildContext In Flutter and It’s Importance?

BuildContext is the object that stores information about the current build. It provides information such as the minimum and maximum supported Flutter version, the device’s screen size and pixel density, the currently active theme, and more.

The BuildContext is the set of inputs that Flutter uses to create an instance of a widget. It includes properties on the Android and iOS platforms, as well as properties related to the current device and environment.

It can be used to customize the behavior and appearance of your widget, but it’s important to understand how it works in order to avoid any issues.

For instance, you can use BuildContext.host () to get a string that specifies the current app’s host name. You can also use BuildContext.local (context).emulator so you can set up an emulator for testing your app on different devices without needing to change settings in Android Studio every time you want to switch emulators.

Flutter is one of the hottest technologies for cross-platform mobile development. It has been described as a new contender in the app development industry, competing with traditional frameworks like React Native and Xamarin.

Flutter builds on Google’s own Dart programming language and provides a library of scalable, customizable UI widgets to help developers build beautiful native interfaces that run across all platforms. It has been designed to help developers build high-quality, natively compiled apps that run on both Android and iOS from one codebase.

Never miss an update from us. Join 10,000+ marketers and leaders.

What is a BuildContext?

The BuildContext is a locator that is used to point the location of the widget in the widget tree.

In Flutter we have to create widgets through the build method & we have to pass the BuildContext as an argument to the build method.

Each BuildContext is different for every widget. Each widget you create has its own BuildContext and they can locate themselves in the widget tree or reach out to the nearest widget.

This is how we create a widget

[code language=”css”]
Widget build (BuildContext context)=> MyAwesomeWidget();
[/code]

Flutter widget tree

Everything in Flutter is a widget. Whether it is a container, providers, text, button, image etc. everything is a widget, whether it reflects the UI in the app or not.

The UI or display in Flutter comprises stacks of widgets popularly called a widget tree. Each component is responsible for a small unit of the entire UI.

Flutter widget tree

The above image is an example of a widget tree in Flutter. We can observe that every widget has its own place in the widget tree i.e. the Button widget is under column widget.

Widgets are only visible to its BuildContext or to its parent’s BuildContext. That means we can locate the parent widget from the child widget. For the above image tree structure we can get Scaffold from Container by going up:

[code language=”css”]
context.ancestorWidgetOfExactType(Scaffold)
[/code]

You can also locate a child widget from a parent widget and for that, we use Inherited Widgets.

There are three main trees in Flutter:

  1. Widget
  2. Element
  3. Render

Widget

Widgets are immutable, they represent the structure for RenderObjects Fluorescence is optimized, which can easily create and destroy widgets without any significant performance implications.

The same can’t be said for RenderObjects.

Element

In the middle of Widgets and RenderObjects sits elements. These act as the glue between the immutable widget layer and the mutable render layer.

As the configuration of a widget changes (for example, the user calls the set state that triggers a rebuild), the element notices incoming changes and says to the corresponding render object,

“Hey! Please update. ”

Render

RenderObjects are what the visual pieces on the screen correspond to. Their purpose is to define areas on the screen regarding their spatial dimensions. They are referenced by the element. As a consequence we are dealing with another (third) tree here: the RenderObjects together form a tree which is called Render Tree whose root node is a RenderView (being a variant of a RenderObject). The RenderObject, on the other hand, are mutable objects that do the heavy lifting of turning the configuration supplied from widgets into pixels users can see and interact with on the screen.

Unlike widgets that are cheap and can safely be created and destroyed without any significant performance implications, the same cannot be said for RenderObjects.

For this reason, whenever the configuration of a widget changes, the framework looks at the change and updates the associated RenderObject instead of creating a new one each time.

Conclusion

Understanding BuildContext is very crucial to develop applications in Flutter. This improves our knowledge on how Flutter works and helps to build apps confidently.

BuildContext is a facade that provides a consistent API for implementing custom layouts and animations. The code is platform-specific, but the abstraction weaves some of the underlying platform-specific logic out of sight. BuildContext also helps reduce the need to know about the underlying platform details when implementing custom layouts and animations.

I’ve worked with the team at Andolasoft on multiple websites. They are professional, responsive, & easy to work with. I’ve had great experiences & would recommend their services to anyone.

Ruthie Miller, Sr. Mktg. Specialist

Salesforce, Houston, Texas

LEARN MORE

Flutter is an open-source mobile app SDK that is used to make a high-quality app with a beautiful and consistent user experience. Unlike native mobile development, Flutter does not require that an app has a single, complete codebase but instead lets you mix and match code for different platforms. It also provides a rich set of pre-built widgets and allows for shared state.

The BuildContext is the context in which the Flutter app is running and is used for determining where to find resources and strings. It can be thought of as the environment in which the app is being used. Flutter provides an abstract class called BuildContext that handles the loading of resources, without requiring the developer to use hardcoded paths. This abstraction is one of the things that makes flutter so easy to use.

Flutter provides a set of high-level classes to help flutter developers build reactive user interfaces. Are you looking to develop an application in flutter framework? Let’s discuss

How To Reduce Web And Mobile App Development Cost?

The best web and mobile app development are more than a concept for every tech entrepreneur to pitch for. It is something that makes everything easy for customers but often comes with a high price tag.

According to industry experts, it is worth spending on quality mobile app development as the return will be too much.

The bitterness of poor quality remains long after low pricing is forgotten! Leon M. Cautillo

But this is how customers react to development companies who prefer to ignore quality to bring down the costs of their web or mobile app.

If you are not ready to lose the quality of mobile or web app development, it is still possible to reduce app development prices. Let’s find out how to bring down the cost of business app development without falling in quality.

Why Does Quality Always Matter?

Quality is never replaceable. It is the only factor, helping products to become popular and grow in market share. To manage Android or iOS app development within the customer’s budget is the main concern for professional developers out there.

But is it possible anyhow?

Never miss an update from us. Join 10,000+ marketers and leaders.

It takes a lot of planning, skill, time, focus, and work hours to develop a fully functional web or mobile application.When customers ask to decrease the app development cost, most of the development companies have no option but to cut corners.

Quality is the most common among other factors to get ignored in this process. But this approach can backfire unexpectedly.

Despite the clear demand for app development cost reduction, there are some proven tips which if followed throughout the development process, can make it happen quite easily for developers.

Let’s take a look at the options you have to reduce web or mobile app development costs in real life.

Reduction in Web and Mobile App Development Costs – Tips to Consider

The development cost of an app is due to many factors that are interconnected to each other and it is difficult to miss any of them. To be true, this cost can be reduced with some effective strategies in use.

Mind you, it is a no joke!!

Don’t you all get convinced?

Some important factors are normally forgotten by mobile app developers. But considering them all from the early stage of development can save developers a lot on their app development costs.

It’s time to learn about all of them one-by-one…

1. Plan carefully and effectively

As you all know failing to plan is equal to planning to fail, app development planning is very crucial. It is the top consideration is to prevent random functionalities and features getting added to the app over time, creating a mess that only wastes time and money.

From deep research on the competitors and targeted users to know about their likes and preferences in features, everything needs to be done before the app development starts.

It will help to make the app unique and profitable in the market too. Once the research part is over, you need to plan on what’s and how’s to reach the development goal.

The more effectively you plan a mobile app development plan, the better it will be to lower trial-and-error costs.

The planning of app development will allow you to focus on quality and budget while avoiding unnecessary expenditures. Also, less time will be invested in the development process.

2. Make Interactive App Prototypes

An interactive prototype is like a quick visualization of a finished app. It has great importance in web and mobile app development when it comes to meeting the user as well as the client’s expectations.

Mobile app developers should think of building interactive prototypes as they give a fair idea of the look and feel, navigation, UI/UX design, and more so that neither customers nor users feel disappointed later.

The prototype serves as a blueprint for the customer and the developer to know if they see the same end product! It is easy to review the prototype and suggest any corrections or modifications by the customer, saving both time and money.

The cost of building an interactive prototype is relatively low in comparison to the cost of correcting or modifying the finished app as per customer’s demand later.

By then, a great deal of our resources and time is already spent on the app development process.

With tools like Figma, Atomic, Adobe XD, it has been easier to build real-looking app prototypes. So, think of making a prototype before developing an app!

3. Launch a Basic Version of the App (MVP)

The idea of launching an MVP (a basic version of your app) helps you get the actual market response in real-time without spending hugely on its complicated secondary features.

And, it is possible adding advanced features in regular updates, after launching your MVP app. Since MVP is based on an agile development methodology, it can evolve with necessity or demand!

The decision to launch an MVP can be crucial in saving both the time and cost of app development in its initial stage.

Moreover, it ensures testing the product in the real market setting, so that you can be sure about the release of upgraded versions in the future.

MVP is not just a quality checking technique but also saves significant costs while improving quality after a live test every time. It also guards against poor user response to the developed app.

4. Use the Option of Cross-Platform Development

Developing cross-platform apps can turn out to be cost-saving too. Instead of targeting your users across multiple platforms separately, you can still use the option of cross-platform app development to reduce the development cost.

The best practice to reduce the cost of developing an app while launching it for both Android and iOS is to go for cross-platform development. It takes the proper use of technical knowledge and expertise to build cross-platform apps.

Appcelerator, PhoneGap, Unity3D, Xamarin, and many more popular cross-platform development tools are available to make the job easier for any professional app developer.

5. Outsource the Project

There are more qualified app developers who can be helpful in keeping the mobile app development cost under check. If your company does not have the right resources to handle app development, it’s better to outsource the project to any such developer outside your company.

Outsourcing has cost advantages along with others. It’s too normal for your app development company to face the challenge of not having specialized in-house developers for any upcoming project.

And you can’t even think of wasting time and money training your developers when projects need to be completed fast.

I’ve worked with the team at Andolasoft on multiple websites. They are professional, responsive, & easy to work with. I’ve had great experiences & would recommend their services to anyone.

Ruthie Miller, Sr. Mktg. Specialist

Salesforce, Houston, Texas

LEARN MORE

Outsourcing can make up the skill your developers lack and help achieve what you can’t afford to lose. This enables you to find a technical partner who has both the skill and expertise to develop the web/mobile app on your behalf.

Both off-shore development and outsourcing are cost-effective means widely used in the area of app development.

Conclusion

Cost of Quality (COQ) is the cost of not making the right product. Every time the product is modified or corrected the cost of quality rises. So, by avoiding doing things wrong, you can genuinely increase the chance of developing the right app at reduced cost and yet not losing quality.

All the above considerations will help you keep app development costs under control.

Do you need a professional web or mobile app development company for cost-effective app development solutions? Call or chat with our expert consultants now!

What’s New In Android L, Windows 8.1 And IOS 8

As all the three major mobile players in smartphone categories  i.e. Apple, Google and Microsoft come up with their latest version of Operating Systems i.e. iOS 8, Android L & Windows 8.1 respectively. Let’s have a look how it is worthy for users to switch over the most-recent OS version based upon the new features.

Android L:-

  • Personalized unlocking features, which make your smartphone or tablet search for familiar Bluetooth’s gadgets, Wi-Fi networks, locations and even voice imprints to deactivate any lock screen protections, letting you jump straight into your phone when it knows you’re nearby. If the device can’t detect any of this metrics, anyone trying to use it will be presented with the standard lock screen.
  • Google is focusing on its stock android keyboard for Android 5.0 Lollipop for adding more personalized and scrapping the individual tiled keys.
  • There is one more exciting feature i.e. “Do Not Disturb mode”, which automatically deactivates all notifications and audio during set times, support for Bluetooth 4.1 and a completely redesigned audio back end with support for USB audio devices.
  • Also Android L is going to introduce 64-bit processor support and  improving battery life with Project Volta. Project Volta includes a new battery historian which will help users work out what a device was doing at any given point in a battery cycle to find out which apps are draining the most power.

Windows 8.1 :–

Microsoft has already rolled out windows 8.1 few months back. Some of the features that were added windows phone 8.1:

  • Cortana, which is very much similar to Siri in iOS device, act as your personal assistant. Cortana notebook features store things that you tell her about yourself and also keep tracks what you like and what you’d like done. It can access apps, set alarms, send messages to specific persons, post a Facebook status, add a tweet, search for something and a lot more.
  • The action center which is finally added, and here you can get all your notifications and other controls such as setting Bluetooth, and Wi-Fi.
  • Another interesting feature that added to windows 8.1 was Quiet Hours. Here You can set what time you want your phone to be “quiet,” shutting out noise or notifications coming from it.

There is some other new features like setting up your personal photos as the background on the said start screen, connects you to free Wi-Fi hotspots near you through Wi-Fi sense, transferring files from the internal memory and SD-card seamless through Storage Sence etc.

iOS 8:-

iOS 8 also launched with lots of new features and here I am going to share few of them:

  • iPhone has new feature “Send Last Location” which allows your iPhone (or iPad) to send its last-known location to Apple when the battery drains to a critical level. If you lost your device, it will help you to find the last location of your device even if it’s battery is completely drained.
  • You can now include photos when making notes, to-do lists and reminders in Apple’s iOS 8 notes app.
  • Now iPhone can identify the song due to Shazam integration in Siri. If you ask Siri, “What song is playing?”, it will cause her to listen to the ambient sound, using Shazam to identify music.
  • You can notice iOS 8 has new keyboard with a very smooth predictive type features, which suggests three words right above the keyboard.

I hope you liked this post. What you would like to prefer- Android L, iOS 8 or windows 8.1 and why. Please share your answer in the below comment section

Recommended Blog: Useful features of iOS 7

Looking to make your mobile application dreams come true? Contact us today to make it a reality.

Grow Your Business For Your Mobile App With Google Analytics

In this digital era, information or data plays pivotal role in the process of development. The more information you have, more precise and accurate decision you can take. And this is also applies to mobile apps.

As per report comes from Portio “1.2 billion people worldwide were using mobile apps at the end of 2012. This is forecast to grow at a 29.8 percent each year, to reach 4.4 billion users by the end of 2017.” This simply indicates industry’s future growth potential; but to stand out this industry is not an easy job. Good news is that Google has its own free analytics tool that helps you to find out insight details of your mobile app which can be your vital part of our app development process.

In June 2012, Google introduced beta version of mobile app analytics ; but now it becomes the part of Universal Analytics. Today our purpose is to educate those developers or users who are not familiar with this influential API(Application Program Interface)

How To Setup Google Analytics for Mobile App?

Step 1:

Set up a new app property in your analytics accounts.
First login into your google analytic profile. Here you get two options:

  • Option One: You can create new account for your mobile app. For this go to admin section, then create new accounts from the account tab and choose “mobile app” tab. Now just provide details like Account name, App name, Industry category and time zone and you will get your tracking code. This option is more suitable if you want to see your analytic data of your mobile apps only.
  • Option Two: Here you can create a new property from your existing account. For this simply go to account where you want to add your new property and then select “Create new property” tab under property section and rest is similar to option one.This option is more suitable if you want to see analytic data of your web application as well as corresponding mobile application.

Step 2:

Download the Google Analytics SDK for Android or iOS from the same account screen that provides the tracking ID. Suggest to take help of mobile developer to implement tracking via SDK.

Never miss an update from us. Join 10,000+ marketers and leaders.

Once you setup your analytic for mobile app you can analyze your data through lots of cool features and out of them I have listed few features here:

  • Enhance your customer base by knowing who utilizes your app, on what platform, where they come from and what they looking for from Traffic Source report and Google play integration.Note: If you link your Google Analytics account to Google Play then your android apps will be automatically recognized in Google Analytic; but you have to associate each application separately with an analytic account.
  • Event tracking, Flow visualization, and Real time reporting helps you to identify scope of improvement for better customer engagement. With in-built crash and exception reporting, you can prioritize the issues which are impacting your visitors, helping you to serve better user experience. More you engage your visitor, better chance to achieve your objective.
  • Every single application has certain goals such as purchase, leads, signup or simply spending time on app. This helps you to setup and track those goals.
  • Google Analytics is now available on Admob. So you can get full analytic data either from Google Analytics or from Analyze tab of Admob account.

Recently, Google also released official Google Analytic app for iphone user (https://itunes.apple.com/app/google-analytics/id881599038). In future we may review this app for you.

See Also : Tips to increase your app download through App Store Optimization(ASO)

Andolasoft has been successfully delivered lots of iOS and Android app for his worldwide customer. You can check out our portfolio page. I would love to hear how you are using, or plan to use, this powerful Google API.

How To Enhance Image Processing With Core Image In IOS Apps

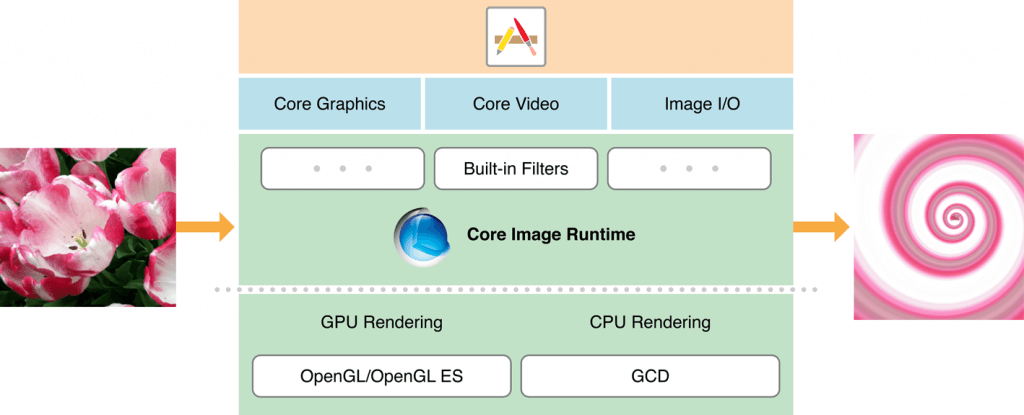
Core Image is a powerful framework for image processing and analysis technology designed to provide real-time processing for still and video images. This helps you easily apply filters to images, such as modifying the hue, exposure or vibrant. It uses the GPU or CPU rendering path to process the image data very fast.

Core Image can be chained with multiple filters to an Image or video frame at once by creating custom effects. Core Image provides us more than 90 built-in filters on iOS and over 120 on OS X. You can set up filters by supplying key-value pairs for a filter’s input parameters. You can use the output of one filter as the input of another filter, to create amazing effects.

Here is how the Core Image is related to the iOS operating system

core-image-1024x415

Before going into Core Image, let’s know about the classes used in the Core Image framework:

CIContext:

The CIContext is a class which provides an evaluation context for rendering a CIImage object. CIContext class is used to take advantage of the built-in Core Image filters while processing an image.

CIImage:

The CIImage is a class which represent an image or holds an image data which may be created from a UIImage, from an image file, or from pixel data.

CIFilter:

The CIFilter class produces a CIImage object as output. A filter takes one or more images as input. The filter class has a dictionary that defines the attributes,so the parameters of a CIFilter object are set and retrieved through the use of key-value pairs. This helps us to add some beautiful effect on the input image.

Sample example:

In this example local image path is used in resource file to apply effects.

// 1 Retrieving the localimage.png path from resource bundle

NSString *filePath =
  [[NSBundle mainBundle] pathForResource:@"localimage" ofType:@"png"];
NSURL *fileNameAndPath = [NSURL fileURLWithPath:filePath];

// 2 Converting the normal image to CIImage object by passing the URL of original localimage.png

CIImage *beginImage =
  [CIImage imageWithContentsOfURL:fileNameAndPath];

// 3 Adding the filter SepiaTone effect to the localimage.png

CIFilter *filter = [CIFilter filterWithName:@"CISepiaTone"
                              keysAndValues: kCIInputImageKey, beginImage,
                    @"inputIntensity", @0.8, nil];
CIImage *outputImage = [filter outputImage];

// 4 showing the output image in the UIImageView

IImage *newImage = [UIImage imageWithCIImage:outputImage];
self.imageView.image = newImage;

Note : Here we can change the value of the CIFilter value which is given 0.8 by using a slider which min value is 0 and max value is 1.

Here we have not used the CIContext to perform an CIFilter as said earlier. It helps us to make it easier.

Lets change the above code to include the CIContex:

CIImage *beginImage =
[CIImage imageWithContentsOfURL:fileNameAndPath];
 
// 1
CIContext *context = [CIContext contextWithOptions:nil];
 
CIFilter *filter = [CIFilter filterWithName:@"CISepiaTone"
keysAndValues: kCIInputImageKey, beginImage,
@"inputIntensity", @0.8, nil];
CIImage *outputImage = [filter outputImage];
 
// 2
CGImageRef cgimg =
[context createCGImage:outputImage fromRect:[outputImage extent]];
 
// 3
UIImage *newImage = [UIImage imageWithCGImage:cgimg];
self.imageView.image = newImage;
 
// 4
CGImageRelease(cgimg);

Let’s see what happened here:

Here we set up the CIContext object. The CIContext takes an NSDictionary that specifies options including the color format and whether the context should run on the CPU/GPU. Here the default values are fine and so you passed as nil for that argument.

Here we used an method on the context object to draw a CGImage. Calling this method createCGImage:fromRect: on the context with the supplied CIImage will give us an output as CGImageRef.

Next, we converted the CGImage to UIImage using “imageWithCGImage”.

At last we release the CGImageRef as CGImage. CGImage is a C API which need to free memory even it runs with ARC.

Note: To know about all available filters write the following code and call the method in viewDidLoad / onLaunch. The filters are written on the console log.

-(void)logAllFilters {
NSArray *properties = [CIFilter filterNamesInCategory:
kCICategoryBuiltIn];
NSLog(@"%@", properties);
for (NSString *filterName in properties) {
CIFilter *fltr = [CIFilter filterWithName:filterName];
NSLog(@"%@", [fltr attributes]);
}
}

Like this blog? I’d love to hear about your thoughts on this. Thanks for sharing your comments.