An Introduction Of PHP Frameworks Guides For Developers

A framework is a structure that developers choose to build their application. It determines the structure of the application and facilitates it to connect with many different API’s. A proficient PHP framework enables developers to develop PHP application faster, efficiently and assist in building stable applications thereby reducing the amount of repetitive coding for PHP programmers.

Frameworks provide scaffolding features that facilitates the development team to build faster and cleaner application. They often provide tool sets for both the UI components and the database access.

Note: It is advisable to use the latest stable version of a framework.

Never miss an update from us. Join 10,000+ marketers and leaders.

Here are few aspects of a proficient PHP framework:
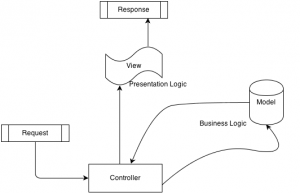
MVC Architecture:

  • The framework should make use of Model View Controller (MVC) architecture. Some of the best frameworks also provide libraries, plug-ins, helpers, and extensions to assist developers. It would be smart and efficient to employ a framework that has at least two of these options.

Database Support:

  • It is one of the most crucial aspects of every PHP development framework. You need decide your framework depending on the database you are going to use for your web application.

For Example:  ‘CodeIgniter’ supports MySQL, Oracle, and SQLite, whereas the ‘Kohana’ framework doesn’t.

Community & Documentation:

  • The framework should be supported by a strong community, not just in terms of size but also in terms of activity and usefulness. Even if it’s a small community, you should be able to get ample support from the community.

A PHP framework should also have good documentation. It should be comprehensive and up-to-date.

Below, I have provided a list of some popular and commonly used PHP frameworks.

CakePHP 2.x:

  • CakePHP is a rapid development framework for PHP. It’s a foundational structure for programmers to create web applications. CakePHP has an active developer team and community, bringing great value to the project. It is also the most preferred development framework.

        Source:http://book.cakephp.org/2.0/en/index.html

Symfony 2.x:

  • Speed up the creation and maintenance of your PHP web applications. Replace the repetitive coding tasks by power, control and pleasure.

        Source: http://symfony.com/

CodeIgniter 2.x:

  • CodeIgniter is a powerful PHP framework with a very small footprint, built for PHP coders who need a simple and elegant toolkit to create full-featured web applications.

         Source: http://ellislab.com/codeigniter

Zend Framework 2:

  • It is an open source framework for developing web applications and services using PHP 5.3+. Zend Framework 2 uses 100% object-oriented code and utilizes most of the new features of PHP 5.3, namely namespaces, late static binding, lambda functions and closures.
  • Zend Framework 2 evolved from Zend Framework 1, a successful PHP framework with over 15 million.

        Source: http://framework.zend.com

Yii Framework 1.1.x:

  • Yii comes with rich features: MVC, DAO/ActiveRecord, I18N/L10N, caching, authentication and role-based access control, scaffolding, testing, etc. It will reduce your development time significantly.

        Source: http://www.yiiframework.com

Kohana 3.x:

  • An elegant HMVC (Hierarchical model–view–controller) PHP5 framework that provides a rich set of components for building web applications.

        Source: http://kohanaframework.org/

FuelPHP:

  • It is a simple, flexible, community driven PHP 5.3+ framework, based on the best ideas of other frameworks.

        Source: http://fuelphp.com/

There are a number of PHP development frameworks in the market which enables the development team to do more with the programming language. Development frameworks makes coding for PHP more manageable and programmers can take its advantage by making use of a convenient development framework.

SSL Authentication Using Security Component In CakePHP

We can achieve SSL authentication in CakePHP by writing own methods like ‘forceSSL’ and ‘unforceSSL’. Also there is an in-built Security Component in CakePHP to achieve SSL authentication.

  • Using Security Component we can integrate tighter security in our application.
  • Like all components it needs configurations through several parameters.
  • We can get CSRF and form tampering protection using Security Component.
  • CsrfExpires controls the form submission.

Example:

All SSL URLs will redirect to a sub-domain ‘https://app.andolacrm.com/’ and the non SSL URL will redirect to a sub-domain ‘http://www.andolacrm.com’

How To Use Security Component

  • Include the security component in you AppControler.php
  •  Like as below

[sourcecode]class AppController extends Controller {
public $components =array( ‘Acl’,’Session’,’Email’,’Security’,’Cookie’ );

}[/sourcecode]

  • There are 3 configurable variable for which you need to set the values as per the requirement of your application in the beforeFilter functions of AppController.php
  • validatePost:

This variable basically used to validate your post data. Set false if you want skip validating you post data or in case data coming from 3rd party Services. Default its true.

  • csrfCheck :

CSRF(Cross-Site_Request_Forgery)  Used for form protection   . Set to false to skip CSRF protections.

  • CsrfUseOnce :

This is used for CSRF token.If it is set as false then it will user one csrf token through out the application else it will generate new token for each form submissions.

Sample Code :

[sourcecode]function beforeFilter() {
// Codes added for SSL security
$this->Security->validatePost=false;
$this->Security->csrfCheck=false;
$this->Security->csrfUseOnce=false;
}[/sourcecode]

  • In the ‘AppController.php’ you need to define the list of URLs that doesn’t need to be checked for SSL

[sourcecode]$sslnotallowed_url=array(‘beta_user’,’terms’,’privacy’,’security’,’display’,’faq’);[/sourcecode]

  • Code to be written in your ‘beforeFilter()’ of ‘AppController.php’

[sourcecode]function beforeFilter() {
// Codes added for SSL security
$this->Security->validatePost=false;
$this->Security->csrfCheck=false;
$this->Security->csrfUseOnce=false;
$sslnotallowed_url  = array(‘beta_user’,’terms’,’privacy’,’security’);
$this->Security->blackHoleCallback = ‘forceSSL’;
if(!in_array($this->params[‘action’],$sslnotallowed_url)){
$this->Security->requireSecure(‘*’);
}
}[/sourcecode]

ForceSSL Method

[sourcecode]function forceSSL() {
$this->redirect(‘https://app.andolacrm.com’ . $this->here);
}[/sourcecode]

NOTE: Security Component can only be used for the forms create using FormHelper.

Conclusion:

Using the steps as described above would facilitate you to successfully implement the SSL in CakePHP. But you need to be more careful while using security component for your application. It may cause ‘blackhole’ error if there is any kind of security hole in your application. However, you could avoid such errors by setting above described variable to ‘false’.

How To Integrate PayPal In PHP

To accept online payments through your website you would need a payment gateway. There are numerous payment gateways that can be implemented to your website; however you will need to choose the best for your PHP application. “PayPal” is one of the most renowned payment platforms that offers the best in class services as well as secure payment transaction. One of the best features of PayPal is that it facilitates developers to check-out the integration on merchant sites.

From a developer’s point of view, PayPal API is a simple, user friendly and versatile which facilitates them to avoid the PCI burden of having credit card details to be passed through their servers. PayPal is also the most secure platform that takes care of all the money transactions for the users.

Integrating PayPal in Your Website

The first thing we need is a Sandbox Credential and API Credentials. This can be availed using the following steps:

  • Create a Business account in “https://developer.paypal.com/” in order to access the Sandbox account.
  • Log into your business account; move to the ‘Application Tab’ and create a Sandbox test account for developers to check-out the PayPal integration.
  • For PayPal payment pro services, you can use this Sandbox Credentials for logging into “https://www.sandbox.paypal.com/”
  • If you want to login to your sandbox account you have to first log into your developer account.

Steps to Implement ‘the work’ in Your Site

  • In PayPal payment pro ‘the work’ is done through API call.
  • In your code you will have to implement a function i.e. ‘PPHttpPost(methodname,str);’
  • ‘methodname’ specifies the name of the API you want to call i.e. ‘CreateRecurringPaymentsProfile’, ‘GetTransactionDetails’ etc.

There are numerous other methods for the integration which can be availed form the PayPal developer site:  https://developer.paypal.com/webapps/developer/docs/classic/api/

Under ‘Merchant’ API you would find a list of functions that can be performed by PayPal website pro.
Clicking on NVP link of each function you can view the methods and the required parameters for that method.

Second Parameter in the string; which is passed to the API, is for getting the response. It includes all the parameters that have to be passed e.g.

[sourcecode]$str = "&TOKEN = $token&AMT = $paymentAmount&CURRENCYCODE = $currencyID&PROFILESTARTDATE =
$startDate";[/sourcecode]


[sourcecode]$nvpStr  .= "&BILLINGPERIOD = $billingPeriod&BILLINGFREQUENCY = $billingFreq&CREDITCARDTYPE = $CREDITCARDTYPE&ACCT = $ACCT&EXPDATE = $EXPDATE&CVV2 = $CVV2&EMAIL = $EMAIL&STREET = $STREET&CITY = $CITY&STATE = $STATE&COUNTRYCODE = $COUNTRYCODE&ZIP = $ZIP&FIRSTNAME = $FIRSTNAME&LASTNAME = $LASTNAME&DESC = $DESC&FAILEDINITAMTACTION = $FAILEDINITAMTACTION&INITAMT = $INITAMT";[/sourcecode]

Note: This string might differ for different methods but the structure is similar.

  • This function returns an array having one key as ACK.
  • The value of this key specifies the FAILURE and SUCCESS of the function.

If ACK is a failure then the returned array contains following error message.

[sourcecode]function PPHttpPost($methodName, $nvpStr_) {

$APIUserName = urlencode(‘API USERNAME’);

$APIPassword = urlencode(‘API PASSWORD’);

$APISignature = urlencode(‘API SIGNATURE’);

$APIEndpoint = "https://api-3t.sandbox.paypal.com/nvp"; //sandbox url.

$version = urlencode(‘51.0’);

//setting the curl parameters.

$choice = curl_init();

curl_setopt($choice, CURLOPT_URL, $APIEndpoint);

curl_setopt($choice, CURLOPT_VERBOSE, 1);

//turning off the server and peer verification(TrustManager Concept).

curl_setopt($choice, CURLOPT_SSL_VERIFYPEER, FALSE);

curl_setopt($choice, CURLOPT_SSL_VERIFYHOST, FALSE);

curl_setopt($choice, CURLOPT_RETURNTRANSFER, 1);

curl_setopt($choice, CURLOPT_POST, 1);

//NVPRequest for submitting to server

$nvprequest = "METHOD=$methodName&VERSION=$version&PWD=$APIPassword&USER=$APIUserName&SIGNATURE=$APISignature";

// setting the nvprequest as POST FIELD to curl

curl_setopt($choice, CURLOPT_POSTFIELDS, $nvprequest);

//getting response from server

$httpResponse = curl_exec($choice);

if(!$httpResponse) {

exit("$methodName failed: ".curl_error($choice).'(‘.curl_errno($choice).’)’);

}

// Here Extract the RefundTransaction response details

$httpResponseArr = explode("&", $httpResponse);

$httpParsedResponseArr = array();

foreach ($httpResponseArr as $i => $value) {

$tmpAr = explode("=", $value);

if(sizeof($tmpAr) > 1) {

$httpParsedResponseArr[$tmpAr[0]] = $tmpAr[1];
}
}

if((0 == sizeof($httpParsedResponseArr)) || !array_key_exists(‘ACK’, $httpParsedResponseArr)) {
exit("Invalid HTTP Response for POST request($nvprequest) to $APIEndpoint.");
}
return $httpParsedResponseArr;
}[/sourcecode]

Setting of IPN URL

IPN stands- Instant Payment Notification

Under the Profile tab of the sandbox site there is an ‘Instant Payment Notification preference’ link. Set the IPN URL from the link.

Conclusion:

This notification is sent from server to server when any transaction is done in PayPal. To capture this transaction we can set URL in Instant Payment Notification preferences page and manage those transaction information.

Why Implement Fat Model And Skinny Controller in CakePHP

Fat Model and Skinny Controller in CakePHP framework encourages developers to include as much business logic into the application models and the controllers should translate the requests, instantiating classes, getting data from the domain objects and passing it to the view.

  • This development methodology is not new but rarely adopted among the developers. Developers should focus on creating model behaviors rather than creating controller components.
  • It is a simple and powerful concept to implement is offers numerous convenient features to the developers.
  • Controller is responsible for handling & executing the actions routed through the router, it should be lightweight and agile in nature.
  • It is not about counting the lines in controller, rather putting codes in the right place.

Why Fat Model and Skinny Controller:

After developing for a while, when you look back at your code you’ll realize how hard it is to keep track of all these things. When you have a Fat Controller, it can get pretty messy even with a proper formatting.
Put as much of your code that deals with data manipulation in your Model and it solve the problem.

  • When we need some actions repeatedly in different controller, we can have them in Model.
  • We can reduce the use of requestAction() in CakePHP sites with fat models.
  • It’s easier to find out what went wrong when your methods are smaller and specific. Because, model methods are more specific than controller methods.

How To use?

Code-you should put in Controllers

  1. Usually the only functions you should have in controllers are the view functions.
  2. “before” functions, Index, Login, Signup, Add, Edit, View, Delete.

Everything else can go to your model.

Code-you should put in Models

  1. You should put the code and functions in your model that relates to Model and its data.
  2. Formatting, Retrieving, Searching, Pagination are few examples.
  3. Keep all your business logic in the models (try to write generalized methods whenever possible). Call your generalized methods from controller by passing the required parameters.
  4. Using this you will end up writing self-documented code.
  5. It is absolutely fine if your view contains some PHP code which deals with the presentation logic.
  6. You can use the Model’s callback methods like: beforeFind, afterFind, beforeValidate, beforeSave, afterSave, beforeDelete, afterDelete, onError

Skinny_Controller_logic

Example with Sample Code

Below is the example of a listing page using CakePHP paginate, search, sorting with the concept of Fat Model and Skinny Controller.

Let’s get the User list,

  • In your Controller’s Action

[sourcecode]$limit = 10;
$this->paginate = $this->User->_Pagination($limit,$_GET[‘search’]);

//To write your business logic, lets call another Model method
$listdata = $this->User->formatListing($this->paginate(‘User’));

$this->set(‘listdata’, $listdata);[/sourcecode]

  • In Your corresponding Model

[sourcecode]public function _Pagination($limit = 30,$search){
$conditions = array(‘User.is_active’=>1);
if(isset($search) && trim($search)) {
$search = urldecode(trim($search));
$conditions[‘User.name LIKE’] = ‘%’.$search.’%’;
}
$params = array(
‘conditions’ => $conditions,
‘fields’ => array(‘id’,’name’,’email’,’created’),
‘limit’ => $limit,
‘order’ => array(‘User.name’=>’asc’,’User.created’ => ‘desc’),

);

return $params;
}
public function formatListing($userList){
$listdata = array();
foreach($userList as $ukey=>$data) {
$listdata[$ukey][‘id’] = $data[‘User’][‘id’];
$listdata[$ukey][’email’] = $data[‘User’][’email’];
$listdata[$ukey][‘name’] = $data[‘User’][‘name’];
$listdata[$ukey][‘created’] = date(‘M d, Y’,strtotime($data[‘User’][‘created’]));
}
return $listdata;

}[/sourcecode]

Why FAT Model and why not Components?

  • Components should have the logic that can be shared across multiple controllers.
  • Logic should be placed inside the Components to get the data for the view. If the logic includes manipulating of the data, then it should be in a model.

Note these Check points while implementing above steps:

  • When you need to call controller methods inside a model then you are obviously doing something wrong and need to re-examine your code.
  • CakePHP will create an automatic model (instance of AppModel) when there is a table but no model file. When you create a model with wrong model file name, still CakePHP will access auto-model. Hence, it results in different behaviors and all your validations and custom functions will not work.

Too much eating may cause gaining weight, once you’re overweight; it’s too hard to lose that extra weight.
If you don’t want to end up with overweight controllers which eventually will require surgical intervention, just follow the basics and that’s Fat Model and Skinny Controller

CakePHP_fat_models


Suggest me if I am somewhere wrong. Any suggestions are welcome.

Beginner’s Guide to Cropping Images in PHP Using ImageMagick

While using images in a web application, developers can’t always include images of a particular measurement. In such cases, resizing the images for the application would be a good option but, not efficient either. For example, resizing a long vertical image into a horizontal dimension would just squeeze the image; thereby, affecting the aesthetics of the website and also reducing the purpose of it. Hence it would be smart to implement a cropping tool like ‘ImageMagick’ in order to fit images of various dimensions into a specified size.

ImageMagick is a collection of robust and convenient tools for manipulating images. It can be used to crop images of numerous formats such as JPEG, PNG, GIF, TIFF, PhotoCD and many more. ImageMagick facilitates creation of dynamic images that are fitting to the specific requirements of web applications.

Difference Between Cropping in GD Library and ImageMagic:

GD is the most commonly used extension for PHP. It is popular because it is easier to install and configure (`yum install php-gd` on Fedora, CentOS etc or `sudo apt-get php5-gd` on ubuntu). However, it has some limitations such as:

  • It is comparatively slower
  • It is more memory intensive
  • For certain aspects it can be more complex to use.

Below I have mentioned a sample code for image cropping using GD:

[sourcecode]<?php
function resize_my_image($file, $w, $h, $crop=FALSE) {
list($width, $height) = getimagesize($file);
$r = $width / $height;
if ($crop) {
if ($width > $height) {
$width = ceil($width-($width*($r-$w/$h)));
} else {
$height = ceil($height-($height*($r-$w/$h)));
}
$newGDwidth = $w;
$newGDheight = $h;
} else {
if ($w/$h > $r) {
$newGDwidth = $h*$r;
$newGDheight = $h;
} else {
$newGDheight = $w/$r;
$newGDwidth = $w;
}
}
$src = imagecreatefromjpeg($file);
$dst = imagecreatetruecolor($newGDwidth, $newGDheight);
imagecopyresampled($dst, $src, 0, 0, 0, 0, $newGDwidth, $newGDheight, $width, $height);

return $dst;
}

$img = resize_my_image(‘/path/to/some/image.jpg’, 150, 150);
?>[/sourcecode]

You can either output it to the browser or save it to a file using the ‘imagejpeg’ function.

Imagick:

Imagick is a less frequently used PECL extension. ImageMagick is a free tool that is used for creating and manipulating images that supports over 100 different image formats. This can be used on a command line tool for any programming language. The Imagick extension essentially provides an API for all of the functionalities available in the `convert` command line tool.

Some of its advantages are:

  • It is faster
  • It uses less memory
  • Offers more powerful functionality
  • Imagick’ is lot easier to use (once you figure out how), your code may end up smaller and cleaner.

The down side of using this extension is that the documentation is extremely limited and there are almost no examples available on the web. Installation on the other hand can be a painful task as well.

Although it should just be a matter of running the command `pecl install imagick`.

Sample code:

Cropping larger images:

Put a big picture named andolasoft_logo.jpg along side with your php page, run the test and check the directory to see andolasoft_logo_thumb.jpg.

Requirement:

imagemagick with imagick extension

[sourcecode]<?php
$obj = new imagick(‘andolasoft_logo.jpg’);
//resize the above image
$obj->thumbnailImage(160, 0);
//write the thumb
$obj->writeImage(‘andolasoft_logo_thumb.jpg’);
?>[/sourcecode]

To Crop Animated Image:

[sourcecode]<?php
$image = new imagick(“andolasoft_animated_logo.gif”);
$image = $image->coalesceImages(); // the trick! To crop animated image
foreach ($image as $frame) {
$frame->cropImage($width, $height, $x, $y);
$frame->setImagePage(0, 0, 0, 0); // Remove gif canvas
}
?>[/sourcecode]

$x → The X coordinate of the cropped region’s top left corner
$y → The Y coordinate of the cropped region’s top left corner

Implementing ‘ImageMagick’ would make the website look clean and flawless. Images on the other hand retain its look and feel, thereby making the application look professional and optimized.

Find anything amiss here, then share it with us.