How To Setup CakePHP DataSource For Solr?

Imagine that you have millions of data and your SQL database is not optimized enough to handle them, then “Solr” is your best data source. Apache Solr is a fast search platform. It’s major features include full-text search faceted search, dynamic clustering, database integration, rich document handling. Solr is highly scalable and it is the most popular enterprise search engine.

This document will guide you through DataSource setup for Solr in CakePHP. Set-up the Solr DataSource in CakePHP and query Solr with your CakePHP model “find” function, just similar to querying any other SQL database.

/app/Config/database.php:

Configuring your the DataSource for Solr database connection:

  • host: Solr server address.
  • port: Solr server port.
  • datasource: This should match with your DataSource at /app/Model/Datasource/SolrSource.php

[php]class DATABASE_CONFIG {
public $solr = array(
‘datasource’ => ‘SolrSource’,
‘host’ => ‘192.168.2.131’,
‘port’ => ‘9983’,
‘path’ => ‘/solr/’
);
}[/php]

/app/Model/Solr.php:

Use the database config in your models like:

[php]class Solr extends AppModel {
 public $useTable = false;
 public $useDbConfig = ‘solr’;
 }[/php]

/app/Model/Datasource/SolrSource.php:

Below code describes only the most required functions.

  • You can find other required functions at http://book.cakephp.org/2.0/en/models/datasources.html
    Like: calculate($model, $func, $params) and others create(), update(), delete().
  • Below DataSource only implements read() function.
  • Create a file called SolrSource.php and use below code:

[php]App::uses(‘HttpSocket’, ‘Network/Http’);
require_once($_SERVER[‘DOCUMENT_ROOT’].’/root_folder/app/Vendor/Apache/Solr/Service.php’);
class SolrSource extends DataSource {

protected $_schema = array();
protected $_host;
protected $_port;

public function __construct($config){
parent::__construct($config);
$this->Http = new HttpSocket();

$this->host = $config[‘host’];
$this->port = $config[‘port’];
$this->_schema = $config[‘path’];

$this->solr=new Apache_Solr_Service($this->host, $this->port, $this->_schema);
}

public function read(Model $model, $queryData = array(), $recursive = null) {
$results = array();
$query = $queryData[‘conditions’][‘solr_query’];
if (Configure::read(‘log_solr_queries’) === true) {
CakeLog::write(‘debug’, $query); /* Logs the solr query in app/tmp/logs/debug.log file */
}

try {
$solr_docs = $this->solr->search($query, $queryData[‘offset’], $queryData[‘limit’], array(‘sort’ => $queryData[‘order’]));
} catch (Exception $e) {
CakeLog::write(‘error’, $e->getMessage()); /* Logs the solr errors message in app/tmp/logs/error.log file */
CakeLog::write(‘error’, $query); /* Logs the solr query in app/tmp/logs/error.log file */
}
$model->params = $solr_docs->responseHeader->params;
$model->numFound = $solr_docs->response->numFound;
$docs = $solr_docs->response->docs;
foreach ($docs as $doc) {
$document = array();
foreach ($doc as $fieldName => $fieldValue) {
$document[$fieldName] = $fieldValue;
}
$results[] = $document;
}
return array($model->alias => $results);
}
}[/php]

/app/Controller/UsersController.php:

Getting data from Solr server by using above SolrSource.

[php]App::uses(‘AppController’, ‘Controller’);
class UsersController extends AppController {

public $name = ‘Users’; //Controller name
public $uses = array(‘Solr’); //Model name

function beforeFilter(){
parent::beforeFilter();
$this->Auth->allow(‘index’);
}

public function index(){
$cond = "active:1";
$sort = "timestamp desc";

$params = array(
‘conditions’ =>array(
‘solr_query’ => $cond
),
‘order’ => $sort,
‘offset’ => 0,
‘limit’ => 1
);

$result = $this->Solr->find(‘all’, $params);
$this->layout = ‘ajax’;
header(‘Content-Type: application/json; charset=utf-8’); /* To send response in json format */
echo json_encode($result);
die;
}
}[/php]

See Also : How to use ‘neighbors’ with ‘find’ method

Debugging:

The above code has been tested and validated with CakePHP 2.2.3, PHP 5.3.1 .
Incase you face any problems:

  • First check the DataSource configuration in /app/Config/database.php.
  • Check /app/Model/Solr.php for this line: public $useDbConfig = ‘solr’;
  • Make sure Solr Service Vendor loaded in /app/Model/Datasource/SolrSource.php.
  • Check the path is correct for the Solr vendor.

Hope you liked this. Let me know if you want to add anything?

Containable Behavior in CakePHP

When we are going to retrieve records of (user) using User model, we can get the associated model’s record at the same time. That might not require at some point. To avoid this, CakePHP provides the bindModel/unbindModel methods. But this is not be a good practice. You can streamline your operation using the containable behavior. The performance and the speed will increased as well. It will mostly reduce the joining of tables.

Usage & Examples:

class User extends AppModel {
     public $actsAs = array('Containable');
   }

Where “User” is the model for which you are adding the containable behavior.

You can also do the following on the fly:

$this->User->Behaviors->load(‘Containable’);

Operations:

Without the use of Containable

$this->User->find('all');
  Here User model has hasMany relation with the Comment.
  [0] => Array
        (
            [User] => Array
                (
                    [id] => 1
                    [title] => First article1
                    [content] => aaa1
                    [created] => 2008-05-17 00:00:00
                )
            [Comment] => Array
                ( [0] => Array
          (
            [id] => 1
            [User_id] => 1
            [author] => Daniel1
            [email] => dan@example.com1
            [website] => http://example.com1
            [comment] => First comment1
            [created] => 2008-05-17 00:00:00
          )
        [1] => Array
          (
            [id] => 2
            [User_id] => 1
            [author] => Sam1
            [email] => sam@example.net1
            [website] => http://example.net1
            [comment] => Second comment1
            [created] => 2008-05-10 00:00:00
          )
      )
  )
  [1] => Array
  (
    [User] => Array
      (...

Using Containable:

Case 1: If we need only User data.

$this->User->contain();
      $this->User->find('all');
  OR
  $this->User->find('all', array('contain' => false));
  Out Put:
  [0] => Array
        (
            [User] => Array
                (
                    [id] => 1
                    [title] => First article1
                    [content] => aaa1
                    [created] => 2008-05-17 00:00:00
                )
        )
       [1] => Array
        (
            [User] => Array
                (
                    [id] => 2
                    [title] => Second article1
                    [content] => bbb1
                    [created] => 2008-05-10 00:00:00
                )
        )
  Case 2: With complex associations
       $this->User->contain('Comment.author');
           $this->User->find('all');
 
           // or..
 
           $this->User->find('all', array('contain' => 'Comment.author'));
  Out put:
  [0] => Array
        (
            [User] => Array
                (
                    [id] => 1
                    [title] => First article1
                    [content] => aaa1
                    [created] => 2008-05-17 00:00:00
                )
            [Comment] => Array
                (
                    [0] => Array
                        (
                            [author] => Daniel1
                            [User_id] => 1
                        )
                    [1] => Array
                        (
                            [author] => Sam1
                            [User_id] => 1
                        )
                )
        )
 
   $this->User->find('all', array('contain' => 'Comment.author = "Daniel1"'));
 
    Out put:
  [0] => Array
        (
            [User] => Array
                (
                    [id] => 1
                    [title] => First article1
                    [content] => aaa1
                    [created] => 2008-05-17 00:00:00
                )
            [Comment] => Array
                (
                    [0] => Array
                        (
                            [id] => 1
                            [post_id] => 1
                            [author] => Daniel1
                            [email] => dan@example.com1
                            [website] => http://example.com1
                            [comment] => First comment1
                            [created] => 2008-05-11 00:00:00
                        )
                )
        )
  [1] => Array
        (
            [User] => Array
                (
                    [id] => 2
                    [title] => Second article2
                    [content] => bbb2
                    [created] => 2008-05-22 00:00:00
                )
            [Comment] => Array
                (
                )
        )

The gray area showing that the User data always returned irrespective of the “Comment”.

Pagination Using Containable:

Including the ‘contain’ parameter in the $paginate property we can achieve find(‘count’)
and find(‘all’) on the model. This is a most valuable feature of CakePHP.

$this->paginate['User'] = array(
    'contain' => array('Comment', 'Tag'),
    'order' => 'User.name'
  );
  $users = $this->paginate('User');

If you are searching for PHP or CakePHP developers, then we are the ideal and cost savvy option for you.

Like this blog? I’d love to hear about your thoughts on this. Thanks for sharing your comments.

The 10th Best CakePHP Web-App Development Company in The World

Today, we are thrilled to announce that Andolasoft is named at #10 in the Top 10 CakePHP Development Companies by bestwebdesignagencies.com.

We pledge this success to our customers for their continuous support which has brought us such laurels. We are pleased that our team of expert CakePHP developers, project management, and testing have done their job to perfection yet again.

Our Comprehensive Range of CakePHP Development Services

  • Custom PHP Web Development
  • PHP-Based CMS Development
  • PHP-Based eCommerce Development
  • PHP Migration Services
  • PHP Web-App Maintenance Services
  • PHP API & Plugin Development
  • PHP-Based Web Product Development

Key Solutions We Provide to Mitigate Customer Challenges

  • We offer full-stack CakePHP developers who create a seamless integration of front-end and back-end services to deliver a consistent user experience
  • Our expert team of developers provide high-level of customization both in terms of user-experience, user-interface and app-functionalities.
  • We employ the highest level of security measures to ensure our client’s and end-users’ data remain secure.
  • We follow an agile development process to craft PHP solutions in an iterative and incremental process.
  • Our team members are well-versed in using light-weight plugins to optimize web-performance.
  • Customers can collaborate with our team members and project managers on Orangescrum project collaboration tools.
  • We offer the quickest turnaround customer support during all stages of product development.

Why Brand Around the World Choose Andolasoft for CakePHP Web-App Development

Client-Friendly Approach

Our development team and project managers are approachable and easy-to-talk-to. They keep the atmosphere light and friendly when communicating with clients on project requirements.

Latest Tools and Technologies

Our team always keeps themselves updated with the latest tools and technologies giving our customers the winning-edge by crafting a solution that is more updated, secure and optimized.

Agile Development Model

We follow Agile methodology to develop solutions in an interactive and incremental manner which enables our team members to keep publishing various modules of the product faster.

Never miss an update from us. Join 10,000+ marketers and leaders.

Why parallax scrolling is in trend?

It keeps our development process open to new changes and modifications.

Comfortable to work in your Time zone

We have dedicated developers who can work on your time zone and develop solutions exclusively for our clients.

Maintenance & QA

Out QA cover 100% of the modules, features and functionalities developed to ensure the credibility of the product developed. We leave no stone unturned and ensure that the product developed meets your business and functional requirements.

Quickest Turnaround Customer Support

Andolasoft has the quickest turnaround customer support. We reach out to our customers faster to resolve their queries and issues during all stages of our partnership.

No Hidden Cost

We charge only for the services we offer as defined while signing the NDA. We don’t surprise you with any hidden cost after delivery of your project.

Flexible Hiring Models

Our customers have the option to work with us by hiring our team of developers and designers on a per-hour basis or hire dedicated developers who will work exclusively on customer projects in their time zone.

Track Your Projects Through PM Tool

You can track the progress of your projects using Orangescrum PM tool.

Are you looking for a CakePHP developer

Contact Us

We keep our customers in the loop and keep updating them at every step of the development lifecycle.

What Factors Helped Us:

      • The development of CakePHP web-apps based on MVC architecture
      • Re-usability of code to develop robust apps in less time
      • Rapid web-app development with Agile methodology
      • Search engine friendly CakePHP apps
      • Secure apps with a logical separation of data, business logic, and design
      • Strong security measures to keep application data secured
      • Social Media, Payment gateway and other API integration to our web-apps
      • Best Practices Followed
      • On-time delivery
      • Faster Communication
      • Quick turnaround Support

Conclusion

The bestwebdesignagencies.com is an autonomous body that identifies and lists out the best design and development companies in the world. The purpose is to help customers to find the right ones in the industry. They adopt a stringent evaluation process to determine the quality of work delivered by each company to their customers’ satisfaction.

Why Implement Fat Model And Skinny Controller in CakePHP

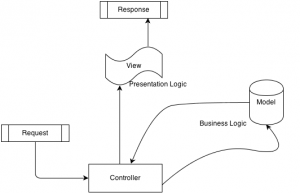
Fat Model and Skinny Controller in CakePHP framework encourages developers to include as much business logic into the application models and the controllers should translate the requests, instantiating classes, getting data from the domain objects and passing it to the view.

  • This development methodology is not new but rarely adopted among the developers. Developers should focus on creating model behaviors rather than creating controller components.
  • It is a simple and powerful concept to implement is offers numerous convenient features to the developers.
  • Controller is responsible for handling & executing the actions routed through the router, it should be lightweight and agile in nature.
  • It is not about counting the lines in controller, rather putting codes in the right place.

Why Fat Model and Skinny Controller:

After developing for a while, when you look back at your code you’ll realize how hard it is to keep track of all these things. When you have a Fat Controller, it can get pretty messy even with a proper formatting.
Put as much of your code that deals with data manipulation in your Model and it solve the problem.

  • When we need some actions repeatedly in different controller, we can have them in Model.
  • We can reduce the use of requestAction() in CakePHP sites with fat models.
  • It’s easier to find out what went wrong when your methods are smaller and specific. Because, model methods are more specific than controller methods.

How To use?

Code-you should put in Controllers

  1. Usually the only functions you should have in controllers are the view functions.
  2. “before” functions, Index, Login, Signup, Add, Edit, View, Delete.

Everything else can go to your model.

Code-you should put in Models

  1. You should put the code and functions in your model that relates to Model and its data.
  2. Formatting, Retrieving, Searching, Pagination are few examples.
  3. Keep all your business logic in the models (try to write generalized methods whenever possible). Call your generalized methods from controller by passing the required parameters.
  4. Using this you will end up writing self-documented code.
  5. It is absolutely fine if your view contains some PHP code which deals with the presentation logic.
  6. You can use the Model’s callback methods like: beforeFind, afterFind, beforeValidate, beforeSave, afterSave, beforeDelete, afterDelete, onError

Skinny_Controller_logic

Example with Sample Code

Below is the example of a listing page using CakePHP paginate, search, sorting with the concept of Fat Model and Skinny Controller.

Let’s get the User list,

  • In your Controller’s Action

[sourcecode]$limit = 10;
$this->paginate = $this->User->_Pagination($limit,$_GET[‘search’]);

//To write your business logic, lets call another Model method
$listdata = $this->User->formatListing($this->paginate(‘User’));

$this->set(‘listdata’, $listdata);[/sourcecode]

  • In Your corresponding Model

[sourcecode]public function _Pagination($limit = 30,$search){
$conditions = array(‘User.is_active’=>1);
if(isset($search) && trim($search)) {
$search = urldecode(trim($search));
$conditions[‘User.name LIKE’] = ‘%’.$search.’%’;
}
$params = array(
‘conditions’ => $conditions,
‘fields’ => array(‘id’,’name’,’email’,’created’),
‘limit’ => $limit,
‘order’ => array(‘User.name’=>’asc’,’User.created’ => ‘desc’),

);

return $params;
}
public function formatListing($userList){
$listdata = array();
foreach($userList as $ukey=>$data) {
$listdata[$ukey][‘id’] = $data[‘User’][‘id’];
$listdata[$ukey][’email’] = $data[‘User’][’email’];
$listdata[$ukey][‘name’] = $data[‘User’][‘name’];
$listdata[$ukey][‘created’] = date(‘M d, Y’,strtotime($data[‘User’][‘created’]));
}
return $listdata;

}[/sourcecode]

Why FAT Model and why not Components?

  • Components should have the logic that can be shared across multiple controllers.
  • Logic should be placed inside the Components to get the data for the view. If the logic includes manipulating of the data, then it should be in a model.

Note these Check points while implementing above steps:

  • When you need to call controller methods inside a model then you are obviously doing something wrong and need to re-examine your code.
  • CakePHP will create an automatic model (instance of AppModel) when there is a table but no model file. When you create a model with wrong model file name, still CakePHP will access auto-model. Hence, it results in different behaviors and all your validations and custom functions will not work.

Too much eating may cause gaining weight, once you’re overweight; it’s too hard to lose that extra weight.
If you don’t want to end up with overweight controllers which eventually will require surgical intervention, just follow the basics and that’s Fat Model and Skinny Controller

CakePHP_fat_models


Suggest me if I am somewhere wrong. Any suggestions are welcome.

Beginner’s Guide to Cropping Images in PHP Using ImageMagick

While using images in a web application, developers can’t always include images of a particular measurement. In such cases, resizing the images for the application would be a good option but, not efficient either. For example, resizing a long vertical image into a horizontal dimension would just squeeze the image; thereby, affecting the aesthetics of the website and also reducing the purpose of it. Hence it would be smart to implement a cropping tool like ‘ImageMagick’ in order to fit images of various dimensions into a specified size.

ImageMagick is a collection of robust and convenient tools for manipulating images. It can be used to crop images of numerous formats such as JPEG, PNG, GIF, TIFF, PhotoCD and many more. ImageMagick facilitates creation of dynamic images that are fitting to the specific requirements of web applications.

Difference Between Cropping in GD Library and ImageMagic:

GD is the most commonly used extension for PHP. It is popular because it is easier to install and configure (`yum install php-gd` on Fedora, CentOS etc or `sudo apt-get php5-gd` on ubuntu). However, it has some limitations such as:

  • It is comparatively slower
  • It is more memory intensive
  • For certain aspects it can be more complex to use.

Below I have mentioned a sample code for image cropping using GD:

[sourcecode]<?php
function resize_my_image($file, $w, $h, $crop=FALSE) {
list($width, $height) = getimagesize($file);
$r = $width / $height;
if ($crop) {
if ($width > $height) {
$width = ceil($width-($width*($r-$w/$h)));
} else {
$height = ceil($height-($height*($r-$w/$h)));
}
$newGDwidth = $w;
$newGDheight = $h;
} else {
if ($w/$h > $r) {
$newGDwidth = $h*$r;
$newGDheight = $h;
} else {
$newGDheight = $w/$r;
$newGDwidth = $w;
}
}
$src = imagecreatefromjpeg($file);
$dst = imagecreatetruecolor($newGDwidth, $newGDheight);
imagecopyresampled($dst, $src, 0, 0, 0, 0, $newGDwidth, $newGDheight, $width, $height);

return $dst;
}

$img = resize_my_image(‘/path/to/some/image.jpg’, 150, 150);
?>[/sourcecode]

You can either output it to the browser or save it to a file using the ‘imagejpeg’ function.

Imagick:

Imagick is a less frequently used PECL extension. ImageMagick is a free tool that is used for creating and manipulating images that supports over 100 different image formats. This can be used on a command line tool for any programming language. The Imagick extension essentially provides an API for all of the functionalities available in the `convert` command line tool.

Some of its advantages are:

  • It is faster
  • It uses less memory
  • Offers more powerful functionality
  • Imagick’ is lot easier to use (once you figure out how), your code may end up smaller and cleaner.

The down side of using this extension is that the documentation is extremely limited and there are almost no examples available on the web. Installation on the other hand can be a painful task as well.

Although it should just be a matter of running the command `pecl install imagick`.

Sample code:

Cropping larger images:

Put a big picture named andolasoft_logo.jpg along side with your php page, run the test and check the directory to see andolasoft_logo_thumb.jpg.

Requirement:

imagemagick with imagick extension

[sourcecode]<?php
$obj = new imagick(‘andolasoft_logo.jpg’);
//resize the above image
$obj->thumbnailImage(160, 0);
//write the thumb
$obj->writeImage(‘andolasoft_logo_thumb.jpg’);
?>[/sourcecode]

To Crop Animated Image:

[sourcecode]<?php
$image = new imagick(“andolasoft_animated_logo.gif”);
$image = $image->coalesceImages(); // the trick! To crop animated image
foreach ($image as $frame) {
$frame->cropImage($width, $height, $x, $y);
$frame->setImagePage(0, 0, 0, 0); // Remove gif canvas
}
?>[/sourcecode]

$x → The X coordinate of the cropped region’s top left corner
$y → The Y coordinate of the cropped region’s top left corner

Implementing ‘ImageMagick’ would make the website look clean and flawless. Images on the other hand retain its look and feel, thereby making the application look professional and optimized.

Find anything amiss here, then share it with us.

4 Simple Steps To Implement “Delayed Job” In Rails

Here in this article, I going to tell you the best way to implement “delayed job” in rails

“delayed_job” is a ruby gem used to execute tasks as a background process in Rails environment, increasing page rendering speed.

Delayed::Job (or DJ) allows you to move jobs into the background for asynchronous processing.

Why you need a background process and is it really that important!

Let’s consider a scenario where a mailing application needs to send emails to a huge list of recipients. In such cases it is obvious that the processing time is too long, annoying the users.

Here are some of key points to consider:

  • Incredibly quick & easy to get rolling
  • No addition to your “stack”, runs just fine with Active Record
  • Good choice for beginners while migrating code from foreground to the background

Hence, it’s only wise to move the long running tasks as a background process by using “delayed_job” gem.

Detailed steps to integrate delayed job in a Rails application

Step# 1

  • Add gem to the Gemfile
  • “delayed_job” supports multiple back-ends for storing the job queue
  • To use “delayed_job” with Active Record, use gem ‘delayed_job_active_record’
  • To use “delayed_job” with Mongoid, use gem ‘delayed_job_mongoid’

Example

/Gemfile.rb

  • gem ‘delayed_job_active_record’, ‘4.0.3’
  • Run “bundle install” to install the “delayed_job” gem

Step# 2

  • Generate the related file for the Job run
  • Generate related files required to run the background job by running the following command
    • rails g delayed_job:active_record

It adds following files to the application

  • A Script named “delayed_job” inside “/bin” folder to run the jobs which are in queue.
  • Migration file to create a table to store the job with other information such as priority, attempts, handler, last_error, run_at, locked_at, failed_at, locked_by, queue.

Run the migration file by using the following command

  • rails db:migrate

Set the queue_adapter in config/application.rb

  • config.active_job.queue_adapter = :delayed_job

If you are using the protected_attributes gem, it must appear before delayed_job in your gemfile. If your jobs are failing with:

  • Setup Delayed::Job config in an initializer (config/initializers/delayed_job_config.rb)
    • Delayed::Worker.destroy_failed_jobs = false
    • Delayed::Worker.sleep_delay = 60
    • Delayed::Worker.max_attempts = 3
    • Delayed::Worker.max_run_time = 5.minutes
    • Delayed::Worker.read_ahead = 10
    • Delayed::Worker.default_queue_name = ‘default’
    • Delayed::Worker.delay_jobs = !Rails.env.test?
    • Delayed::Worker.raise_signal_exceptions = :term
    • Delayed::Worker.logger = Logger.new(File.join(Rails.root, ‘log’, ‘delayed_job.log’))

Step# 3

  • Replace script/delayed_job with bin/delayed_job
  • Start up the jobs process

There are two ways to do this.

  • If application is in development mode, we would use the below rake task instead.
    • rake jobs:work
  • If application is in production mode, then it is preferred to use the “delayed_job” script. This demonizes the job process and allows multiple background processes to be spawned.

To use this, pursue the following steps

  • Add gem “daemons” to your Gemfile
  • Run bundle install
  • Make sure you’ve run rails generate delayed_job
  • If you want to just run all available jobs and exit you can use rake jobs:workoff
  • Work off queues by setting the QUEUE or QUEUES environment variable.
    • QUEUE=tracking rake jobs:work
    • QUEUES=mailers,tasks rake jobs:work

Step# 4

  • Add task to run in background
  • In Controller just call .delay.method(params) on any object and it will be processed in the background.

Example:

UsersController before adding to background job

[code language=”html”]
class UsersController < ApplicationController
def send_email
User.find_each(is_subscribed: true) do |user|
NewsMailer.newsletter_mail(user).deliver
flash[:notice] = "Mail delivered"
redirect_to root_path
end
end
end
[/code]

 
UsersController after adding to background job

[code language=”html”]
class UsersController < ApplicationController
def send_email
User.find_each(is_subscribed: true) do |user|
# add .delay method to add it to background process. In case of mail sending remove the .deliver method to make it work.
NewsMailer.delay.newsletter_mail(user)
flash[:notice] = "Mail delivered"
redirect_to root_path
end
end
end
[/code]

Advantages of implementing above steps:

  • No more waiting for a response, after clicking a link to do a big stuff.
  • Just call .delay.method(params) on any object and it processes in the background.
  • Job objects are serialized to yaml and stored in the delayed_jobs table, so they can be restored by the job runner later.
  • It automatically retries on failure. If a method throws an exception it’s caught and the method reruns later. The method retries up to 25 times at increasingly longer intervals until it passes.
  • “delayed_job” gem maintains log by creating a log file “/log/delayed_job.log”

I am sure this article will give you a clear idea about the way to implement “delayed job” in rails. You can share your thoughts with comments if I have missed anything or if you want to know more.

Do you work on or use Ruby on Rails? Let’s Discuss!