How To Generate Barcode Using Barby Gem In Rails 2.3.8

A barcode is a series of vertical black lines with white spaces in between. This series of lines and spaces can be read by a device that can decode them. This would be a barcode reader.

In Ruby on Rails there is a gem called “barby” which generates the barcode with various format.

Here is an example to create barcode using barby & Rails 2.3.8.

Step#1

Include the barby gems in your config/environment.rb file

config.gem'barby'
config.gem 'barby-chunky_png'
config.gem 'png''RubyInline'

Install the gems by running the commandrake gems:install. Restart the Rails server.

You might face problem to start the server after the gems installed.Comment out the gems “png” & “RubyInline” in the “config/environment.rb” to get the server started.

Step#2

Create a folder named “Barcodes” to store the barcode images in your “Public” folder.

Step#3

Add the below lines of code in your controller

require'barby'
'barby/outputter/png_outputter'

Step#4

The following method will generate the barcode images and store in the “/public/Barcodes” path. Place this method inside the controller.

The “symbology” is the format in which the barcode will be generated. Default is “Code128B”, If you want to generate in different format you can set the “symbology” according to it.

def generate_barcodes(data) # check to see if we don't already have this barcode image uri = CGI.escape(symbology) + '_' + CGI.escape(data) + '.jpg' fname = RAILS_ROOT + '/public/Barcodes/' + uri #fname = '/var/www/html/arc_cloud/arcdevelopment/' + uri
 
# if the barcode image doesn't already exist then generate and save it
if ! File.exists?(fname)
 
str = 'Barby::'+symbology+'.new("'+data+'")'
 
begin
barcode = eval str
rescue Exception => exc
barcode = Barby::Code128B.new(data) # fall back to Code128 type B
end
 
File.open(fname, 'w') do |f|
f.write barcode.to_jpg
end
 
end
uri
end

Step#5

Following lines of code will call to generate your dynamic barcode
generate_barcodes(@item_id)

Step#6

To show the Barcode images call the following lines of code

<img src="/Barcodes/<%= @job_info.job_number %>.jpg" >

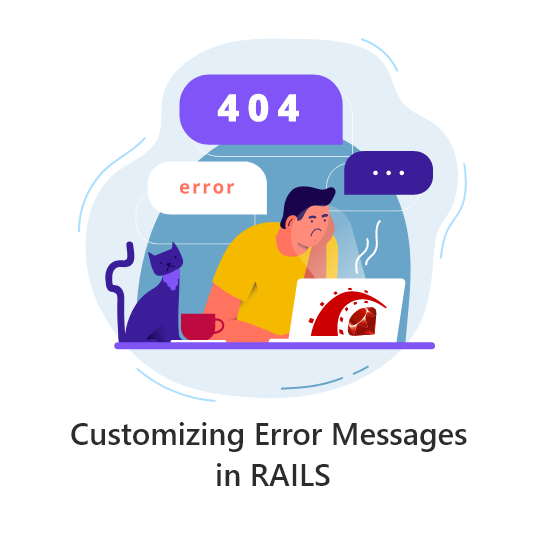
Customizing Error Messages In RAILS

In every application regardless of its complexity we require to customize error messages to make more sense. There are several ways to achieve it in Rails 3 and in Rails 2.3.x which are mentioned specifically and that can be handled either in models or controllers or helpers.

Solution# 1:

If it is needed to be handled in model and message need to be have customized instead of the attribute name. Like if the attribute name is “name” but you want to display messages “Employee name cannot be blank” then we have to install “custom-err-msg” plug-in.

This plugin gives you the option to not have your custom validation error message prefixed with the attribute name. Ordinarily, if you have, say:

validates_acceptance_of : terms, :message => 'Please accept the terms of service'

You’ll get the following error message: Terms Please accept the terms of service

This plugin allows you to omit the attribute name for specific messages. All you have to do is begin the message with a ‘^’ character. Example:

validates_acceptance_of :accepted_terms, :message => '^Please accept the terms of service'

step# 1

To install the ”custom-err-msg” plug-in you have to use the command.

“ruby script/plugin install https://github.com/gumayunov/custom-err-msg.git”

If you are facing problem by installing the plugin then clone it and just copy the folder (”gumayunov-custom-err-msg-640db42”) inside “Vendor/plugin/” folder

step# 2

In view file just display it as mentioned below:

Similarly, it can use in other places like,

validates_presence_of :claim_no, :message => "^Work Order/Claim number cannot be blank!"

The plugin also lets you use procs instead of strings.

Example:

validates_acceptance_of :accepted_terms, :message => Proc.new {|service| "You must accept the terms of the service #{service.name}" }

The above plug-in usage can be avoided by declaring alias for each attribute as mentioned below.
You should have a file named config/locales/en.yml, if not simply create one. There you can add your own custom names.

en:
activerecord:
models:
order: "Order"
attributes:
order:
b_name: "Business Name"

This will replace your attribute “b_name” with “Business Name”

Your Order model in app/models/order.rb should look like:

class Order < ActiveRecord::Base
validates :b_name, :presence => true

The error message will be displayed like

Business Name cannot be blank

Solution# 3:

Another way is to define a method and an error message inside the method in the model.

Class Employee < ActiveRecord::Base
validate :zip_must_be_valid
def zip_must_be_valid
unless zip.map(&:valid?).all?
errors.add_to_base " zip code is invalid"
end
end
end

We can also customize the error messages in Controllers.
Suppose “First Name” cannot be blank to be checked. Then use below code to check for it and show customized messages

if(params[:employee][:first_name].nil?)
flash[:error] = "First name should not be blank.n"
end

Subsequently, if it is required to add other messages to the above for other attributes then it can be written as,

if(params[:employee][:address].nil?)
flash[:error] += Address should not be blank.n"
end

Solution# 5

Customization of error messages can be done in controllers by adding messages to the existing error object’s method “add_to_base”.

if email_data[:"email_no_#{i}"] != "" && email_data[:"email_no_#{i}"] !~ /^([^@s]+)@((?:[-a-z0-9]+.)+[a-z]{2,})$/i
valid_params = false
@company_info_new.errors.add_to_base( "Invalid Email Id!" )
End

In views it can be displayed by writing below code:

0 %>
nil, :message => nil >

Solution# 6

The customization that can be handled in views using

“error_message_on” helpers (Rails 2.3.8)”

In case you wish to show one error message in a specific location that relates to a specific validation then use “error_message_on” helper. You might have used “error_message_on” to display field-specific error messages. Here is an example that would display an error message on a name field:

Solution# 7

You can also use “error_message_on”(Rails 2.3.8) to display non-field-specific error messages.

class User < ActiveRecord:Base
validate :user_is_active
private
def user_is_active
if self.is_active != true
errors.add : user_is_active, 'User must be active to continue'
end
end
end

Now, to display this custom validation error message with “error_message_on”, we simply need to reference “:user_is_active” when we call the helper. Consider this implementation:

Solutions# 8

class User < ActiveRecord::Base validates_presence_of :email validates_uniqueness_of :email validates_format_of :email, :with => /^[wd]+$/ :on => :create, :message => "is invalid"
end

In Rails 3 it’s possible to call a validate method and pass it a hash of attributes to define the validations instead of defining each validation separately as mentioned above.
/app/models/user.rb

class User < ActiveRecord::Base validates :email, :presence => true,
:uniqueness => true,
:format => { :with => /^([^@s]+)@((?:[-a-z0-9]+.)+[a-z]{2,})$/i }
end

In the User model we’re still validating that the field has a value and that the value is unique. For validating the format there are a number of options we can pass so we use a secondary hash to define those.

We can supply any number of validations for an attribute with a single command. While this is useful it can become cumbersome if there are a large number of validations but for most situations, it works nicely.

We can make the “:format” option more concise and clean it up a little. We often want to validate email addresses and having the same long regular expression in each validator is a little ugly and introduces repetition into the code. We can extract this out into a separate validation by creating a new class in our application’s /lib directory. We’ll call the file email_format_validator.rb.

class EmailFormatValidator < ActiveModel::EachValidator
def validate_each(object, attribute, value)
unless value =~ /^([^@s]+)@((?:[-a-z0-9]+.)+[a-z]{2,})$/i object.errors[attribute] << (options[:message] || "is not formatted properly")
end
end
end

The EmailFormatValidator class inherits from ActiveModel:: EachValidator. We have to define one method in the class “validate_each”, that takes three parameters called object, attribute and value. The method then checks that the value matches the regular expression we’re using to validate an email address and if not it will add the attribute to the objects errors.

We can use this technique to define any kind of validation we like. Now that we have our custom validator we can update the validator in the “User” model to use it.
/app/models/user.rb

class User < ActiveRecord::Base
validates :email,
:presence => true,
:uniqueness => true,
:format => { :with => /^([^@s]+)@((?:[-a-z0-9]+.)+[a-z]{2,})$/i }
end

Having an email_format key in the “validates” hash means that the validator will look for a class called email_format_validator and passes the validation behavior into the custom class that we just wrote.
If we try to create a new user now and enter an invalid email address we’ll see the expected error message.

If you have some trick to share, do it in the comments.
How to customize OCSNG and GLPI

Using work through customized scripts or applications is smart approach by System Administrators. For a busy system administrator to collect all the h/w and s/w information from the network is really tedious. For this work there fantastic open source tool named “OCS Inventory NG” which would collect all the h/w and s/w information from the network. But the web interface of OCS (where all the information about networked machines are visualized) is not much user friendly, rather confusing.

However, there is another open source application called GLPI, having a cool interface with capability to import & synchronize records from OCS.

For importing records from OCS to GLPI you have to use a plug-in in GLPI named OCS import and this plug-in manages the whole OCS synchronization process. To use OCS Import effectively, one need to make sure that the OCS mode is operational.

Here are the simple steps for the synchronization process:

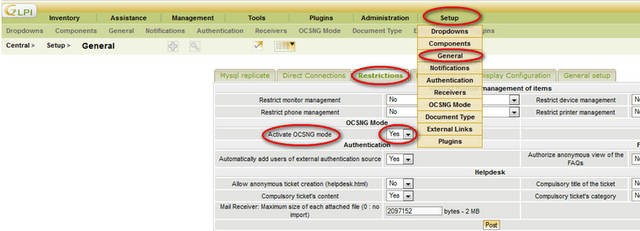
Activate OCSNG mode in GLPI:

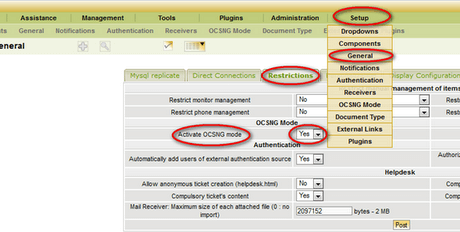
  • Click on Setup; then select General-Restrictions [Tab]-Activate OCSNG mode – Set to YES and then click on Post.

100-11-460x232

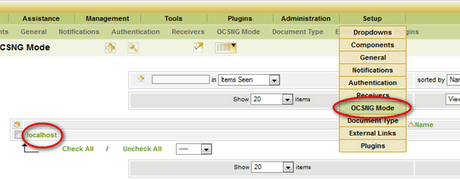
  • Next, OCSNG mode, again go to the Setup tab and Click on OCSNG Mode

101-1-460x180

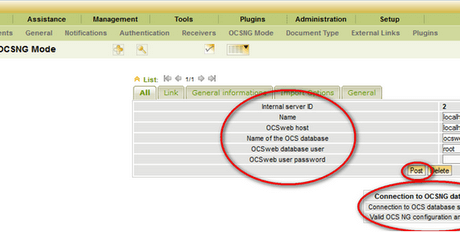
Now you will able to see one connection named localhost as pointed in the above image. Click on that localhost. Now you’ll see a simple form to enter DB credentials for the OCSNG application.

  • Once providing all valid DB information about OCSNG application, click on Post and it pops-up message ‘Connection to OCS database successfully’.

102-1-460x232

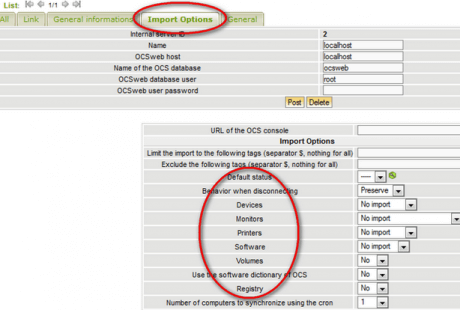
  • There is another tab named Import Option in the same window. Here you can set up which information needs to be imported from OCSNG like monitor, printer, devices, registry and software. Choose those information and Click on Post to update the info.

103-1-460x310

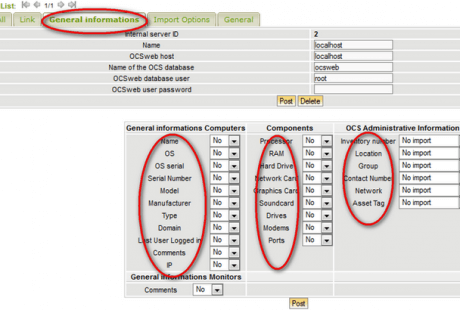
  • Beside the Import Options tab, there is a General Information tab where you can define which elements you want to import from OCS like OS, Serial Number, Model etc. You can choose those elements and click on Post to update it in GLPI.

104-1-460x310After completing the above steps you will able to see the data on the GLPI.

105-1-460x127Now we’ll see the steps on how to add custom fields into the Inventory List in GLPI.

How to add a custom field in GLPI:

To add custom fields to GLPI we need another plug-in named Custom Fields. It can be found in the Plug-in folder of GLPI archive.

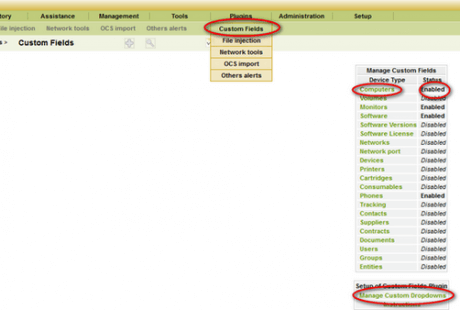
  • After installing this plug-in you can see a Custom Fields option in the drop down menu of Plug-ins Tab as indicated below.

[Note: To check what other plug-ins are installed you can check the drop down menu of Plug-in tab.]

106-1-460x310

  • By clicking on Custom Fields you can find a list of many device types like in the above image. Just click on the device name(s) on which you want the custom fields, to make it Enabled. You can also disable them in the same way when needed.

[Note: The device types that are enabled in the Manage Custom Fields section will be viewed in the Inventory List to which user can add various custom fields later]

  • Now to add fields click on the ‘Manage Custom Dropdowns‘ below the device list.

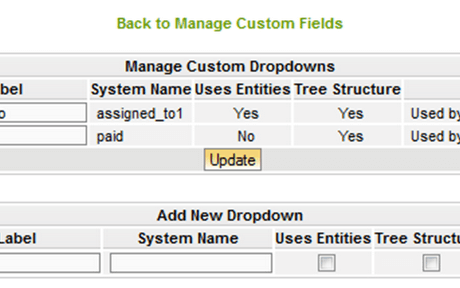
Suppose you want to add a custom filed named ‘Assigned to’ in the device Computers. Then first you need to enable the device Computers in Manage Custom Fields. After that go to Manage custom Dropdowns and add a label named ‘Assigned to’. You also need to add a System Name e.g.assigned_to1.You can check the Use Entities or Tree Structure boxes if you want to use them. Please find these steps indicated in the below image.

[Note: Later you can add more drop downs in the same way and click on the Update button to update the list.]

107-1-460x288

  • Now you’ve to add these custom fields to you inventory. For that you need to go to the Inventory tab in the GLPI main menu and Click on Computers and then click on the + sign.

[Note: In the Inventory apart from Computers, other devices will show up if they’re enabled in the Manage Custom Fields section]

108-1-460x116

  • You will get another pop-up window showing the column headers and here you can see that your custom field has been added to the list.

109-1-460x310

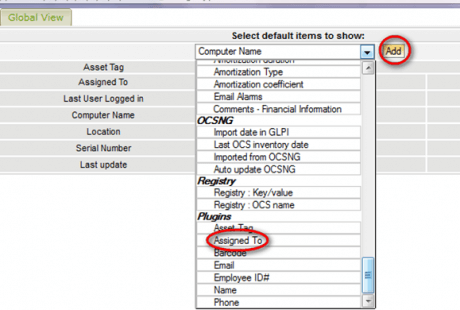
  • Select the custom field name from the Dropdown menu and the Click on Add.
  • Click on the arrow image like in the above image to arrange the order of the various fields on the list.

[Note: Repeat the same steps when you add more custom fields to your Inventory.]

Do you have anything to add? Just leave a comment below.

Photo Sharing IPhone App Developed By Andolasoft

Yes, you read it right! We’ve developed a photo sharing app in just less than 20 hours. We named it Andolapic and its quite amazing like Instagram. We’ve maintained optimum quality and functionality to improve your photo sharing experience.

Earlier when Mark Zuckerberg came up with Facebook, it was only for social networking with messaging. But then he included photo sharing which made it extremely popular among youth mass. In the recent past Instagram came up with a nice bread-butter photo sharing app. It includes more social platforms and due to its huge popularity, Facebook partially bought Instagram. To make the photo sharing more easier we’ve developed Andolapic, a built on top social photo sharing app that lets you share your photos with your friends instantly. You can get it from iTunes

Never miss an update from us. Join 10,000+ marketers and leaders.

Here you go with the features:

Snap & Share:

As soon as you take a snap with Andolapic, those friends who follow you see your photo instantly. You don’t have to click and share your photos.

Follow and Un-follow:

Follow your friends whose photos you want to see and comment. Un-follow if they are clogging photos which is most undesirable. Post, Like and Comment: Post your photos and like your friends’ photos & comment too.

Upload and Remove Pics:

Upload photos through Andolapic and remove them if you don’t like it to be seen. We’ve also developed the iPad component of Andolapic where you can take photos with you iPad with a bigger screen and share with your friends. As of now Andolapic is only available to Facebook users as it’s the top social platform. Soon we’ll be integrating to more social platforms like Twitter, Flickr and Tumblr.

So why wait?
Invite your friends on Facebook to use this iPhone app and share photos and stories instantly from anywhere and anytime.

Why Android Shouldn’t get threatened from Windows 8

android-logo_in_deviceMicrosoft has announced its upcoming OS Windows 8 on February 2012 which will be launched in the coming Fall. There are loads of features in Windows 8, but will it be a strong contender in the tablet or smartphone war? Android now covers 50-55 percentage of mobile and tablet markets around the world and most the custom software development companies choose android application development as their primary expertise. One of the great advantages of Android over Windows 8 is its open source, free and customizable. Let’s compare some of the key features of the above two and see as below.

Home Screen:

Home screen in both Android and Windows 8 are great with amazing dynamic icons and widget controls. Windows 8 placed icons and widgets in a more dynamic and usable manner, which is great for first-party apps. But when it come to third-party apps icons, justifying them is a lot harder. But in case of Android everything is customizable as the widgets can be re-sized, icons adjust themselves as per space on home screen and widgets show a lot information.

Browser Syncing:

Google provides the Chrome for Android, which has a great desktop sync including bookmark and search sync. Browser Sync is virtually absent with the Internet Explorer running on Windows 8.

App Market:

In the app Market there are around 600,000 apps based for android platforms whereas Windows based apps count only to 100,000 odd. It seems in the coming days it will be very difficult for Windows to catch up with android the way it grows. Most of the individual developers and custom software development companies are releasing apps based on android application development to the app stores offering a steep competition to windows.

Price Comparison of Tablets:

Manufacturers of Windows 8 tablets will have to use Windows 8 RT licenses costing around 90-100$ per device to build the devices which is a lot of money if compared to the free Android licensing. So the windows tablets will cost 30-40 percentage more than the Android tablets.

Apart from the above, Windows 8 lacks functionality in Voice Commands, Maps and Call Features as compared to Android. Even if Windows 8 have some advantages on Office Suites, Video Chatting, Wallets and user-friendliness, but it still has a long long way to go to level with the standards of Android.

Android Application Development is one of the major services offered by Andolasoft supported by experienced android developers who build the best apps as per your requirements. We work in an agile and collaborative environment to bring success to every project. We’ve developed apps based on restoration management, online to-do list services, rigging capacity tracking, baby vaccination tracking and on many other projects. Andolasoft provides android development in Corporate business applications, Multimedia and gaming applications, Web based applications and social networking applications for small start-ups and large businesses.

Advance Java and J2EE Helps Java Developer to Built Enterprise Application

java1

Basically Java is an object oriented programming language. It was invented for the purpose of increasing the productivity of both developers and End Users. Java enterprise application development is not an easy task for a java developer being high risky. Before java, Professional developers were doing their jobs faster through COBOL, Pascal, C, or C++ in a complicated process and the end user can also build new creative mini applications using various. Now software marketer and enterprise application developers have rush to create creative new generation applications using java with less risk and more user friendly. The fourth-generation programming languages have gone to the back seat and the new generation developers giving more productivity to the market through advance java and J2EE.

Java came in the year 1990 with more portable option with C++ to develop embedded systems by Sun Microsystems. Sun Microsystems has offered java as a programming and development platform. It became an awesome choice for developer and software venders to develop high quality applications and software. Development of business and enterprise application development was bit complex at that time but after arrival of advanced java and J2ee it helped a lot. J2EE is the Java 2 Platform; Enterprise Edition helps in developing multitier enterprise applications. Before J2EE, the Java developers were also facing some problems during the application development because of the following reasons:

1. More use of modules in the projects. We are in the favor of modularity which helps java developers to work separately but when you have few line codes inserting many buckets the developer may face problem.

2. Developer can invent new programming language but Implementation can be done under the underlying platforms with traditional service provider.

3. The steady stream of new UI approaches reflects in the presentation layer due to Java’s lack of leadership.

4. The deficiencies of Java disclose in hibernate, spring, Struts, and other frameworks.

The advanced J2EE model provides modified and simplified approach to develop high quality java application development. The complexity of enterprise applications are managed through its components and application developers are free to stick on their logic. J2EE summarizes the layers of functionality in specific types of components. This helps in faster development in time, better quality, maintainability and portability of applications. It hides the complexity and create flexible user Interaction.

At Andolasoft the Java Developers are dedicated to provide quality Java and J2EE application developments that are robust and performance oriented. We follow Agile Methodology and this iterative process allows us to deliver enterprise applications quickly. Our team of skilled Java and J2EE Developers are highly experienced and ready to take on any technical challenges.