How To Integrate PayPal In PHP

To accept online payments through your website you would need a payment gateway. There are numerous payment gateways that can be implemented to your website; however you will need to choose the best for your PHP application. “PayPal” is one of the most renowned payment platforms that offers the best in class services as well as secure payment transaction. One of the best features of PayPal is that it facilitates developers to check-out the integration on merchant sites.

From a developer’s point of view, PayPal API is a simple, user friendly and versatile which facilitates them to avoid the PCI burden of having credit card details to be passed through their servers. PayPal is also the most secure platform that takes care of all the money transactions for the users.

Integrating PayPal in Your Website

The first thing we need is a Sandbox Credential and API Credentials. This can be availed using the following steps:

  • Create a Business account in “https://developer.paypal.com/” in order to access the Sandbox account.
  • Log into your business account; move to the ‘Application Tab’ and create a Sandbox test account for developers to check-out the PayPal integration.
  • For PayPal payment pro services, you can use this Sandbox Credentials for logging into “https://www.sandbox.paypal.com/”
  • If you want to login to your sandbox account you have to first log into your developer account.

Steps to Implement ‘the work’ in Your Site

  • In PayPal payment pro ‘the work’ is done through API call.
  • In your code you will have to implement a function i.e. ‘PPHttpPost(methodname,str);’
  • ‘methodname’ specifies the name of the API you want to call i.e. ‘CreateRecurringPaymentsProfile’, ‘GetTransactionDetails’ etc.

There are numerous other methods for the integration which can be availed form the PayPal developer site:  https://developer.paypal.com/webapps/developer/docs/classic/api/

Under ‘Merchant’ API you would find a list of functions that can be performed by PayPal website pro.
Clicking on NVP link of each function you can view the methods and the required parameters for that method.

Second Parameter in the string; which is passed to the API, is for getting the response. It includes all the parameters that have to be passed e.g.

[sourcecode]$str = "&TOKEN = $token&AMT = $paymentAmount&CURRENCYCODE = $currencyID&PROFILESTARTDATE =
$startDate";[/sourcecode]


[sourcecode]$nvpStr  .= "&BILLINGPERIOD = $billingPeriod&BILLINGFREQUENCY = $billingFreq&CREDITCARDTYPE = $CREDITCARDTYPE&ACCT = $ACCT&EXPDATE = $EXPDATE&CVV2 = $CVV2&EMAIL = $EMAIL&STREET = $STREET&CITY = $CITY&STATE = $STATE&COUNTRYCODE = $COUNTRYCODE&ZIP = $ZIP&FIRSTNAME = $FIRSTNAME&LASTNAME = $LASTNAME&DESC = $DESC&FAILEDINITAMTACTION = $FAILEDINITAMTACTION&INITAMT = $INITAMT";[/sourcecode]

Note: This string might differ for different methods but the structure is similar.

  • This function returns an array having one key as ACK.
  • The value of this key specifies the FAILURE and SUCCESS of the function.

If ACK is a failure then the returned array contains following error message.

[sourcecode]function PPHttpPost($methodName, $nvpStr_) {

$APIUserName = urlencode(‘API USERNAME’);

$APIPassword = urlencode(‘API PASSWORD’);

$APISignature = urlencode(‘API SIGNATURE’);

$APIEndpoint = "https://api-3t.sandbox.paypal.com/nvp"; //sandbox url.

$version = urlencode(‘51.0’);

//setting the curl parameters.

$choice = curl_init();

curl_setopt($choice, CURLOPT_URL, $APIEndpoint);

curl_setopt($choice, CURLOPT_VERBOSE, 1);

//turning off the server and peer verification(TrustManager Concept).

curl_setopt($choice, CURLOPT_SSL_VERIFYPEER, FALSE);

curl_setopt($choice, CURLOPT_SSL_VERIFYHOST, FALSE);

curl_setopt($choice, CURLOPT_RETURNTRANSFER, 1);

curl_setopt($choice, CURLOPT_POST, 1);

//NVPRequest for submitting to server

$nvprequest = "METHOD=$methodName&VERSION=$version&PWD=$APIPassword&USER=$APIUserName&SIGNATURE=$APISignature";

// setting the nvprequest as POST FIELD to curl

curl_setopt($choice, CURLOPT_POSTFIELDS, $nvprequest);

//getting response from server

$httpResponse = curl_exec($choice);

if(!$httpResponse) {

exit("$methodName failed: ".curl_error($choice).'(‘.curl_errno($choice).’)’);

}

// Here Extract the RefundTransaction response details

$httpResponseArr = explode("&", $httpResponse);

$httpParsedResponseArr = array();

foreach ($httpResponseArr as $i => $value) {

$tmpAr = explode("=", $value);

if(sizeof($tmpAr) > 1) {

$httpParsedResponseArr[$tmpAr[0]] = $tmpAr[1];
}
}

if((0 == sizeof($httpParsedResponseArr)) || !array_key_exists(‘ACK’, $httpParsedResponseArr)) {
exit("Invalid HTTP Response for POST request($nvprequest) to $APIEndpoint.");
}
return $httpParsedResponseArr;
}[/sourcecode]

Setting of IPN URL

IPN stands- Instant Payment Notification

Under the Profile tab of the sandbox site there is an ‘Instant Payment Notification preference’ link. Set the IPN URL from the link.

Conclusion:

This notification is sent from server to server when any transaction is done in PayPal. To capture this transaction we can set URL in Instant Payment Notification preferences page and manage those transaction information.

How To Use “UIActionSheet” As A Pop-over View In Your IOS Apps

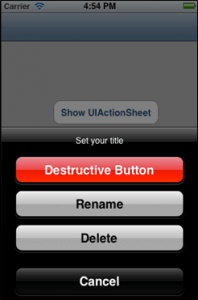
iOS-destructive_button

What is UIActionSheet

The action sheet in iOS contains a title and one or more buttons. Each of the buttons is associated with separate actions. It can be presented from a toolbar; tab bar, button bar item or from a view, however the title can be optional.

Why use UIActionSheet?

UIActionSheet is used in the following cases:

  • To show an option for a given task
  • To prompt the user to confirm an action
  • To get user input

Action sheet is dismissed by touching anywhere outside the pop-over.

How to use it?

  • Extend the UIActionSheetDeleagte in the .h header file of the ViewController
  • Then add a method named as”showActionSheet”

Example

[sourcecode]@interface MyViewController : UIViewController {

}

-(IBAction)showActionSheet:(id)sender;
@end[/sourcecode]

Initializing the UIActionSheet takes 5 following parameters

  •  initWithTitle
  • delegate
  • cancelButtonTitle
  • destructiveButtonTitle
  • otherButtonTitles

Add the following code in the .m file of viewcontroller.

Example

[sourcecode]-(IBAction)showActionSheet:(id)sender {
UIActionSheet *popupQuery = [[UIActionSheet alloc] initWithTitle:@"Set your title" delegate:self cancelButtonTitle:@"Cancel" destructiveButtonTitle:@"Destructive Button" otherButtonTitles:@"Rename",@"Delete", nil];

popupQuery.actionSheetStyle = UIActionSheetStyleBlackOpaque;
[popupQuery showInView:self.view];
[popupQuery release];
}[/sourcecode]

How to know which button was clicked by user?

There is a delegate method named as “actionSheet clickedButtonAtIndex” in which you can get the action.

[sourcecode]-(void)actionSheet:(UIActionSheet *)actionSheet clickedButtonAtIndex:(NSInteger)buttonIndex {

switch (buttonIndex) {
case 0:
NSLog(@”%@”,Destructive Button Clicked);
break;
case 1:
NSLog(@”%@”,Rename Button Clicked);
break;
case 2:
NSLog(@”%@”,Delete Button Clicked);
break;
case 3:
NSLog(@”%@”,Cancel Button Clicked);
break;
}
}[/sourcecode]

Conclusion:

UIActionSheet gives additional choices to the users for a particular action & gives a cleaner look to the app.

Unveiling FeedZirra: Simplifying Feed Parsing in Your Rails Application

What is a Feed?

A feed is a data format which is used to provide frequent updates and latest contents to the users. A feed has no particular type; it could be news, latest technology, game, gadgets, sports etc. These feeds can be easily parsed into your Rails application to make it more useful for the users. The feed is build up with XML and has particular format type.

What is Feedzirra?

“Feedzirra” on the other hand is a feed library built on Ruby that is designed to get and update a number of feeds as fast as possible. This includes using “libcurl-multi” through the “curb” gem for faster http gets, and “libxml” through “nokogiri” and “sax-machine” for faster parsing.

Suppose you need to add some updated information to your Rails application from other feed site like ‘feedburner’, in such cases you can easily work it out by using the gem “feedzirra”.

Here are the steps to use ‘feedzirra’ in your Rails application.

Step-1

Add the gem ‘feedzirra’ in to your gem file.

[sourcecode language=”plain”]gem ‘feedzirra'[/sourcecode]

Run ‘bundle install’ to install the gem along with its dependencies.

Step-2

Modify your controller where you are fetching the feeds.

[sourcecode language=”plain”]require ‘feedzirra'[/sourcecode]

Step-3

Now, write the following code in your method in order to parse feeds from an external site.

[sourcecode language=”plain”]feed =Feedzirra::Feed.fetch_and_parse("http://feeds.feedburner.com/TechCrunch/gaming")
@entry = feed.entries
[/sourcecode]

Note: Here we are parsing the feeds from ‘feedburne’r site with updated information on gaming news.

Step-4

Now, open your view section and write the following code snippet to display the information regarding the feeds.

[sourcecode language=”plain”]<ul>
<%@entry.each do |t|%>
<li>
<%= link_to "#{t.title}", "#{t.url}",:target => "_blank" %>
<%=t.author%>
<%=t.content%>
<%=t.published%>
<%=t.categories%>
</li>
<%end%>
</ul>
[/sourcecode]

Note: The above code will display the feed title, author name, content, published date and category type. Clicking the feed title, will launch a new tab in browser and display the detail information of that feed.

Step-5

You can also fetch multiple feeds by writing the following code.

[sourcecode language=”plain”]feed_urls = ["http://feeds.feedburner.com/PaulDixExplainsNothing", "http://feeds.feedburner.com/trottercashion"]
feeds = Feedzirra::Feed.fetch_and_parse(feed_urls)
[/sourcecode]

Conclusion:

The FeedZirra gem empowers Rails developers to seamlessly integrate feed parsing capabilities into their applications. 

Are you looking for a Ruby on Rails developer

Contact Us

Whether you’re building a news aggregator, a blog reader, or a content recommendation system, FeedZirra simplifies the process of retrieving and presenting timely content from various sources. 

By harnessing the power of FeedZirra, you can enhance user engagement, keep your app’s content fresh, and deliver a more dynamic user experience.

Related Questions

Q1: What is the FeedZirra gem, and how does it simplify feed parsing in Rails applications?

The FeedZirra gem is a powerful tool in the Ruby ecosystem that provides a user-friendly way to parse RSS and Atom feeds. It abstracts the complexities of handling different feed formats, making it easier for developers to extract and utilize the content they need within their Rails apps.

Q2: How can I integrate the FeedZirra gem into my Rails application for parsing feeds?

To integrate the FeedZirra gem into your Rails app, start by adding it to your Gemfile with the following line: gem ‘feedzirra’. After running bundle install, you can fetch and parse feeds using the Feedzirra::Feed.fetch_and_parse method. This allows you to access the feed’s entries (articles) and display them in your app.

Q3: What are some of the advanced features offered by the FeedZirra gem for feed parsing in Rails?

The FeedZirra gem provides several advanced features, including access to various properties of feed entries such as publication date, author, summary, and content. It also offers automatic HTML content sanitization to ensure safe rendering. Additionally, you can implement caching to reduce the load on feed sources and optimize performance.

Q4: How does the FeedZirra gem benefit developers when integrating feed parsing into their Rails applications?

The FeedZirra gem brings several benefits to developers, including streamlined efficiency by handling the intricacies of feed parsing. It supports multiple feed formats (RSS and Atom), making it compatible with a wide range of sources. The gem’s simple API is designed for ease of use, catering to developers of various skill levels. Moreover, it provides customization options to tailor parsed feed content to suit your app’s design and requirements.

Q5: Can the FeedZirra gem be used to enhance user engagement and content freshness in Rails apps?

Absolutely. By utilizing the FeedZirra gem to parse feeds, you can enhance user engagement by providing fresh and relevant content from various sources. Whether you’re building a news aggregator, a blog reader, or a content recommendation system, integrating feed parsing into your Rails app with FeedZirra helps create a dynamic user experience that keeps users informed and engaged.

3 Easy Steps to optimize Queries in Rails using ‘Bullet’

In the world of web development, performance optimization is a crucial aspect that can make or break the user experience. 

One area that often demands attention is database query optimization. Rails developers, rejoice!

The ‘Bullet’ gem is here to help you fine-tune your database queries and boost your application’s speed and efficiency. In this blog, we’ll delve into the steps to optimize queries in your Rails app using the powerful ‘Bullet’ gem.

First,

let me introduce you to the ‘Bullet’ gem

‘Bullet’ is a ruby gem which facilitates the developers by alerting when an application performs an inefficient database query, such as an N+1 query. It is one of the most efficient tool to optimize a Rails application.

Traditional Method (w/o optimization):

This example illustrates the old-fashioned method of optimizing a query.

For example there are two models, one is Order and other is Product’. And an order has many products. Then the code for order listing page will be

In app/controllers/orders_controller.rb

class OrdersController < ApplicationController
  def index
    @orders = Order.all
  end
end

In app/views/orders/index.html.erb

<h1>Orders</h1>

<% @orders.each do |order| %>
  <div class="order">
    <h2><%=link_to order.title, order_path(order)%></h2>
  </div>
  <%order.products.each do |product|%>
     <ul class=”product”>
        <li><%=link_to product.title, product_path(product)%></li>
     </ul>
  <%end%>
<% end %>

These codes would generate N+1 query issues, because here we have queried just once to get the orders and then separate queries for each order to fetch its products. These sorts of problems can be easily overlooked during development.

‘Bullet’ gem comes in handy for avoiding such problems.

Optimized Method – integrating gem ‘Bullet’:

Let me explain in just 3 easy steps, how the gem ‘Bullet’ can be integrated to optimize the query,

Step#1 – Add the gem to the Gemfile

Example

/Gemfile.rb

  gem 'bullet', '4.6.0', :group => “development”

Run “bundle install” to install the bullet gem in the development group.

Step#2 – Configuration setting in development.rb file

To enable Bullet change its configuration with the after_initialize block in the development.rb file. Set alert as true to get alert popup through the browser.

config.after_initialize do 
    Bullet.enable = true 
    Bullet.alert = true  
    Bullet.bullet_logger = true 
    Bullet.console = true 
    Bullet.rails_logger = true 
  end

Step#3 – Restart the Server

Restart the server as well as reload the page.
After completing the above mentioned steps a JavaScript alert popup would appear with the detected N+1 query. The alert would display the file containing the issue as well as what could be done to overcome the problem.

The previous N+1 query can be fixed by following below mentioned steps:

In Controller,

lass OrdersController < ApplicationController
  def index
    @orders = Order.includes(:products)
  end
end

After changing the statement from ‘Order.all’ to ‘Order.includes’(:products). We can fetch the products through eager loading. Now, if we reload the page we wouldn’t get any alert as we are fetching the efficiently. Here the data is fetched by only two queries, one to get the orders and the other to get the products in those orders.

‘Bullet’ can also tell us when we’re doing eager loading unnecessarily. Let’s say in the order listing page only order will be displayed. So, we removed the code that was displaying the list of products. Now after reloading the page we will get an alert popup displaying that Bullet has detected unused eager loading.

Step 4: Run Your App

With ‘Bullet’ enabled, navigate through your application by using its various features. ‘Bullet’ will keep a close eye on your queries and provide alerts if it detects N+1 query problems or suggests eager loading opportunities.

Step 5: Review Alerts

As you interact with your app, pay attention to any alerts generated by ‘Bullet.’ It will notify you about potential N+1 query issues, which occur when a single query fetches associated records for multiple main records, leading to excessive database hits.

Step 6: Eager Loading Optimization

When ‘Bullet’ suggests eager loading, take action by optimising your queries. Use ActiveRecord includes or eager_load methods to load associated records in advance, reducing the need for multiple queries.

Benefits:

  • No need to search the codes in each file to figure out the inefficient database query.
  • Bullet can notify us, through an alert message, by writing in the console or in the log file.
  • Prevent our application from performing an inefficient database query like an N+1 query.
  • It can also detect unused eager loading.

Conclusion

The ‘Bullet’ gem is a powerful tool that empowers Rails developers to optimize their application’s database queries and improve overall performance. 

By following the step-by-step guide outlined in this blog, you can easily integrate ‘Bullet’ into your development workflow, identify potential N+1 query problems, and capitalize on eager loading opportunities. 

Embrace the ‘Bullet’ gem and take your Rails app’s speed and efficiency to new heights, ensuring a seamless and delightful user experience.

Related Questions

Q1: What is the main purpose of the ‘Bullet’ gem in a Rails application?

Ans:
The ‘Bullet’ gem serves as a performance optimization tool in Rails applications. It monitors queries and helps identify potential N+1 query issues and opportunities for eager loading, ultimately optimizing database queries for improved application performance.

Q2: What steps are involved in installing and configuring the ‘Bullet’ gem for query optimization?

Ans:
To optimize queries using the ‘Bullet’ gem, start by adding it to your Gemfile. After installation, configure the gem in your config/environments/development.rb file by enabling it, enabling alerts, and setting up bullet logging. This allows ‘Bullet’ to monitor and alert you about query-related issues.

Q3: How does the ‘Bullet’ gem help in identifying N+1 query issues?

Ans:
The ‘Bullet’ gem identifies N+1 query problems by analyzing your application’s query patterns. If it detects instances where multiple queries are being executed to retrieve associated records for a main record, it generates alerts. These alerts prompt developers to address the issue and optimize queries through eager loading.

Q4: What is eager loading, and how does the ‘Bullet’ gem assist in optimizing it?

Ans:
Eager loading is a technique to fetch associated records in advance to avoid N+1 query problems. The ‘Bullet’ gem suggests opportunities for eager loading by analyzing query patterns. When an N+1 query issue is detected, ‘Bullet’ recommends using ActiveRecord’s includes or eager_load methods to load associated records efficiently.

Q5: What are the benefits of using the ‘Bullet’ gem for query optimization in Rails applications?

Ans:
Using the ‘Bullet’ gem offers several benefits, including optimized queries that reduce database hits, enhanced application performance, increased developer productivity through quick problem identification, and efficient use of eager loading to minimize query-related issues. Overall, it leads to a smoother user experience and improved application responsiveness.

How Do I Implement Localization In IOS Apps?

We know that, all the apps in the Apple App Store are English-speaking, i.e. the menu, information, settings and everything else is in English. However, the apps become almost useless for the consumers from non native English speaking countries. Hence, it becomes essential for the developers to release apps with multiple language support. This is where internationalization and localization comes in handy which facilitates the iOS application developers to support numerous native languages that greatly increase the global user experience.

What Exactly Is Internationalization And Localization?

  • Internationalization and localization means adapting the software product to different languages, regional differences and technical requirements of a targeted market.
  • Internationalization is the process of designing a software application, so that it can be adapted to various languages and regions without engineering changes.
  • Localization is the process of accommodating internationalized software product for a specific region or language by adding locale-specific components and translating text.

Here Is An Example To Help You Grasp The Concept:

Let’s say there is an iPhone/iPad application made for Brazilian client and he needs to localize that product to Portuguese language so that every users of Brazil can use it.

Each and every application must contain some hardcoded strings. We need to pull all of these hardcoded strings into a separate file so that we can localize them.

To do this, create a “.strings” file in the Xcode to contain all of the strings that your project needs. Then the hardcoded strings should be replaced with a function call to look up the appropriate string from the “.strings” file based on the current language.

For example:

To create a “.string” file, follow below mentioned steps

  • Select the Project group in Xcode, and navigate to File >>New >>New File.
  • Choose iOS >>Resource >>Strings File, and click Next, as shown in the below snapshot.
  • Name the new file Localizable.strings, and then click Save.

Note that the “Localizable.strings” is the default filename; iOS looks for when dealing with localized text. If you rename the file, you’ll need to specify the name of the .strings file every time.

The format for the strings file is:

[sourcecode]"KEY" = "CONTENT";[/sourcecode]

For our ‘Account’ text add in:

[sourcecode]"TITLE" = "Account";[/sourcecode]

Now switch to “ViewController.m”, and find the “viewDidLoad” method. Now you can set the text as below:

[sourcecode]self.titleLabel.text = @"Account";[/sourcecode]

We want it to read from our “.strings” file. For this, you need to change the current line to use a macro called “NSLocalizedString” as shown below:

[sourcecode]self.titleLabel.text = NSLocalizedString(@"TITLE", nil);[/sourcecode]

Adding A Portuguese Localization

Steps to add a Portuguese localization are as follows:

  • You need to select “Localizable.strings”, and open the Info pane.
  • You can do this by selecting the 3rd tab in the top toolbar of the View section, and selecting the 1st tab in the top section, as shown in the below screenshot.

To add support for another language execute following steps:

  • You need to simply click on the ‘+’ (Plus) in that ‘Localization’ pane on the right of the view.
  • At first it will create localization for English.
  • If the “Localizable.Strings” deselect after your click then select the “Localizable.Strings” again. After the “Localizable.Strings” selected click the ‘+’ button once again and choose ‘Portuguese(pt)’ from the dropdown.

Now, Xcode has set up some directories containing a separate version of “Localizable.strings” for each language that you selected, behind the scenes. To view this for yourself, go to your project folder in Finder and open it. There you’ll get the following:

  • ‘en.lproj’ and ‘pt.lproj’ contain language-specific versions of files.
  • ‘en’ is the localization code for English, whereas ‘pt’ is for Portuguese.

To change the text for Portuguese, select ‘Localizable.strings (Portuguese)’ and change the text as follows:

[sourcecode]"TITLE" = "Conta";
“Back” = “Voltar”;
etc.
[/sourcecode]

It’s all about how to localize a string. But you also need to localize the UI, as the text length for a button may vary in different languages.

How To Adjust UI Elements:

Let’s discuss about how to localize the button text.

  • For Portuguese let’s say the button text is ‘MODIFICAR’.
  • The problem is that you need your button border to be relatively tight around the text. This isn’t a problem for title label because there is no constraint on its width, but here you’ll need to adjust the size of the button to make it look perfect.
  • If you simply change the text in “viewDidLoad” it will look odd, as the text of that button may or may not fit into it.

So you need to add localization to your “xib” and make the button bigger in Portuguese.

  • Go to “ViewController.xib” and in the info pane on the right of the view, click the ‘+’ button to add a Localization and choose Portuguese.
  • Note you may need to scroll down in the Info pane as it has some Interface Builder content in that side.
  • Now we have copy of “ViewController.xib” in our Portuguese folder (pt.lproj).
  • Select “ViewController.xib (Portuguese)”, and edit the button text in that version to say ‘MODIFICAR’.
  • It will resize the button by default.

Once, all the set up is done perfectly, delete the application from simulator/device and select Project>>Clean to get a fresh build and install. Then build and run your app.

How To Apply Localization For Images:

If you have text in your image you need to localize it.Follow the steps mentioned below.

  • Select the .jpg file and add localization for Portuguese.
  • Check out the project folder.
  • The ‘.jpg’ image file has been added to the English folder (en.lproj) and then copied to the Portuguse folder (pt.lproj).
  • To make a different image for the Portuguese version, you need to overwrite the image in the Portuguese folder.
  • Rebuild and get the final result!

Benefits:

It is better to have localization in your iOS apps to target the global users. The app will display the contents according to the visitor’s language.

  • Same information can be shared across the world.
  • Great user experience.

How to Use Fragment Layouts in Android

android-293x300-123

Fragment is a concept of UI components-with a new idea for the ability to retain state across configuration changes. As a result, web-pages load comparatively faster because it retains their previous state. Without Fragments components, the normal activity class causes running activities to be stopped, reloaded and re-rendered using the new parameters. A fragment allows building a UI as a series of smaller, reusable graphical elements that can be arranged as needed, based on the device’s capabilities.

Fragment layout in Android is pretty distinct from other platforms. This design was first introduced for the platform in version 3.0 and onwards.

Here are the main concepts about Android fragment layout:

  • Android tabs are most often presented as text compared to icons, because it is difficult to come up with descriptive icons for all the possible navigation option. Text is much better.
  • Android tabs aren’t square buttons.  They mostly contain text
  • Visual style of Android tabs is flat. There should not be any glossy or reflection effects like in html web design.

A Fragment framework works much like an activity.
To implement it in the app we need an independent Java activity class along with a fragment xml layout:

  1. Create a layout XML and an Activity subclass for your activity
  2. Create a layout XML and a Fragment subclass for your fragment
  3. Map the two together in your Activity layout XML (or using FragmentTransaction mostly in Java code)

Example of layout xml for activity

[sourcecode]<?xml version=”1.0″ encoding=”utf-8″?>
<TabHost
xmlns:android=”http://schemas.android.com/apk/res/android”
android:id=”@android:id/tabhost”
android:layout_width=”fill_parent”
android:layout_height=”fill_parent”>

<LinearLayout
android:orientation=”vertical”
android:layout_width=”fill_parent”
android:layout_height=”fill_parent”>

<FrameLayout
android:id=”@android:id/tabcontent”
android:layout_width=”0dp”
android:layout_height=”0dp”
android:layout_weight=”0″/>

<FrameLayout
android:id=”@+android:id/realtabcontent”
android:layout_width=”fill_parent”
android:layout_height=”0dp”
android:layout_weight=”1″/>

<TabWidget
android:id=”@android:id/tabs”
android:orientation=”horizontal”
android:layout_width=”fill_parent”
android:layout_height=”55dip”
android:layout_weight=”0″/>

</LinearLayout>
</TabHost>
[/sourcecode]

Example of Activity subclass

[sourcecode]package com.myproj;

import java.util.HashMap;
import java.util.Iterator;
import java.util.Stack;

import android.annotation.SuppressLint;
import android.app.Activity;
import android.content.Intent;
import android.os.Bundle;
import android.support.v4.app.Fragment;
import android.support.v4.app.FragmentActivity;
import android.support.v4.app.FragmentManager;
import android.support.v4.app.FragmentTransaction;
import android.view.LayoutInflater;
import android.view.View;
import android.widget.ImageView;
import android.widget.TabHost;
import android.widget.TextView;

public class AppMainTabActivity extends FragmentActivity {
/* Your Tab host */
private TabHost mTabHost;

/* A HashMap of stacks, where we use tab identifier as keys..*/
private HashMap<String, Stack<Fragment>> mStacks;

/*Save current tabs identifier in this..*/
private String mCurrentTab;

protected void onCreate(Bundle savedInstanceState) {
super.onCreate(savedInstanceState);
setContentView(R.layout.fragment_layout);
/*
*  Navigation stacks for each tab gets created..
*  tab identifier is used as key to get respective stack for each tab
*/
mStacks = new HashMap<String, Stack<Fragment>>();
mStacks.put(AppConstants.TAB_A, new Stack<Fragment>());
mStacks.put(AppConstants.TAB_B, new Stack<Fragment>());
mStacks.put(AppConstants.TAB_C, new Stack<Fragment>());
mStacks.put(AppConstants.TAB_D, new Stack<Fragment>());
mTabHost = (TabHost)findViewById(android.R.id.tabhost);
mTabHost.setOnTabChangedListener(listener);
mTabHost.setup();
initializeTabs();
}

private View createTabView(final int id,String s) {
View view = LayoutInflater.from(this).inflate(R.layout.tabs_icon, null);
ImageView imageView =   (ImageView) view.findViewById(R.id.icon);
imageView.setImageDrawable(getResources().getDrawable(id));
TextView textview= (TextView) view.findViewById(R.id.title);
textview.setText(s);
return view;
}

public void initializeTabs(){
/* Setup your tab icons and content views.. Nothing special in this..*/
TabHost.TabSpec spec    =   mTabHost.newTabSpec(AppConstants.TAB_A);
mTabHost.setCurrentTab(-3);
spec.setContent(new TabHost.TabContentFactory() {
public View createTabContent(String tag) {
return findViewById(R.id.realtabcontent);
}
});
spec.setIndicator(createTabView(R.drawable.cameratab, “Camera”));
mTabHost.addTab(spec);

spec = mTabHost.newTabSpec(AppConstants.TAB_B);
spec.setContent(new TabHost.TabContentFactory() {
public View createTabContent(String tag) {
return findViewById(R.id.realtabcontent);
}
});
spec.setIndicator(createTabView(R.drawable.presettab, “Presets”));
mTabHost.addTab(spec);

//Create a class AppConstants to declare your variables

spec = mTabHost.newTabSpec(AppConstants.TAB_C);
spec.setContent(new TabHost.TabContentFactory() {
public View createTabContent(String tag) {
return findViewById(R.id.realtabcontent);
}
});
spec.setIndicator(createTabView(R.drawable.manualtab, “Manual Entry”));

mTabHost.addTab(spec);

spec = mTabHost.newTabSpec(AppConstants.TAB_D);
spec.setContent(new TabHost.TabContentFactory() {
public View createTabContent(String tag) {
return findViewById(R.id.realtabcontent);
}
});
spec.setIndicator(createTabView(R.drawable.infotab, “Info”));
mTabHost.addTab(spec);
}

/*Comes here when user switch tab, or we do programmatically*/
TabHost.OnTabChangeListener listener    =   new
TabHost.OnTabChangeListener() {
public void onTabChanged(String tabId) {
/*Set current tab..*/
mCurrentTab                     =   tabId;

if(mStacks.get(tabId).size() == 0){
/*
*    First time this tab is selected. So add first fragment of that tab.
*    Dont need animation, so that argument is false.
*    We are adding a new fragment which is not present in stack. So add to stack is true.
*/
if(tabId.equals(AppConstants.TAB_A)){
pushFragments(tabId, new Camera(), false,true);
}else if(tabId.equals(AppConstants.TAB_B)){
pushFragments(tabId, new PresetsActivity(), false,true);
}else if(tabId.equals(AppConstants.TAB_C)){
pushFragments(tabId, new ManualActivity(), false,true);
}else if(tabId.equals(AppConstants.TAB_D)){
pushFragments(tabId, new InfoActivity(), false,true);
}
}else {
/*
*    We are switching tabs, and target tab is already has atleast one fragment.
*    No need of animation, no need of stack pushing. Just show the target fragment
*/
pushFragments(tabId, mStacks.get(tabId).lastElement(), false,false);
}
}
};

/* Might be useful if we want to switch tab programmatically, from
inside any of the fragment.*/
public void setCurrentTab(int val){
mTabHost.setCurrentTab(val);
}

/*
*      To add fragment to a tab.
*  tag             ->  Tab identifier
*  fragment        ->  Fragment to show, in tab identified by tag
*  shouldAnimate   ->  should animate transaction. false when we switch tabs, or adding first fragment to a tab
*                      true when when we are pushing more fragment into navigation stack.
*  shouldAdd       ->  Should add to fragment navigation stack (mStacks.get(tag)). false when we are switching tabs (except for the first time)
*                      true in all other cases.
*/
public void pushFragments(String tag, Fragment fragment,boolean shouldAnimate, boolean shouldAdd){
if(shouldAdd)
mStacks.get(tag).push(fragment);
FragmentManager   manager         =   getSupportFragmentManager();
FragmentTransaction ft            =   manager.beginTransaction();
if(shouldAnimate)
ft.setCustomAnimations(R.anim.slide_in_right, R.anim.slide_out_left);
ft.replace(R.id.realtabcontent, fragment);
ft.commit();
}

public void popFragments(){
/*
*    Select the second last fragment in current tab’s stack..
*    which will be shown after the fragment transaction given below
*/
Fragment fragment             =   mStacks.get(mCurrentTab).elementAt(mStacks.get(mCurrentTab).size() – 2);

/*pop current fragment from stack.. */
mStacks.get(mCurrentTab).pop();

/* We have the target fragment in hand.. Just show it.. Show a standard navigation animation*/
FragmentManager   manager         =   getSupportFragmentManager();
FragmentTransaction ft            =   manager.beginTransaction();
ft.setCustomAnimations(R.anim.slide_in_left, R.anim.slide_out_right);
ft.replace(R.id.realtabcontent, fragment);
ft.commit();
}

@SuppressLint(“NewApi”)
@Override
public void onBackPressed() {
if(((BaseFragment)mStacks.get(mCurrentTab).lastElement()).onBackPressed() == false){
/*
* top fragment in current tab doesn’t handles back press, we can do our thing, which is
*
* if current tab has only one fragment in stack, ie first fragment is showing for this tab.
*        finish the activity
* else
*        pop to previous fragment in stack for the same tab
*
*/
if(mStacks.get(mCurrentTab).size() == 1){
super.onBackPressed();  // or call finish..
}else{
popFragments();
}
}else{
//do nothing.. fragment already handled back button press.
}
}

/*
*   Imagine if you wanted to get an image selected using ImagePicker intent to the fragment. Ofcourse I could have created a public function
*  in that fragment, and called it from the activity. But couldn’t resist myself.
*/
@Override
protected void onActivityResult(int requestCode, int resultCode, Intent data) {

mStacks.get(mCurrentTab).lastElement().onActivityResult(requestCode, resultCode, data);
}
}
[/sourcecode]

Example of Fragment subclass

[sourcecode]package com.myproj;

import android.content.Intent;
import android.os.Bundle;
import android.support.v4.app.Fragment;

public class BaseFragment extends Fragment {
public AppMainTabActivity mActivity;
@Override
public void onCreate(Bundle savedInstanceState) {
super.onCreate(savedInstanceState);

mActivity    = (AppMainTabActivity) this.getActivity();
}

public boolean onBackPressed(){
return false;
}
public void onActivityResult(int requestCode, int resultCode, Intent data){

}
}
[/sourcecode]

Fragment layout in Android is pretty distinct from other platforms. This design was first introduced for the platform in version 3.0 and onwards.

Here are the main concepts about Android fragment layout:

  1. Android tabs are most often presented as text compared to icons. Because, it is difficult to come up with descriptive icons for all the possible navigation option. Text is much better.
  2. Android tabs aren’t square buttons.  They mostly contain text
  3. Visual style of Android tabs is flat. There should not be any glossy or reflection effects like in html web design.

A fragment must always be embedded in an activity and the fragment’s lifecycle is directly affected by the parent activity’s lifecycle. When we add a fragment as a part of an activity layout, it lives in ViewGroup inside the activity’s view hierarchy and the fragment defines its own view layout. We can insert a fragment into the activity layout by declaring the fragment in the activity’s layout file, as a <fragment> element, or from the application code by adding it to an existing ViewGroup.
To animate the transition between fragments or to animate the process of showing or hiding a fragment the Fragment Manager API can be used and create a Fragment Transaction.
Within each Fragment Transaction we can specify in and out animations that will be used for show and hide respectively (or both when replace is used).

Benefits:

Fragments are useful in following cases:

  • If we split up views on some devices/orientations and show them in two activities and show all the content in one on other devices. That would be a use case if you go on a tablet or maybe even in landscape mode on a phone: e.g. you show the list of items and the details on one screen. On a phone or in portrait mode you just show one part.
  • Another use case is reusable views. So if we have some views that are visible on different activities and also perform some actions we could put this behavior into a fragment and then reuse it.
  • Animated effects can availed when dynamically adding and removing fragments from the screen
  • Integration with the action bar for tabs, as a replacement for TabHost
  • Integration with the action bar for “list”-based navigation (really a Spinner in the action bar, toggling between different fragments)

See Also: Webview Layouts usages in Android

If you have thoughts about or experiences with Android fragments, share them with us. We’d love to hear from you.