How to put custom Gradient backgrounds in IOS App

iOS_screenshot-196x300

Introduction:

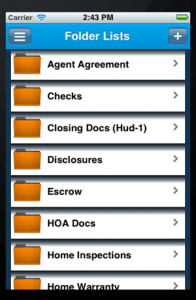
It is essential to have a unique design for every iPhone application; in order to deliver the most intriguing and compelling interfaces, customization is necessary in every step. A great place to start is to implement your own background and use a clear table view background. Many iOS apps are now following this. Another way is to add a custom background colour. It is as easy as setting the cells background color property.

I tried both the above methods, and still not satisfied with it. There are numerous applications that have pretty similar interfaces. That’s why I thought about putting a gradient view as the background.

Core Graphics is a great resource that helped me in the right direction. It is supposed to customize the background of a cell, but I used it as a basis for my code to draw a gradient.

Here is an example of GradientView

GradientView.h

[sourcecode]#import <UIKit/UIKit.h>
@interface GradientView : UIView
{
}
@end[/sourcecode]

GradientView.m

[sourcecode]#import "GradientView.h"
#import <QuartzCore/QuartzCore.h>
@implementation GradientView
//
// layerClass
//
// returns a CAGradientLayer class as the default layer class for this view
//
+ (Class)layerClass
{
return [CAGradientLayer class];
}
//
// setupGradientLayer
//
// Construct the gradient for either construction method
//
– (void)setupGradientLayer
{
CAGradientLayer *gradientLayer = (CAGradientLayer *)self.layer;
gradientLayer.colors =
[NSArray arrayWithObjects:
(id)[UIColor colorWithRed:0.85 green:0.85 blue:0.85 alpha:0.8].CGColor,(id)[UIColor colorWithRed:1.0 green:1.0 blue:1.0 alpha:1].CGColor,
(id)[UIColor colorWithRed:1.0 green:1.0 blue:1.0 alpha:1].CGColor,(id)[UIColor colorWithRed:1.0 green:1.0 blue:1.0 alpha:1].CGColor,
nil];
self.backgroundColor = [UIColor clearColor];
}
//
// initWithFrame:
//
// Initialise the view.
//
– (id)initWithFrame:(CGRect)frame
{
self = [super initWithFrame:frame];
if (self)
{
CAGradientLayer *gradientLayer = (CAGradientLayer *)self.layer;
//gradientLayer.cornerRadius = 10;
gradientLayer.colors =
[NSArray arrayWithObjects:
(id)[UIColor colorWithRed:0.255/255.0 green:0.215/255.0 blue:0.0/255.0 alpha:0.5].CGColor,(id)[UIColor colorWithRed:1.0 green:1.0 blue:1.0 alpha:1].CGColor,
(id)[UIColor colorWithRed:1.0 green:1.0 blue:1.0 alpha:1].CGColor,(id)[UIColor colorWithRed:1.0 green:1.0 blue:1.0 alpha:1].CGColor,(id)[UIColor colorWithRed:1.0 green:1.0 blue:1.0 alpha:1].CGColor,
nil];
self.backgroundColor = [UIColor clearColor];
}
return self;
}
@end[/sourcecode]

Then u can use this class object in “cellForRowAtIndex” method of “UITableViewController” class as follows

[sourcecode]- (UITableViewCell *)tableView:(UITableView *)tableView cellForRowAtIndexPath:(NSIndexPath *)indexPath
{
static NSString *CellIdentifier = @"Cell";
UITableViewCell *cell = [tableView dequeueReusableCellWithIdentifier:CellIdentifier];
if (cell == nil) {
cell = [[UITableViewCell alloc]
initWithStyle:UITableViewCellStyleDefault         reuseIdentifier:CellIdentifier] ;            cell.accessoryType=UITableViewCellAccessoryDisclosureIndicator;
cell.selectionStyle = UITableViewCellSelectionStyleNone;
cell.backgroundView = [[[GradientView alloc] init] autorelease];
}
// Configure the cell.
cell.textLabel.text = [self.allFolder objectAtIndex:indexPath.row];
cell.textLabel.backgroundColor = [UIColor clearColor];
cell.imageView.image=[UIImage imageNamed:@"folder.png"];
return cell;
}[/sourcecode]

Conclusion:

Many times, we need to make the application stand out from the crowd. While redesigning, we need something that would make our list of contents distinct from all the other table views. Hence, implementing custom background tables in ‘UITableView’ will be a smart way to start.

How To Use “UIActionSheet” As A Pop-over View In Your IOS Apps

iOS-destructive_button

What is UIActionSheet

The action sheet in iOS contains a title and one or more buttons. Each of the buttons is associated with separate actions. It can be presented from a toolbar; tab bar, button bar item or from a view, however the title can be optional.

Why use UIActionSheet?

UIActionSheet is used in the following cases:

  • To show an option for a given task
  • To prompt the user to confirm an action
  • To get user input

Action sheet is dismissed by touching anywhere outside the pop-over.

How to use it?

  • Extend the UIActionSheetDeleagte in the .h header file of the ViewController
  • Then add a method named as”showActionSheet”

Example

[sourcecode]@interface MyViewController : UIViewController {

}

-(IBAction)showActionSheet:(id)sender;
@end[/sourcecode]

Initializing the UIActionSheet takes 5 following parameters

  •  initWithTitle
  • delegate
  • cancelButtonTitle
  • destructiveButtonTitle
  • otherButtonTitles

Add the following code in the .m file of viewcontroller.

Example

[sourcecode]-(IBAction)showActionSheet:(id)sender {
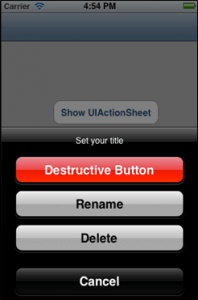
UIActionSheet *popupQuery = [[UIActionSheet alloc] initWithTitle:@"Set your title" delegate:self cancelButtonTitle:@"Cancel" destructiveButtonTitle:@"Destructive Button" otherButtonTitles:@"Rename",@"Delete", nil];

popupQuery.actionSheetStyle = UIActionSheetStyleBlackOpaque;
[popupQuery showInView:self.view];
[popupQuery release];
}[/sourcecode]

How to know which button was clicked by user?

There is a delegate method named as “actionSheet clickedButtonAtIndex” in which you can get the action.

[sourcecode]-(void)actionSheet:(UIActionSheet *)actionSheet clickedButtonAtIndex:(NSInteger)buttonIndex {

switch (buttonIndex) {
case 0:
NSLog(@”%@”,Destructive Button Clicked);
break;
case 1:
NSLog(@”%@”,Rename Button Clicked);
break;
case 2:
NSLog(@”%@”,Delete Button Clicked);
break;
case 3:
NSLog(@”%@”,Cancel Button Clicked);
break;
}
}[/sourcecode]

Conclusion:

UIActionSheet gives additional choices to the users for a particular action & gives a cleaner look to the app.

Guide To Display Images In Grid View On IPhone

In some iOS apps, displaying images in a single view would make the UI lose its uniformity. It would be difficult to manage images of different resolution and impossible to keep track of thousand of images without using Grid View in iPhone.

This is just like a “Grid View” application. Here we will explore how to display images, programmatically in “Grid view” on an iPhone.

Here We Go…

Step 1:

  • Open Xcode
  • Create a View base applicationGridview-123
  • Give the application name “ImageGrid”.

Step 2:

The directory structure is automatically created by the Xcode which also adds up essential frameworks to it. Now, explore the directory structure to check out the contents of the directory.

Step 3:

Here you need to add one ‘NSObject’ class to the project.

  • Select  project -> New File -> Cocoa Touch -> Objective-C class
  • Give the class name “Images”.

Step 4:

Then add an image to the project and give the image name “icon.png”.

Step 5:

  • Open “ImageGridViewController” file and add ‘UITableViewDelegate’ and ‘UITableViewDataSource’
  • Define ‘UITableView’ and ‘NSMutableArray’ classes as well as the buttonPressed: method
  • Import the ‘Image.h’ class and make the following changes.

[sourcecode]#import &lt;UIKit/UIKit.h&gt;
#import "Image.h"
@interface ImageGridViewController:UIViewController &lt;UITableViewDelegate, UITableViewDataSource&gt; {
IBOutlet UITableView *tableView;
NSMutableArray&nbsp; *sections;
}
@property (nonatomic, retain) UITableView *tableView;
@property (nonatomic, retain) NSMutableArray *sections;
-(IBAction)buttonPressed:(id)sender;
@end[/sourcecode]

Step 6:

  • Double click the ‘ImageGridViewController.xib’ file and open it in the Interface Builder.
  • First drag the ‘TableView’ from the library and place it in the view window.
  • Select ‘tableview’ from the view window and bring up connection inspector and connect ‘dataSource’ to the ‘File’s Owner’ and delegate to the ‘File’s Owner’ icon.
  • Now save the .xib file and go back to Xcode.

Step 7:

In the ‘ImageGridViewController.m’ file, make the following changes:

[sourcecode]#import "ImageGridViewController.h"
#import "Item.h" @implementation ImageGridViewController
@synthesize tableView,sections;

-(void)loadView{

[super loadView];
sections = [[NSMutableArray alloc] init];

for(int s=0;s&lt;1;s++) { // 4 sections
NSMutableArray *section = [[NSMutableArray alloc] init];

for(int i=0;i&lt;12;i++) {// 12 items in each section
Image *item = [[ Image alloc] init];
item.link=@"New Screen";
item.title=[NSString stringWithFormat:@"Item %d", i];
item.image=@"icon2.png";

[section addObject:item];
}
[sections addObject:section];
}
}

– (NSInteger)numberOfSectionsInTableView:(UITableView *)tableView {
return [sections count];
}

– (NSInteger)tableView:(UITableView *)tableView numberOfRowsInSection:(NSInteger)section {
return 1;
}

– (CGFloat)tableView:(UITableView *)tableView heightForRowAtIndexPath:(NSIndexPath*)indexPath {
NSMutableArray *sectionItems = [sections objectAtIndex:indexPath.section];
int numRows = [sectionItems count]/4;
return numRows * 80.0;
}

-(NSString *)tableView:(UITableView *)tableView titleForHeaderInSection:(NSInteger)section {

NSString *sectionTitle = [NSString stringWithFormat:@"Section&nbsp; %d", section];
return sectionTitle;
}

– (UITableViewCell *)tableView:(UITableView *)tableView cellForRowAtIndexPath:(NSIndexPath *)indexPath {

static&nbsp;&nbsp; &nbsp;NSString *hlCellID = @"hlCellID";

UITableViewCell *hlcell = [tableView dequeueReusableCellWithIdentifier:hlCellID];
if(hlcell == nil) {
hlcell = [[[UITableViewCell alloc]
initWithStyle:UITableViewCellStyleDefault reuseIdentifier:hlCellID] autorelease];
hlcell.accessoryType = UITableViewCellAccessoryNone;
hlcell.selectionStyle = UITableViewCellSelectionStyleNone;
}

int section = indexPath.section;
NSMutableArray *sectionItems = [sections objectAtIndex:section];

int n = [sectionItems count];
int i=0,i1=0;

while(i&lt;n){
int yy = 4 +i1*74;
int j=0;
for(j=0; j&lt;4;j++){

if (i&gt;=n) break;
Image *item = [sectionItems objectAtIndex:i];
CGRect rect&nbsp; = CGRectMake(18+80*j, yy, 40, 40);
UIButton *buttonImage=[[UIButton alloc] initWithFrame:rect];
[buttonImage setFrame:rect];
UIImage *buttonImageNormal=[UIImage imageNamed:item.image];
[buttonImage setBackgroundImage:buttonImageNormal forState:UIControlStateNormal];
[buttonImage setContentMode:UIViewContentModeCenter];
NSString *tagValue = [NSString stringWithFormat:@"%d%d", indexPath.section+1, i];
buttonImage.tag = [tagValue intValue];
//NSLog(@tag….%d", button.tag);
[buttonImage addTarget:self
action:@selector(buttonPressed:)forControlEvents:UIControlEventTouchUpInside];
hlcell.contentView addSubview:buttonImage];
[buttonImage release];

UILabel *label = [[[UILabel alloc]initWithFrame:CGRectMake((80*j)-4, &nbsp;&nbsp; &nbsp;&nbsp;&nbsp; &nbsp;&nbsp;&nbsp; &nbsp;&nbsp;&nbsp; &nbsp;yy+44, 80, 12)] autorelease];
label.text = item.title;
label.textColor = [UIColor blackColor];
label.backgroundColor = [UIColor clearColor];
label.textAlignment = UITextAlignmentCenter;
label.font = [UIFont fontWithName:@"ArialMT" size:12];
[hlcell.contentView addSubview:label];
i++;
}
i1 = i1+1;
}
return hlcell;
}
-(IBAction)buttonPressed:(id)sender {
int tagId = [sender tag];
int divNum = 0;
if(tagId&lt;100)
divNum=10;
else
divNum=100;
int section = [sender tag]/divNum;
section -=1;// we had incremented at tag assigning time
int itemId = [sender tag]%divNum;
NSLog(@"…section = %d, item = %d", section, itemId);
NSMutableArray*sectionItems = [sections objectAtIndex:section];
Image&nbsp;&nbsp; &nbsp;*item&nbsp;&nbsp; &nbsp;=&nbsp;&nbsp; &nbsp;[sectionItems objectAtIndex:itemId];
NSLog(@"Image selected…..%@, %@", item.title, item.link);

}

-(void)viewDidLoad{
[super viewDidLoad];
}

-(void)didReceiveMemoryWarning{
[super didReceiveMemoryWarning];
}

-(void)viewDidUnload{
// Release any retained subviews of the main view.
// e.g. self.myOutlet = nil;
}

-(void)dealloc{
[super dealloc];
}
@end[/sourcecode]

Step 8:

Open the ‘Image.h’ file and make the following changes:

[sourcecode]#import &lt;Foundation/Foundation.h&gt;
@interface Image:NSObject{
NSString*title;
NSString*link;
NSString*image;
}
@property(nonatomic, copy)NSString*title;
@property(nonatomic, copy)NSString*link;
@property(nonatomic, copy)NSString*image;
@end[/sourcecode]

Step 9:

Make the changes in the ‘Item.m’ file:

[sourcecode]#import "Image.h"
@implementation Item
@synthesize title, link, image;
@end[/sourcecode]

Step 10:

Now save it and compile it in the Simulator.

It would be smart to use Grid View to display a number of images in a single view because it enables to manage multiple images efficiently. Users are also facilitated to keep track of their images. It becomes eye soothing and looks great on the iPhone mobile devices.

Keep visiting regularly to Andolasoft blog to know our upcoming article about the process to show your android Smartphone captured images dynamically in “Grid View” Layout.

How Do I Implement Localization In IOS Apps?

We know that, all the apps in the Apple App Store are English-speaking, i.e. the menu, information, settings and everything else is in English. However, the apps become almost useless for the consumers from non native English speaking countries. Hence, it becomes essential for the developers to release apps with multiple language support. This is where internationalization and localization comes in handy which facilitates the iOS application developers to support numerous native languages that greatly increase the global user experience.

What Exactly Is Internationalization And Localization?

  • Internationalization and localization means adapting the software product to different languages, regional differences and technical requirements of a targeted market.
  • Internationalization is the process of designing a software application, so that it can be adapted to various languages and regions without engineering changes.
  • Localization is the process of accommodating internationalized software product for a specific region or language by adding locale-specific components and translating text.

Here Is An Example To Help You Grasp The Concept:

Let’s say there is an iPhone/iPad application made for Brazilian client and he needs to localize that product to Portuguese language so that every users of Brazil can use it.

Each and every application must contain some hardcoded strings. We need to pull all of these hardcoded strings into a separate file so that we can localize them.

To do this, create a “.strings” file in the Xcode to contain all of the strings that your project needs. Then the hardcoded strings should be replaced with a function call to look up the appropriate string from the “.strings” file based on the current language.

For example:

To create a “.string” file, follow below mentioned steps

  • Select the Project group in Xcode, and navigate to File >>New >>New File.
  • Choose iOS >>Resource >>Strings File, and click Next, as shown in the below snapshot.
  • Name the new file Localizable.strings, and then click Save.

Note that the “Localizable.strings” is the default filename; iOS looks for when dealing with localized text. If you rename the file, you’ll need to specify the name of the .strings file every time.

The format for the strings file is:

[sourcecode]"KEY" = "CONTENT";[/sourcecode]

For our ‘Account’ text add in:

[sourcecode]"TITLE" = "Account";[/sourcecode]

Now switch to “ViewController.m”, and find the “viewDidLoad” method. Now you can set the text as below:

[sourcecode]self.titleLabel.text = @"Account";[/sourcecode]

We want it to read from our “.strings” file. For this, you need to change the current line to use a macro called “NSLocalizedString” as shown below:

[sourcecode]self.titleLabel.text = NSLocalizedString(@"TITLE", nil);[/sourcecode]

Adding A Portuguese Localization

Steps to add a Portuguese localization are as follows:

  • You need to select “Localizable.strings”, and open the Info pane.
  • You can do this by selecting the 3rd tab in the top toolbar of the View section, and selecting the 1st tab in the top section, as shown in the below screenshot.

To add support for another language execute following steps:

  • You need to simply click on the ‘+’ (Plus) in that ‘Localization’ pane on the right of the view.
  • At first it will create localization for English.
  • If the “Localizable.Strings” deselect after your click then select the “Localizable.Strings” again. After the “Localizable.Strings” selected click the ‘+’ button once again and choose ‘Portuguese(pt)’ from the dropdown.

Now, Xcode has set up some directories containing a separate version of “Localizable.strings” for each language that you selected, behind the scenes. To view this for yourself, go to your project folder in Finder and open it. There you’ll get the following:

  • ‘en.lproj’ and ‘pt.lproj’ contain language-specific versions of files.
  • ‘en’ is the localization code for English, whereas ‘pt’ is for Portuguese.

To change the text for Portuguese, select ‘Localizable.strings (Portuguese)’ and change the text as follows:

[sourcecode]"TITLE" = "Conta";
“Back” = “Voltar”;
etc.
[/sourcecode]

It’s all about how to localize a string. But you also need to localize the UI, as the text length for a button may vary in different languages.

How To Adjust UI Elements:

Let’s discuss about how to localize the button text.

  • For Portuguese let’s say the button text is ‘MODIFICAR’.
  • The problem is that you need your button border to be relatively tight around the text. This isn’t a problem for title label because there is no constraint on its width, but here you’ll need to adjust the size of the button to make it look perfect.
  • If you simply change the text in “viewDidLoad” it will look odd, as the text of that button may or may not fit into it.

So you need to add localization to your “xib” and make the button bigger in Portuguese.

  • Go to “ViewController.xib” and in the info pane on the right of the view, click the ‘+’ button to add a Localization and choose Portuguese.
  • Note you may need to scroll down in the Info pane as it has some Interface Builder content in that side.
  • Now we have copy of “ViewController.xib” in our Portuguese folder (pt.lproj).
  • Select “ViewController.xib (Portuguese)”, and edit the button text in that version to say ‘MODIFICAR’.
  • It will resize the button by default.

Once, all the set up is done perfectly, delete the application from simulator/device and select Project>>Clean to get a fresh build and install. Then build and run your app.

How To Apply Localization For Images:

If you have text in your image you need to localize it.Follow the steps mentioned below.

  • Select the .jpg file and add localization for Portuguese.
  • Check out the project folder.
  • The ‘.jpg’ image file has been added to the English folder (en.lproj) and then copied to the Portuguse folder (pt.lproj).
  • To make a different image for the Portuguese version, you need to overwrite the image in the Portuguese folder.
  • Rebuild and get the final result!

Benefits:

It is better to have localization in your iOS apps to target the global users. The app will display the contents according to the visitor’s language.

  • Same information can be shared across the world.
  • Great user experience.

How To Draw Smooth Lines In IOS Apps?

One of the most common issues in drawing apps is that the polylines appears jagged when drawn quickly. Such flaws create unfavorable impact on the application as well developers. Apps developed for IPhone, which is one of the premium devices in the world; must encompass all the development aspects, may it be a major bug as in Apple Map or as simple as jagged polylines in drawing apps.

Drawing lines are one of the most common features in iOS apps. It can be used for numerous purposes such as putting a signature in PDFs and images, drawing line graphs, preparing presentations with sketches and many more. Most of the iOS applications generate jaggy lines when drawn quickly. On the other hand, smooth lines facilitate uses with the convenience to draw quickly and without affecting the practicality of the application.

Below are the steps to follow how to draw smooth lines in iOS apps.

1. Add UIImage View

First of all we need to add UIImageView to a UIView.

[sourcecode]SmoothLineViewController.h:
@property (nonatomic, readwrite, retain) IBOutlet UIImageView *imageView;
Then we’ll @synthesize this property in SmoothLineViewController.m:
@synthesize imageView=imageView_;
[/sourcecode]

Finally, we’ll use the Interface Builder to add the UIImageView component to SmoothLineViewControllerr.xib

2. Handling Touches

Now we are ready to write code for handle touches and draw polylines. We’ll need to declare the following member variables in the header:

[sourcecode]CGPoint previousPoint;
NSMutableArray *drawnPoints;
UIImage *cleanImage;
add the method to the class:
/** This method draws a line to an image and returns the resulting image */
– (UIImage *)drawLineFromPoint:(CGPoint)from_Point toPoint:(CGPoint)to_Point image:(UIImage *)image
{
CGSize sizeOf_Screen = self.view.frame.size;
UIGraphicsBeginImageContext(sizeOf_Screen);
CGContextRef current_Context = UIGraphicsGetCurrentContext();
[image drawInRect:CGRectMake(0, 0, sizeOf_Screen.width, sizeOf_Screen.height)];

CGContextSetLineCap(current_Context, kCGLineCapRound);
CGContextSetLineWidth(current_Context, 1.0);
CGContextSetRGBStrokeColor(current_Context, 1, 0, 0, 1);
CGContextBeginPath(current_Context);
CGContextMoveToPoint(current_Context, from_Point.x, from_Point.y);
CGContextAddLineToPoint(current_Context, to_Point.x, to_Point.y);
CGContextStrokePath(current_Context);

UIImage *rect = UIGraphicsGetImageFromCurrentImageContext();
UIGraphicsEndImageContext();
return rect;
}
drawLineFromPoint:to_Point:image is a simple utility method that draws a line over a UIImage and returns the resulting UIImage.
Now UIResponder‘s touch handling methods will be overridden:
– (void)touchesBegan:(NSSet *)_touches withEvent:(UIEvent *)_event
{
// retrieve the touch point
UITouch *_touch = [_touches anyObject];
CGPoint current_Point = [_touch locationInView:self.view];

// Its record the touch points to use as input to our line smoothing algorithm
drawn_Points = [[NSMutableArray arrayWithObject:[NSValue valueWithCGPoint:current_Point]] retain];

previous_Point = current_Point;

// we need to save the unmodified image to replace the jagged polylines with the smooth polylines
clean_Image = [imageView_.image retain];
}

– (void)touchesMoved:(NSSet *)_touches withEvent:(UIEvent *)_event
{

UITouch *_touch = [_touches anyObject];
CGPoint current_Point = [_touch locationInView:self.view];

[drawnPoints addObject:[NSValue valueWithCGPoint:current_Point]];

imageView_.image = [self drawLineFromPoint:previous_Point toPoint:current_Point image:imageView_.image];

previous_Point = current_Point;
}
[/sourcecode]

3. Simply Polyline

We need to find a similar polyline, but with fewer vertices. This is necessary because we cannot interpolate between vertices to generate a nice smooth polyline if they are placed too close to each other. I use the “Ramer–Douglas–Peucker” algorithm for this. Alternatively, Lang’s simplification algorithm or any other polyline simplification algorithms would work.
We’ll begin by adding the following utility method:

[sourcecode]/** Draws a path to an image and returns the resulting image */
– (UIImage *)drawPathWithPoints:(NSArray *)points image:(UIImage *)image
{
CGSize screenSize = self.view.frame.size;
UIGraphicsBeginImageContext(screenSize);
CGContextRef currentContext = UIGraphicsGetCurrentContext();
[image drawInRect:CGRectMake(0, 0, screenSize.width, screenSize.height)];

CGContextSetLineCap(currentContext, kCGLineCapRound);
CGContextSetLineWidth(currentContext, 1.0);
CGContextSetRGBStrokeColor(currentContext, 0, 0, 1, 1);
CGContextBeginPath(currentContext);

int count = [points count];
CGPoint point = [[points objectAtIndex:0] CGPointValue];
CGContextMoveToPoint(currentContext, point.x, point.y);
for(int i = 1; i &lt; count; i++) {
point = [[points objectAtIndex:i] CGPointValue];
CGContextAddLineToPoint(currentContext, point.x, point.y);
}
CGContextStrokePath(currentContext);

UIImage *ret = UIGraphicsGetImageFromCurrentImageContext();
UIGraphicsEndImageContext();
return ret;
}
[/sourcecode]

drawPathWithPoints:image is similar to our line drawing method above, except it draws a polyline, given an array of vertices.
We’ll also add an Objective-C implementation of Wikipedia’s pseudo code for the Ramer–Douglas–Peucker algorithm:

[sourcecode]- (NSArray *)douglasPeucker:(NSArray *)points epsilon:(float)epsilon
{
int count = [points count];
if(count &lt; 3) {
return points;
}

//Find the point with the maximum distance
float dmax = 0;
int index = 0;
for(int i = 1; i &lt; count – 1; i++) {
CGPoint point = [[points objectAtIndex:i] CGPointValue];
CGPoint lineA = [[points objectAtIndex:0] CGPointValue];
CGPoint lineB = [[points objectAtIndex:count – 1] CGPointValue];
float d = [self perpendicularDistance:point lineA:lineA lineB:lineB];
if(d &gt; dmax) {
index = i;
dmax = d;
}
}

//If max distance is greater than epsilon, recursively simplify
NSArray *resultList;
if(dmax &gt; epsilon) {
NSArray *recResults1 = [self douglasPeucker:[points subarrayWithRange:NSMakeRange(0, index + 1)] epsilon:epsilon];

NSArray *recResults2 = [self douglasPeucker:[points subarrayWithRange:NSMakeRange(index, count – index)] epsilon:epsilon];

NSMutableArray *tmpList = [NSMutableArray arrayWithArray:recResults1];
[tmpList removeLastObject];
[tmpList addObjectsFromArray:recResults2];
resultList = tmpList;
} else {
resultList = [NSArray arrayWithObjects:[points objectAtIndex:0],
[points objectAtIndex:count – 1],nil];
}

return resultList;
}

– (float)perpendicularDistance:(CGPoint)point lineA:(CGPoint)lineA lineB:(CGPoint)lineB
{
CGPoint v1 = CGPointMake(lineB.x – lineA.x, lineB.y – lineA.y);
CGPoint v2 = CGPointMake(point.x – lineA.x, point.y – lineA.y);
float lenV1 = sqrt(v1.x * v1.x + v1.y * v1.y);
float lenV2 = sqrt(v2.x * v2.x + v2.y * v2.y);
float angle = acos((v1.x * v2.x + v1.y * v2.y) / (lenV1 * lenV2));
return sin(angle) * lenV2;
}
[/sourcecode]

CGPoint v1 = CGPointMake(lineB.x – lineA.x, lineB.y – lineA.y);
If you have difficulty for understanding the code above, refer to Wikipedia’s explanation and pseudo code of the algorithm. Now we’ll also override UIResponder‘stouchesEnded:withEvent method to add post-processing instructions for our polyline:

[sourcecode]- (void)touchesEnded:(NSSet *)touches withEvent:(UIEvent *)event
{
NSArray *generalizedPoints = [self douglasPeucker:drawnPoints epsilon:2];
imageView_.image = [self drawPathWithPoints:generalizedPoints image:cleanImage];
[drawnPoints release];
[cleanImage release];
}
[/sourcecode]

The method computes a simplified polyline, using our recorded touch points, drawn Points, as the input to Ramer–Douglas–Peucker algorithm, and replaces the jaggy polyline with the simplified polyline.

Also Read; How To Use Service Oriented Architecture In IOS Swift

If you try running the app now, you would see your polylines being replaced by more jaggy polylines. That’s expected.

4. Smooth Polyline

Now that we have a simplified polyline, we are ready to interpolate the points between the vertices for a nice smooth curve. Add the following method to the class:

[sourcecode]- (NSArray *)catmullRomSpline:(NSArray *)points segments:(int)segments
{
int count = [points count];
if(count &lt; 4) {
return points;
}

float b[segments][4];
{
// precompute interpolation parameters
float t = 0.0f;
float dt = 1.0f/(float)segments;
for (int i = 0; i &lt; segments; i++, t+=dt) {
float tt = t*t;
float ttt = tt * t;
b[i][0] = 0.5f * (-ttt + 2.0f*tt – t);
b[i][1] = 0.5f * (3.0f*ttt -5.0f*tt +2.0f);
b[i][2] = 0.5f * (-3.0f*ttt + 4.0f*tt + t);
b[i][3] = 0.5f * (ttt – tt);
}
}

NSMutableArray *resultArray = [NSMutableArray array];

{
int i = 0; // first control point
[resultArray addObject:[points objectAtIndex:0]];
for (int j = 1; j &lt; segments; j++) {
CGPoint pointI = [[points objectAtIndex:i] CGPointValue];
CGPoint pointIp1 = [[points objectAtIndex:(i + 1)] CGPointValue];
CGPoint pointIp2 = [[points objectAtIndex:(i + 2)] CGPointValue];
float px = (b[j][0]+b[j][1])*pointI.x + b[j][2]*pointIp1.x + b[j][3]*pointIp2.x;
float py = (b[j][0]+b[j][1])*pointI.y + b[j][2]*pointIp1.y + b[j][3]*pointIp2.y;
[resultArray addObject:[NSValue valueWithCGPoint:CGPointMake(px, py)]];
}
}

for (int i = 1; i &lt; count-2; i++) {
// the first interpolated point is always the original control point
[resultArray addObject:[points objectAtIndex:i]];
for (int j = 1; j &lt; segments; j++) {
CGPoint pointIm1 = [[points objectAtIndex:(i – 1)] CGPointValue];
CGPoint pointI = [[points objectAtIndex:i] CGPointValue];
CGPoint pointIp1 = [[points objectAtIndex:(i + 1)] CGPointValue];
CGPoint pointIp2 = [[points objectAtIndex:(i + 2)] CGPointValue];
float px = b[j][0]*pointIm1.x + b[j][1]*pointI.x + b[j][2]*pointIp1.x + b[j][3]*pointIp2.x;
float py = b[j][0]*pointIm1.y + b[j][1]*pointI.y + b[j][2]*pointIp1.y + b[j][3]*pointIp2.y;
[resultArray addObject:[NSValue valueWithCGPoint:CGPointMake(px, py)]];
}
}

{
int i = count-2; // second to last control point
[resultArray addObject:[points objectAtIndex:i]];
for (int j = 1; j &lt; segments; j++) {
CGPoint pointIm1 = [[points objectAtIndex:(i – 1)] CGPointValue];
CGPoint pointI = [[points objectAtIndex:i] CGPointValue];
CGPoint pointIp1 = [[points objectAtIndex:(i + 1)] CGPointValue];
float px = b[j][0]*pointIm1.x + b[j][1]*pointI.x + (b[j][2]+b[j][3])*pointIp1.x;
float py = b[j][0]*pointIm1.y + b[j][1]*pointI.y + (b[j][2]+b[j][3])*pointIp1.y;
[resultArray addObject:[NSValue valueWithCGPoint:CGPointMake(px, py)]];
}
}
// the very last interpolated point is the last control point
[resultArray addObject:[points objectAtIndex:(count – 1)]];

return resultArray;
}
[/sourcecode]

All credits go to supersg559 for the implementation Catmull-Rom Spline algorithm above. I merely modified it to use NSArrays instead of C-arrays. A good explanation of the algorithm can be found on “The Code Project”.
Finally, modify touchesEnded:withEvent: to use this algorithm:

[sourcecode]- (void)touchesEnded:(NSSet *)touches withEvent:(UIEvent *)event
{
NSArray *generalizedPoints = [self douglasPeucker:drawnPoints epsilon:2];
NSArray *splinePoints = [self catmullRomSpline:generalizedPoints segments:4];
imageView_.image = [self drawPathWithPoints:splinePoints image:cleanImage];
[drawnPoints release];
[cleanImage release];
}
[/sourcecode]

That’s it. You’re done!

It would facilitate them to put fine-looking signatures, draw beautiful sketches and make impressive presentations.

Have something to add to this topic? Share it in the comments.

At Andolasoft we have a team dedicated iOS app developer who has long expertise in implementation of Service Oriented Architecture. Our developers can help you in all your mobile app development issues. So don’t hesitate to communicate with them. Book a free consultation to access them directly.
IPhone 5S And IPad 5 Is Expected To Launch On 29th Of June

Apple’s next big thing is expected to lunch iphone 5s and ipad 5 on 29th of June of this year. Apparently iPhone 5S Smartphone will be entering the consumer market much earlier than what was expected. It is designed as a high-end sibling of the present generation iPhone 5. DigiTimes has revealed that the IPhone 5S will feature a faster processor, based on Apple’s ARM processing cores. They have also claimed that, it will have a higher-resolution camera than its previous models. These features can be disappointing for most users who find the phone’s design to be little boring and outdated compared to other major smart device manufacturers. But the next-generation iPhone 6 is expected to bring a fresh, updated and completely re-designed phone. Rumors have it that its design is inspired form iPad mini tablet.

Never miss an update from us. Join 10,000+ marketers and leaders.

DigiTimes’ sources has also pointed out that deliveries of essential iPhone 5S components are already scheduled to May, which makes sense that the launch date might be true. Resources have also stated that Apple is planning to launch iPad5 along with the iPhone 5S in an event on 29thof June. While unconfirmed from Apple, this date fits well with the earlier humors of the launch, but the inclusion of iPad 5 comes as something of a surprise. And these devices might be running iOS 7.

DigiTimes has released in their website stating-“Components for the next-generation iPhone will start shipping at the end of May with the new smartphone to have a chance of showing up in the third quarter, according to sources from the upstream supply chain.”

The new iPhone will not receive a major upgrade and may just be a slightly enhanced version of iPhone 5 (iPhone 5S), the sources said citing their latest specification data.”

If the event does really take place in June, It will be something of a test to iPhone 5S and iPad-5. This could also be the deciding factor of the company’s future. It will be the first major release from the company since the death of its co-founder Steve Jobs.

Major iphone application development company are also looking forward to the release of the new iPhone as well as the iOS 7. It will facilitate them to develop apps for the new OS with numerous new features and functionalities.