After generating a great idea about your application is just a half battle, the main challenge is hiring a developer team that can bring any ideas into reality.
Therefore, you need to consider hiring a Full stack developer team, who can provide you, your desired applications.
According to Evans Data Corporation, the number of developers globally has crossed 30 millions by 2021. It’s estimated that the developers number will be growing along with time, and will reach 45 millions by 2030.
- US has largest number of Software Developers
- Ukraine holds the second largest pool in Web and Mobile app developers
- India pool of developers is going to outgrow the US pool in a few years
Today, several industries, even companies are competing to attract customers with the best possible efforts. Because change is the only constant in the ever-changing world of technology. With the growing demand for technology, changing your business approach is the only way to provide users with better and sharper products and software tools. With larger people moving towards the virtual world, anyone with any sort of enterprise needs to have an online presence.
Never miss an update from us. Join 10,000+ marketers and leaders.
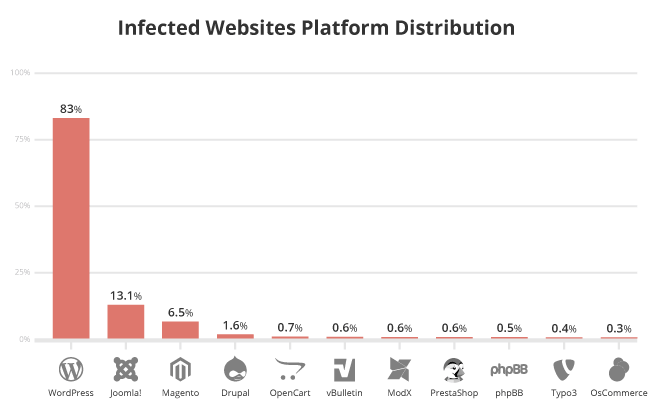
Web development is rapidly growing and the most popular industry globally. 2021 has been a great period to enter in the field, it was reported that the Web Developer jobs has gradually increased to 13% between 2018 and 2028.
We all know that maintaining a competitive edge in this race is quite harder for any business.
You must have acknowledged, many entrepreneurs are upgrading their business stores to the online market. And some are even pushing their industry services to the mobile platform as well.
In order to get your success, you just need to charm your plans and put something extraordinary into it.
As an example- if you are choosing a mobile app development plan, then you must be aware of how much the mobile sector is constantly getting a good response. So,
- Do you have enough budgets for it?
- Are you sure that your business idea is viable?
You found an excellent idea for a startup and you want to turn that into reality. But building even the simplest product needs investment, which is now a major challenge for every entrepreneur.
However simple or complex, it’s obvious to validate that idea to ensure all your investment doesn’t go to waste.
So, What’s The Best Way To Validate The Idea?
The answer is MVP.
Most of the starting up business starts with the MVP development before moving on to the full-fledged web product. Well, this is the right step as it minimizes the risk of product failure upon its launch.
In simple words, it helps to find out whether you should move ahead with the idea to develop the product or not.
But Who Is Going To Will Build The MVP For Your Approach?
Well, here’s the thing…
If you’ve required technical knowledge, then without wasting much time, you should go ahead and start building your MVP. But, what if you are a non-technical entrepreneur? Hire a full-stack developer rather than relying on anyone else.
Now before you rush in finding full-stack developers all over the web, it’s vital to understand
Who Exactly The Full-Stack Developers Are?
In simple words, a full stack developer is a jack of all trades developer. They are well-aware of most of the technologies to build an entire application.
They can work on both front-end and back-end development. In the app development industries, full-stack developers are stood as T-shaped professionals.
The frontend is everything that is observed by end users and the place where they directly interacts with, unlike sign-up page or the site in the online store
T-Shaped Professionals?
The name T-shaped was given because, unlike traditional I-shaped professionals who are professionals only in their own domains but have no idea about others, a full-stack well developer is a professional in one or two different domains and knows about other domains as well.
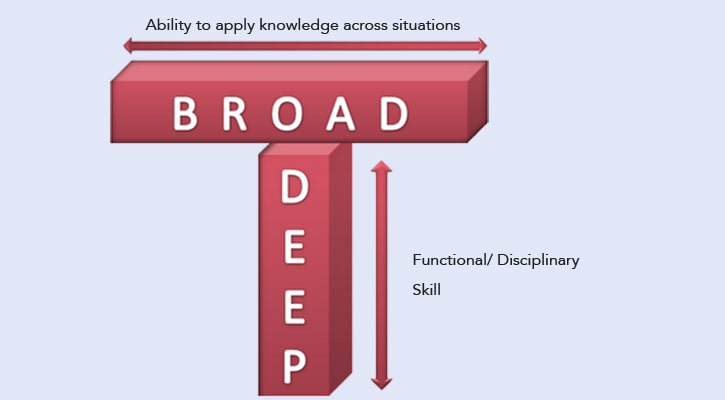 Image Souce: Whatech[.]com
In simple words, a full-stack developer can be an expert in one or two front-end and back-end technologies. They also can possess functional skills of languages beyond their main expertise.
So when it’s about developing an MVP for your business, these T-shaped professionals are the perfect fit.
How MVP Is Helpful?
Suppose you want to develop an E-commerce app. The designs are ready and all you need is to get its MVP built.
So, the first thought may come to your mind to hire in-house developers which might be different professionals for different skill-sets. Such as:
- UX Designer
- Front-end Developer
- Back-end Developer
- Quality Analyst
But, the expenses of each individual are always going to differ. If you want to go with this, then the first obstacle will be the communication between you and the hired dedicated developers, will be chaotic.
Full-stack developers can manage the MVP development effectively. They can fulfill all the development aspects such as quality analysis, UX designing, front-end, and back-end development.
Full-stack development mainly consists of 3 layers, such as;
- Presentation Layer
- Business Logic Layer
- Database Layer
Presentation Layer:
This is the frontend of an application or product. In this layer, the UI is designed and developed. That means your full-stack developer must have the basic knowledge in CSS, HTML, and JavaScript.
That’s not enough. That developer must be well-known to the latest JavaScript framework. Hence, while searching for full-stack developers, make sure that the selected candidate must be experienced in using Angular.js, Vue.js, and React.js.
Business Logic Layer:
This is the backend of an application or product which strengthens the frontend. In this layer, the full-stack developers use server-side programming languages to write the business logic of the product or application.
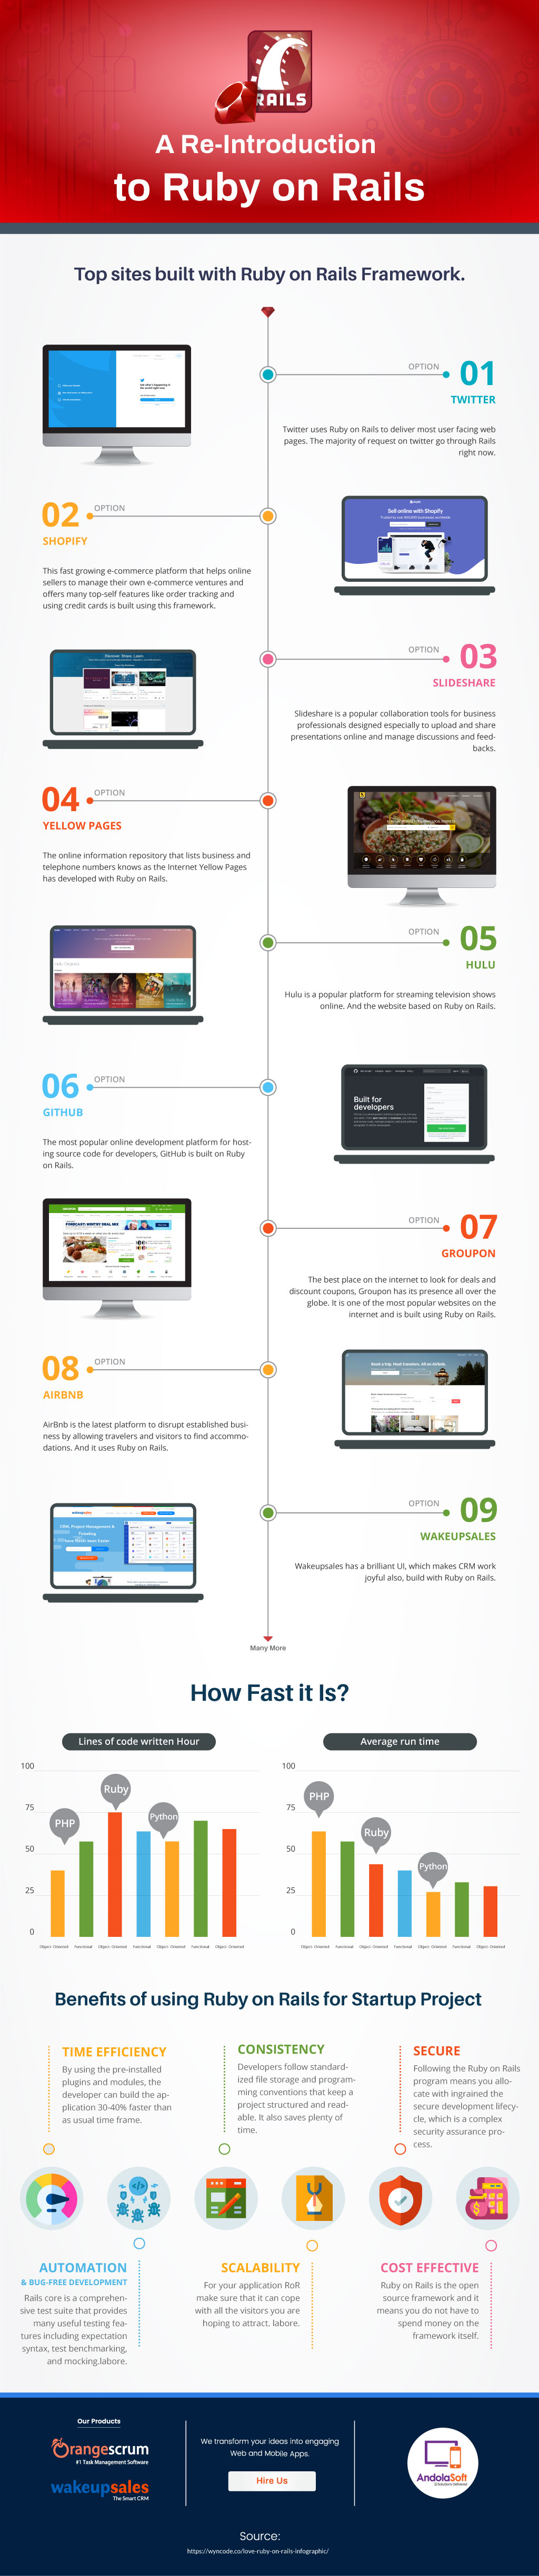
So the chosen full stack developer must know the backend frameworks such as Node.js, Ruby on Rails, Python with Django, and Java with Spring MVC.
Database Layer:
The database is a part of the backend and your full stack developer must be comfortable with both relational as well as Non-relational databases.
Relational databases generally use tables to store data, while Non-relational databases store data in JSON format. And right now, there are mainly three popular database languages: MySQL, MongoDB, and PostgreSQL.
So these are the basic things that required for full-stack development, and to leverage the development process, there must be a skilled developer to archive the real objects.
Now, you can say the full stack developers are real-life superheroes. Isn’t it?
Of course yes!
Let’s see, what are the real benefits of hiring a full-stack developer in MVP development.
- Cost Saving– This is obvious. It costs a lot to hire individual specialized developers than a full-stack developer.
- Easy To Upgrade– Compared to other developers, full-stack developers are more friendly and adaptive to the latest technologies. In case if your MVP needs any kind of technical changes; a full-stack developer can learn the scenario and will manage quickly.
- Easy Switching– Any experienced and skilled full-stack developer can switch between back-end to front-end and vice-versa easily.
- Fast And Perfect Delivery– The full stack developers can work as an individual unit. This makes the entire project development process easier as the developers divide the work responsibility among each other equally and coordinate well to bring out the best results.
What Are The Essential Skills Present In A Full Stack Developers?
A full stack web developer jobs required lots of skills and knowledge. So here is a list of the important skills required in a Full Stack Developer job:
- Backend language: A Full stack developer need to build both part of the application. Therefore they need to have backend knowledge like PHP, Python, Ruby, Java.
- Javascript: A Full stack developer is covered with various knowledge on programming languages. As many tech specialist see Javascript as an important skills for a full stack developer, used for adding behaviour via HTML.
I’ve worked with the team at Andolasoft on multiple websites. They are professional, responsive, & easy to work with. I’ve had great experiences & would recommend their services to anyone.
Ruthie Miller, Sr. Mktg. Specialist
Salesforce, Houston, Texas

GIT and GITHUB: There is no developer who has no knowledge on GIT and GITHUB. As GIT is a popular version control system. It allows the programmer to track all the changes done in the application and streamline the work within the development team.
Wrapping Up
If you’re fully sure about your business idea and ready to bring it to action, then you might consider outsourcing your project to an experienced full-stack web development agency.
The Idea of hiring the full stack developer or team is something like to work closely with your requirements, practical, easy to handle which would help your business to run successfully online. A technology partner like Andolasoft will help to accelerate your business growth, get access to the best talent pool.