When you start an online business, one of the biggest decisions you can make is while choosing an e-commerce platform for your business to ensure a scalable and long term growth.
You can implicate your business on this steps for better growth of your business:
- Protect the bottom line in terms for sale growth, in addition with the installation and maintenance.
- Ensure that your employees get what they want to implement on the campaign strategies.
- Help customers to get engaged with your brands and reduce friction while they’re getting the product they need.
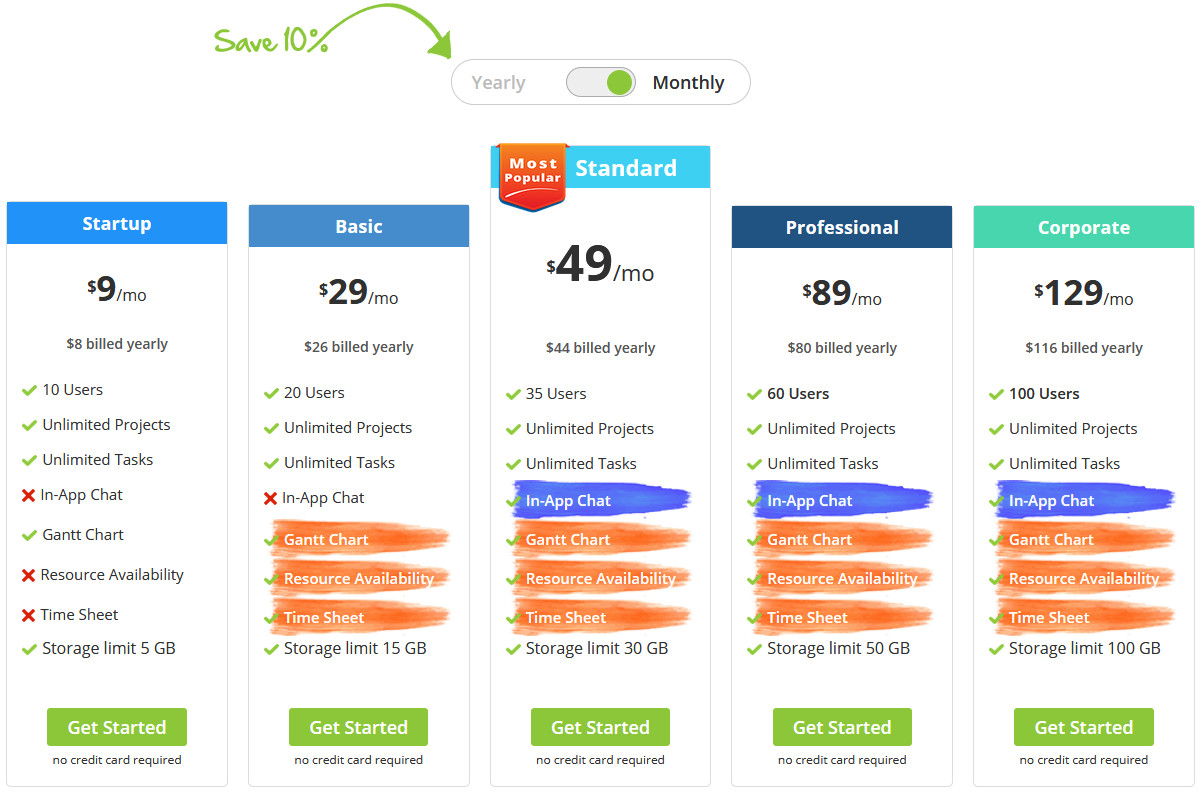
Let’s look at what things to consider while choosing an E-Commerce platform.
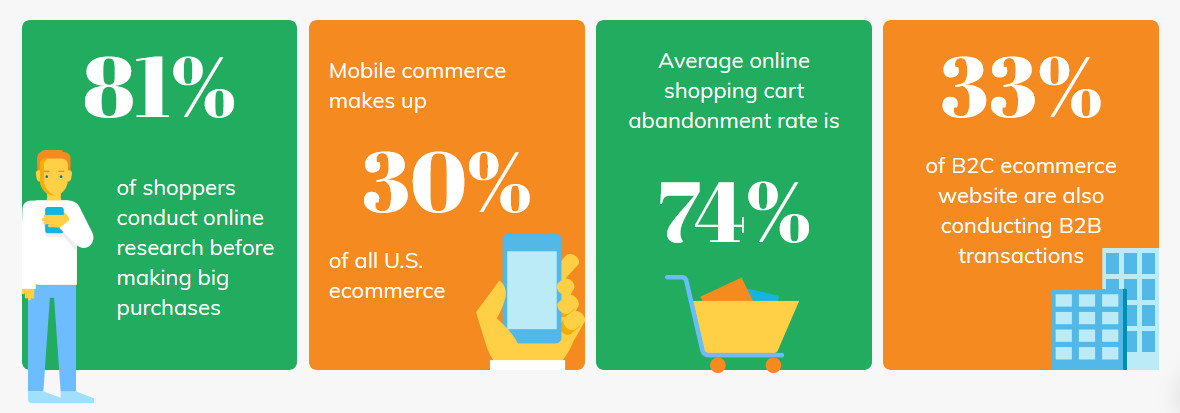
The online selling method has become the most popular and favoured method for vendors to generate revenues these days.
Never miss an update from us. Join 10,000+ marketers and leaders.
The new entrepreneurs with their unique ideas finding new possibilities in this business as well. With a large customer channel, eCommerce selling has become a modern trend for every enterprise.
So, what is eCommerce sell actually?
Well, selling the products online or taking orders and accepting payments online without leaving the store is an eCommerce sale.
To make it happen we need an online store, and this online store called “eCommerce Website“.
Now you need a website developer to set up a unique, simple to manage and good looking website. Aren’t you?
To make your website secure, hassle-free functionalities, you also have to choose the right platform as well.
But what is that platform?
The e-commerce platform is the web-based software in which your business will use to conduct buying or selling activities.
And the developer is the person who will set it up and customize according to your needs.
And there are many platforms that have been here to choose from. Like WordPress, Magento, Shopify, Drupal, etc.

As an entrepreneur, you may further like to think about choosing the right platform. Because every business owner might not have a good technical background to decide on.
When you get down to the competitive market, you may find a few competing with each other claiming to have nice features to help change or modify your functionality with ease.
In this case, you may develop a desire for a safe platform which gives you the flexibility to change your site features without the help of a dedicated developer.
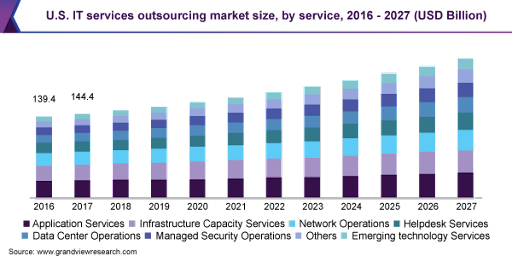
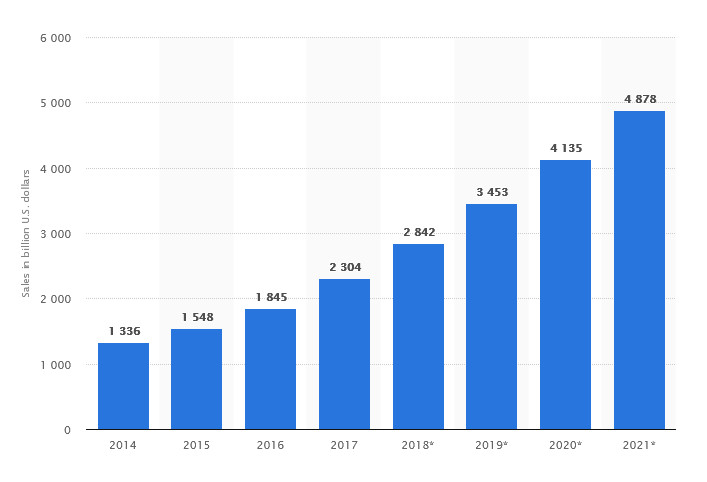
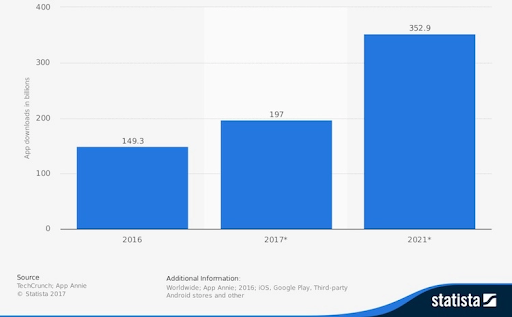
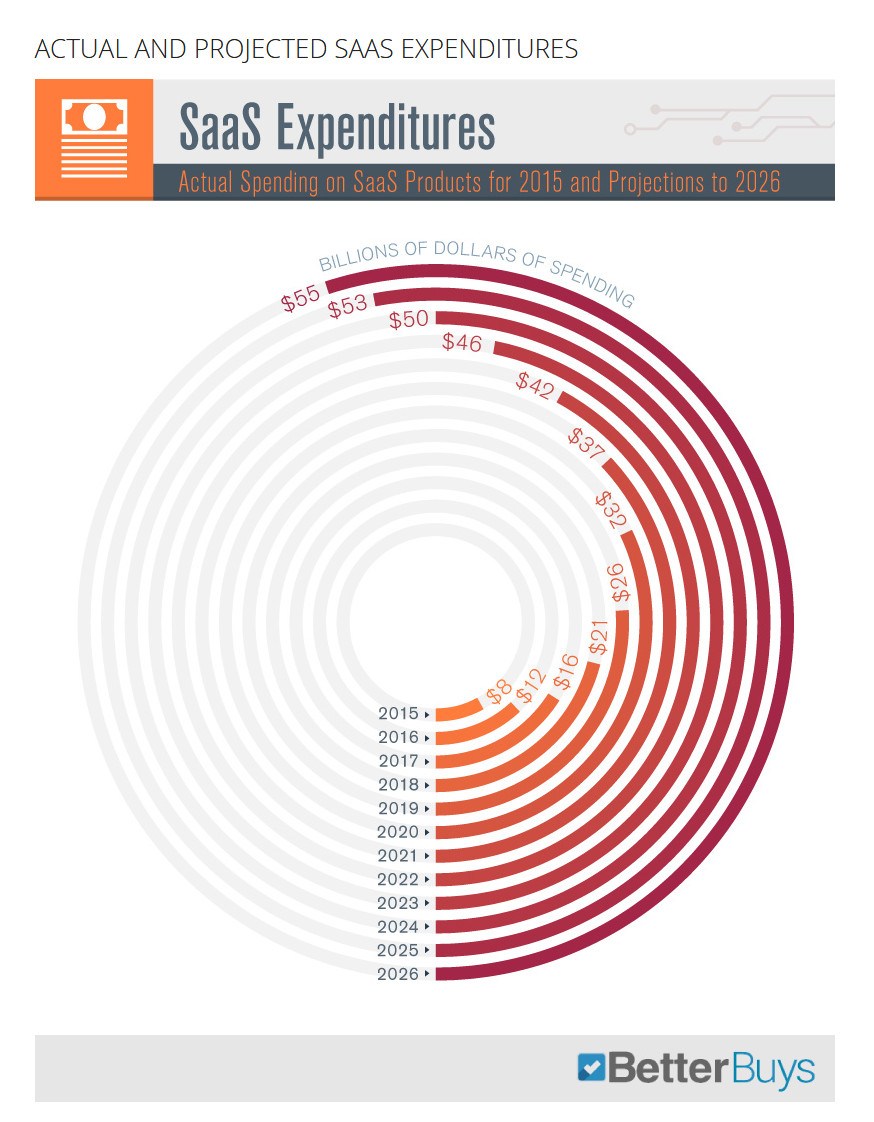
Let’s see what the present statistics say.
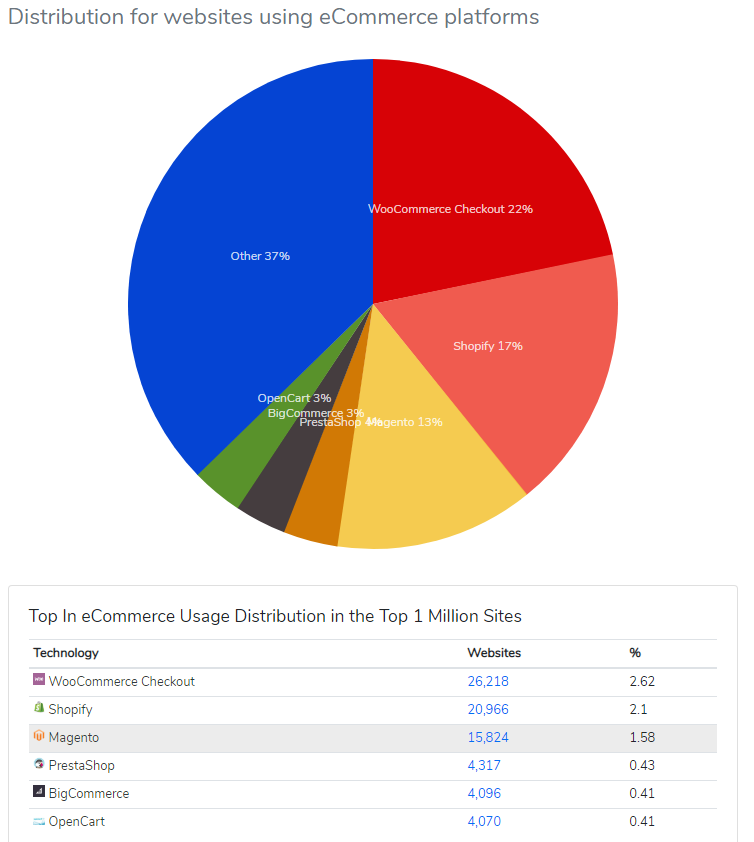
Looks like WooCommerce and Magento, both are leading the race. The above statistic is showing these platforms are far ahead in the competition as the best choice for entrepreneurs. Let’s learn more about these.
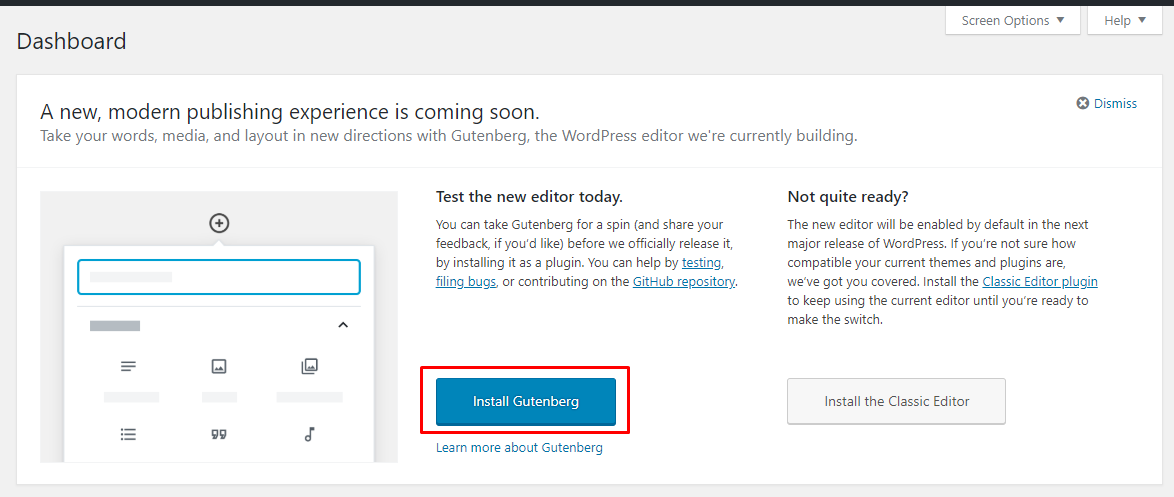
What Is WooCommerce?
Let me clear it first, WooCommerce is not an e-commerce platform itself.
It is a plugin/addon that adds e-commerce functionality to the website. It is widely used in the WordPress platform. And with just a few clicks, it turns the website to a fully-functional e-commerce website.
Whereas, an E-Commerce platform software is defined as the software that allows any online business enterprise or small business to easily manage the websites, sales, marketing and operations. It is a central hub or homebase to your businesses.
It offers many powerful features that help to run a business while also integrating with many common business tools that enables businesses to centralise the operation and run their business in an effective way.
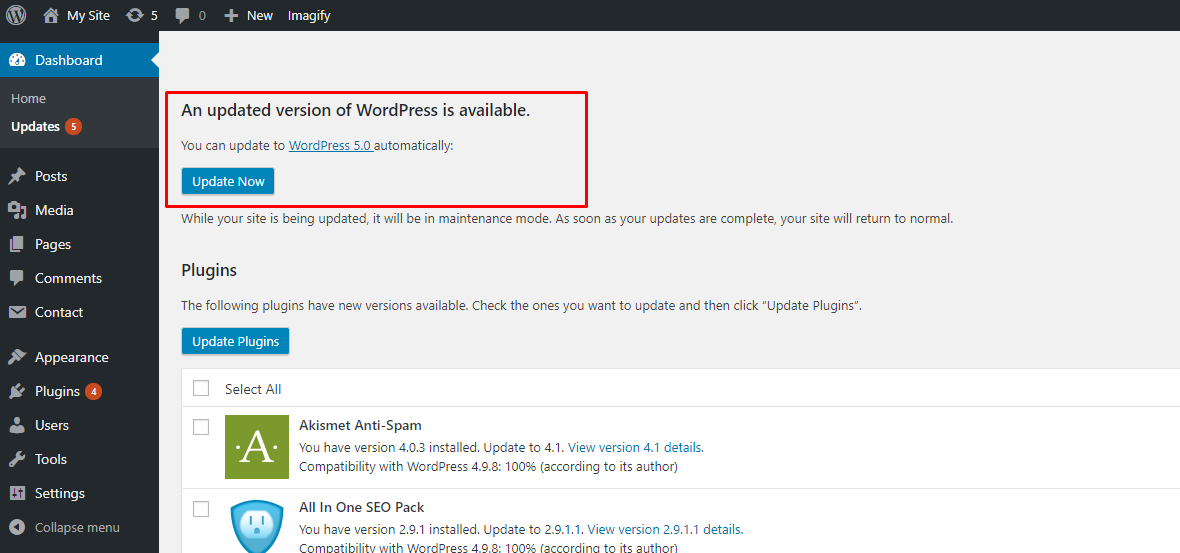
It means you can use this tool if you would build your website on the WordPress platform.
I already have given brief details about WordPress and the features on my previous blog.
This tool is widely popular for its features which are easy and helpful for both developers and entrepreneurs. i.e
- Easy Installation, Setup, and Integration
- Data Control
- Feature-packed Shopping Cart
- Complete Control of Products
- Easy Shipping
- Easier Tax Management
- A Leader in Marketing and Search Engine Optimization
- Keeping You Informed
- Customer Management
- Easy Mobile E-Commerce
- Fully Extendable
Magento, Is It Similar To WooCommerce?
Absolutely not! Magento is an eCommerce platform built on open source technology that offers a flexible online shopping cart system with full control over the look, content, and functionality of their online store as well.
Magento also offers powerful marketing, search engine optimization, and catalog-management tools.
Here are some other benefits we can get from this platform:
- Easy to install and add additional layouts and plug-ins
- Open source technology that offers flexible, scalable eCommerce solutions
- Effective and cost-sensitive program
- Allows for various discounts and promotions during check-out
- Provides more than 50 payment gateways
With this insight section, you would have quick access to all your actionable data exclusively for your store. And can utilize them accordingly.
 Image Source: Techcresendo.com
Small entrepreneurs always have the benefit of being agile when it comes to taking action.
You can go through my previous blog for “Benefits of Using Magento E-commerce Platform for Your Business“.
I’ve worked with the team at Andolasoft on multiple websites. They are professional, responsive, & easy to work with. I’ve had great experiences & would recommend their services to anyone.
Ruthie Miller, Sr. Mktg. Specialist
Salesforce, Houston, Texas

I believe, Magento is one of the best eCommerce platforms available today, with editions, a range of community open-source, massive, large-scale enterprise SaaS-based systems.
Conclusions:
Certainly, it doesn’t matter how many recommendations you get from your friend or from any other sources, You need to think twice while choosing an e-commerce platform.
Based on the recommendations above, you can go with any of it or other platforms that you like.
If you want your Ecommerce software development, Andolasoft is here to help with all your stuff. Our expert developer will develop an amazing ecommerce websites for your business