What’s New In Laravel 9 And Its Feature Comparison

Laravel has been one of the most popular PHP frameworks for many years and for a long time now. It is adaptable, scalable, versatile, and has become one of the in fact the systems for engineers and companies working with PHP. It’s elegant, scalable, and has become one of the de facto frameworks for developers and companies working with PHP. Laravel 9 is its latest release and comes with many new features.

There’s no surprise that Laravel has become one of the leading PHP frameworks for building endeavor review web applications, custom, and robust applications. Its features and functionalities have developed so well that it has ended up being the go-to PHP system for web application development.

Initially, scheduled to be released by September 2021, Laravel 9 was pushed to January 2022, making it the first long-term bolster (LTS) release to be introduced following the 12-month release cycle.

Here are the expert views,

“I’m finding the Laravel 9 release is much more of a minor “maintenance” release compared to other previous major Laravel releases. Committing ourselves to only 1 “major” release a year really pushed us to ship a bunch of stuff we would have typically held back for a major.” – Taylor Otwell – Founder and CEO of Laravel

“Laravel 9 doesn’t have as many headline features as a normal Laravel release because the team has been focusing on releasing new features throughout the year now that they’ve moved to a yearly release cycle. There’s a pretty comprehensive list of the new features at https://laravel-news.com/laravel-9. The one thing that isn’t mentioned there that I’m excited about is the new support for generics on the Collection class which will really help improve static analysis.” – Jess Archer – Odcast Co-hoster at the BaseCode

What is Laravel?

Laravel is an open-source PHP web application framework known for its elegant syntax. It’s an MVC framework for building simple to complex web applications using the PHP programming language, and it strictly follows the MVC (model–view–controller) architectural pattern.

Laravel Versions

Laravel Lifecycle

Laravel Life Cycle

Some of the main features of Laravel are:

  • Eloquent ORM
  • Query Builder
  • Reverse Routing
  • Restful Controllers
  • Migrations
  • Database Seeding
  • Unit Testing
  • Homestead
  • Source code hosted on GitHub and licensed under MIT License.
  • Most Starred PHP Framework for custom software development on Github.
  • Its ability to use all of the new features of PHP sets it apart.
  • Friendly online community
  • Detailed documentation
  • Security

New Features in Laravel 9

1. Anonymous Stub Migration

Laravel 8

Anonymous Stub Migration 8

Laravel 9

Anonymous Stub Migration 9

2. New Query Builder Interface

With the new Laravel 9, type hinting is highly reliable for refactoring, static analysis, and code completion in their IDEs. Due to the lack of a shared interface or inheritance between Query\Builder, Eloquent\Builder, and Eloquent\Relation. Still, with Laravel 9, developers can now enjoy the new query builder interface for type hinting, refactoring, and static analysis.

Query Builder Interface

3. Controller Route Grouping

Laravel 8

Controller Route Grouping 8

Laravel 9

Controller Route Grouping 9

4. Accessors & Mutators

Accessors Mutators 8
Accessors Mutators 9
Accessors Mutators W 8
Accessors Mutators W 9

5. Helper Functions

Route Function
Laravel 8
Route Function 8

Laravel 9

Route Function 9
String Function
Laravel 8
String Function 8

Laravel 9

String Function 9

6. Flysystem 3.0

Driver Prerequisites
  • S3 Driver Configuration
    Flysystem1
  • FTP Driver Configurationn
    Flysystem2
  • SFTP Driver Configuration
    Flysystem3

7. Symfony Mailer

Laravel provides a clean, simple email API powered by the popular Symfony Mailer component. Laravel and Symfony Mailer provide drivers for sending email via SMTP, Mailgun, Postmark, Amazon SES, and send mail, allowing you to quickly get started sending mail through a local or cloud-based service of your choice.

Driver / Transport Prerequisites
  • Mailgun Driver
  • Postmark Driver
  • SES Driver
Mailgun Driver

To use the Mailgun driver, install Symfony’s Mailgun Mailer transport via Composer:

Mailgun
Mailgun1

Mailgun2
Postmark Driver

To use the Postmark driver, install Symfony’s Postmark Mailer transport via Composer:

Postmark

Postmark1
SES Driver
To use the Amazon SES driver you must first install the Amazon AWS SDK for PHP. You may install this library via the Composer package manager:

SES

SES1

Feature-Based Comparison

Laravel Feature Based Comparison

Conclusion:

Laravel is a compelling PHP framework that’s picking up more consideration among developers. Its up-and-coming major release is the primary one taking after a 12-month release cycle, and able to already see it’ll introduce “juicy” new features. Laravel will likely add new features before the release date, so do follow this article for future updates and reviews.

Laravel is a compelling PHP framework that’s gaining more attention among developers. Laravel 9 is the first one following a 12-month release cycle, and we can already experience its “juicy” new features.

With the latest version of Laravel, it will be easier to develop web apps. If you need help designing a web app, you can hire Laravel 9 developers from Andolasoft. Our team has experience working with the latest Laravel versions.

ECMAScript 6: What You Need to Know

ES6 is the latest version of JavaScript. While ES5 and ES2015 are still widely used today, ES6 is a significant update from both of them. The ES6 specification was finalized in June 2015, and it’s now supported by all major browsers with some minor exceptions.

ES6 is designed to be easier to read and write than previous versions of JavaScript. Let’s take a look at some of the new features implemented in ES6 that are more intuitive and cleaner than their predecessors.

What is ECMA?

European Computer Manufacturers Association (ECMAScript) or (ES) is a standard for scripting languages like JavaScript, ActionScript and JScript.

It was initially created to standardize JavaScript, which is the most popular implementation of ECMAScript.

What is ECMAScript?

ECMAScript (ES) is a scripting language specification standardized by ECMAScript International.

It is used by applications to enable client-side scripting.

The specification is influenced by programming languages like Self, Perl, Python, and Java etc. Languages like JavaScript, Jscript and ActionScript are governed by this specification.

ECMA Script6’s new features −

  • Support for constants
  • Block Scope
  • Arrow Functions
  • Template Literals
  • Extended Literals
  • Enhanced Object Properties
  • Destructuring
  • Modules
  • Classes
  • Iterators
  • Generators
  • Collections
  • New built in methods for various classes
  • Promises

ECMAScript Versions

ECMAScript Versions

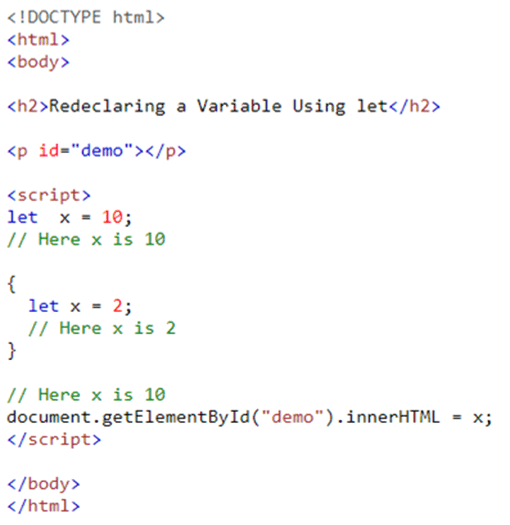
JavaScript let

The let keyword allows you to declare a variable with block scope.

Let and const basically replace var.

You use let instead of var, const instead of var if you plan on never re-assigning this “variable”.

JavaScript let

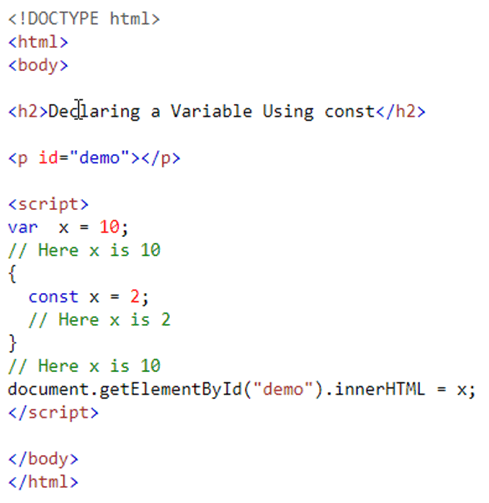
JavaScript const

The const keyword allows you to declare a constant (a JavaScript variable with a constant value).

Constants are similar to let variables, except that the value cannot be changed.

JavaScript const

Arrow Functions

Arrow functions allows a short syntax for writing function expressions.

This is a different way of creating functions in JavaScript. Besides a shorter syntax, they offer advantages when it comes to keeping the scope of the keyword.

Arrow function syntax may look strange but it’s actually simple.

Arrow Functions

Normal function syntax as below:

Function callMe (name){

console.log(name);

}

Arrow function syntax may look as below:

const callMe = (name) => {

console.log (name);

}

Arrow Functions

When having no arguments, you have to use empty parentheses in the function declaration:

const callMe = () => {

console.log (‘Max!’);

}

When having exactly one argument, you may omit the parentheses:

const callMe = name => {

console.log (name);

}

Arrow Functions

When just returning a value, you can use the following shortcut:

const returnMe = name => name

That’s equal to:

const returnMe = name => {

return name;

}

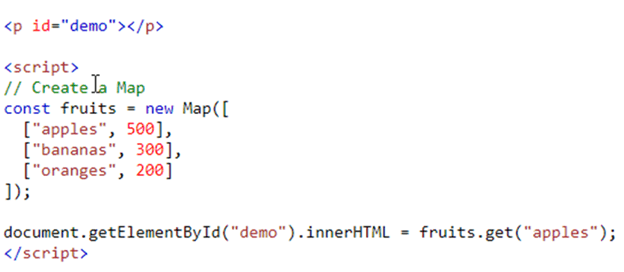
JavaScript Maps

  • A Map holds key-value pairs where the keys can be any data type.
  • A Map remembers the original insertion order of the keys.
  • A Map has a property that represents the size of the map.

JavaScript MapsJavaScript Sets

  • A JavaScript Set is a collection of unique values.
  • Each value can only occur once in a Set.
  • A Set can hold any value of any data type.

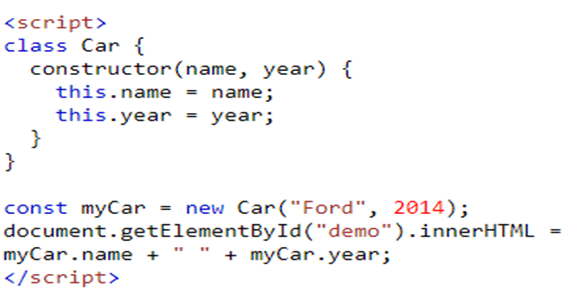
JavaScript Classes

Classes are a feature which basically replace constructor functions and prototypes. You can define blueprints for JavaScript objects with them. Use the keyword class to create a class. Always add a method named constructor ():

JavaScript Classes

Ans: Ford 2014

Math Methods in ES6

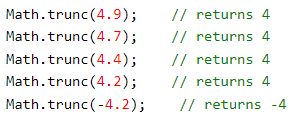
ES6 added the following methods to the Math object:

Math.trunc ()

Math.sign ()

Math.cbrt ()

Math.log2 ()

Math.log10 ()

Math Methods

Math Methods

Math Methods

Math Methods

Math Methods

Spread Operator

The spread and rest operators actually use the same syntax: …  Yes, that is the operator – just three dots.

Its usage determines whether you’re using it as the spread or rest operator.

Using the Spread Operator:

The spread operator allows you to pull elements out of an array (=> split the array into a list of its elements) or pull the properties out of an object.

Here are two examples:

const old Array = [1, 2, 3];

const new Array = […old Array, 4, 5]; // This now is [1, 2, 3, 4, 5];

Spread Operator

Here’s the spread operator used on an object::

const oldObject = { name: ‘Max’  };

const newObject = { …oldObject, age: 28 };

new Object would then be

{

name: ‘Max’,

age: 28

}

The spread operator is extremely useful for cloning arrays and objects. Since both are reference types (and not primitives), copying them safely can be tricky.

With the spread operator you have an easy way of creating a clone of the object or array.

Rest Operator

The rest parameter (…) allows a function to treat an indefinite number of arguments as an array.

E.g:

Function sum (…args) {

let sum = 0;

for (let arg of args) sum += arg;

return sum;

}

let x = sum(4, 9, 16, 25, 29, 100, 66, 77);

Ans: 326

Destructuring

Destructuring allows you to easily access the values of arrays or objects and assign them to variables.

Here’s an example for an array:

const array = [1, 2, 3];

const [a, b] = array;

console.log(a); // prints 1

console.log(b); // prints 2

console.log(array); // prints [1, 2, 3]

Destructuring

Example for an object:

const myObj = {

name: ‘Max’,

age: 28

}

con         st {name} = myObj;

console.log(name); // prints ‘Max’

console.log(age); // prints undefined console.log(myObj); // prints {name: ‘Max’, age: 28}

Destructuring

Destructuring is very useful when working with function arguments.

E.g:

const printName = (personObj) => {

console.log(personObj.name);

}

printName({name: ‘Max’, age: 28});

//prints ‘Max’

Here, we only want to print the name in the function but we pass a complete person object to the function. Of course this is no issue but it forces us to call personObj.name inside of our function

Destructuring

We can condense this code with destructuring:

E.g:

const printName = ({name}) => {

console.log(name);

}

printName({name: ‘Max’, age: 28});

//prints ‘Max’

We get the same result as above but we save some code. By destructuring, we simply pull out the name property and store it in a variable/ argument named name which we then can use in the function body

Conclusion:

ES6 is a newer version of JavaScript that has some useful new features. It’s cleaner and easier to read, and it has a few new syntax features that make coding easier. There are also a lot of new functions that are built into the language that make coding easier.

The main highlight of ES6 is that it makes syntax cleaner, its scope is more restricted, and there are also a lot of new functions built into the language that make coding easier and libraries like Underscore or Lodash unnecessary.

If you want to start using ES6, then you can use a code transpiler like Babel to convert your code to the older ES. Andolasoft has highly experienced JavaScript developers who has expertise in ES6 latest version of JavaScript. Book a free consultation now to get solution on your queries.

ReactJS Basics and Difference Between AngularJS and ReactJS

ReactJS and AngularJS are the most popular front-end JavaScript frameworks today. They both have their own strengths and weaknesses, but that’s why they’re so popular.

Famous YouTubers, plugin makers, and developers around the world are opting for either one over the other.

The two front-end frameworks are so popular because they solve distinct problems and because they do so in a variety of ways.

What is ReactJS?

ReactJS is an open-source JavaScript library that is used for building user interfaces specifically for single-page applications. It’s used for handling the view layer for web and mobile apps. React also allows us to create reusable UI components.

ReactJS is a JavaScript library for building user interfaces. It’s one of many frameworks that have popped up in the past few years as front-end developers seek new ways to build web apps.

React Property

Functional Component in ReactJS

Functional components are some of the more common components that will come across while working in React. These are simply JavaScript functions. We can create a functional component to react by writing a JavaScript function.

Class Components in ReactJS

React class-based components are the bread and butter of most modern web apps built in ReactJS. These components are simple classes (made up of multiple functions that add functionality to the application). All class-based components are child classes for the Component class of ReactJS.

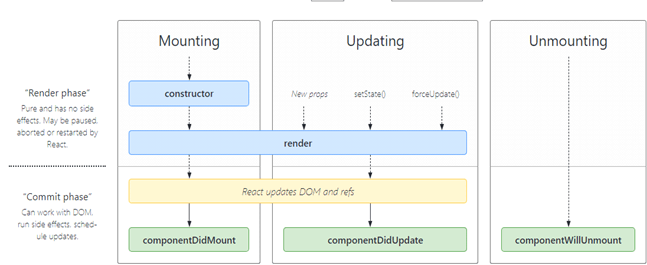
React Lifecycle Method

React Lifecycle

What is AngularJS?

AngularJS is a web application framework developed by Google. It’s used to develop single-page applications that run within the browser. Like other front-end web development frameworks, AngularJS solves a particular problem and provides developers with a set of tools.

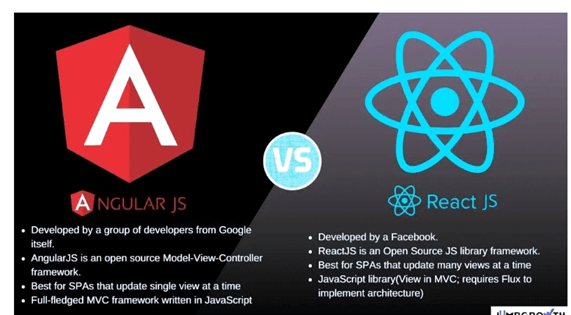
Difference between AngularJS and ReactJSAngular vs React

Why do we use ReactJS instead of AngularJS?

Angular is a complete full-blown framework so if somebody wants to make an application or project on Angular they need to learn a lot of things like Typescript in-depth.

MVC also there are so many other concepts to learn such as directives, modules, decorators, components, services, dependency injection, pipes, and templates. In advance topic, it requires learning change detection, zones, AOT (Ahead-of-Time) compilation, and Rx.js. Angular provides a lot of stuff “out of the box”. It has strict coding which gives a clear structuring but there are so many things to learn if somebody wants to enter Angular.

On the other hand, ReactJS is just a library and so it has fewer concepts to learn in comparison to Angular. React uses JSX (JavaScript XML) which is a way of writing HTML into JavaScript. So we need to know the syntax of JSX, how to write components, manage internal state, props for configuration, routing, and state management using Redux. It’s easy to learn quickly.

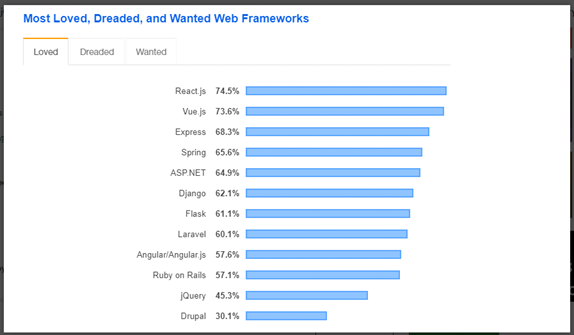
Web Frameworks

From the above images, it’s clearly mentioned that ReactJS has higher priority than Angular and Google Trends also says ReactJS is the most popular library.

Conclusion:

ReactJS and AngularJS are two front-end web development frameworks that have gained immense popularity in the past few years.

These two frameworks are considered as top-notch choices to build scalable, engaging user interfaces. However, these two frameworks have many differences. They are also designed for different purposes.

Both AngularJS and ReactJS provide developers with a way to create fast, secure, and responsive web and mobile apps. While they both have their own specific advantages, they also have some key differences that you should be aware of.

If you’re thinking about which JavaScript framework to use for your next project, then please consult with Andolasoft experts. Andolasoft has tech experts in both AngularJS and ReactJS to guide you in a better way to develop your dream application within your time and budget. So feel free to book a free consultation with us.

Key Difference Between ReactJS And React Native

ReactJS and React Native are two leading JavaScript frameworks that allow users to build mobile user interfaces (MUI). They both provide developers with an opportunity to quickly prototype mobile apps and manage complexity as projects grow in scope. Both ReactJS and React Native are used to create native-like apps. However, there are certain differences between the two. Let me explain one by one

What is ReactJS?

React.JS often referred to as React or ReactJS is a JavaScript library responsible for building a hierarchy of UI components or in other words, responsible for the rendering of UI components. It provides support for both front-end and server-side.

Advantages of ReactJS

  1. Easy to learn and use: ReactJS is much easier to learn and use. Any developer who comes from a JavaScript background can easily understand and start creating web apps using react.
  2. Creating dynamic web applications becomes easier: To create a dynamic web application specifically with HTML was tricky, which requires complex coding, but ReactJS solved that issue and makes it easier. It provides less coding and gives more functionality.
  3. Reusable components: ReactJS web application is made up of multiple components, and each component has its logic and controls. These components can be reused wherever needed. The reusable code helps to make your apps easier to develop and maintain.
  4. Performance enhancement: ReactJS improves performance due to virtual DOM. The React Virtual DOM exists entirely in memory and is a representation of the web browser’s DOM. Due to this, when we write a react component, we do not write directly to the DOM. Instead, we are writing virtual components that will turn into the DOM, leading to smoother and faster performance.
  5. The support of handy tools: ReactJS supports a handy set of tools which make the task of the developers understandable and easier.

What is React Native?

React Native is an open-source JavaScript framework used for developing a mobile application for iOS, Android, and Windows. It uses only JavaScript to build a cross-platform mobile app. React Native is the same as react, but it uses native components instead of using web components as building blocks. It targets mobile platforms rather than the browser.

Facebook developed the React Native in 2013 for its internal project Hackathon. In March 2015, Facebook announced that React Native is open and available on GitHub.

Advantages of React Native

There are several advantages of React Native for building mobile applications. Some of them are given below:

  1. Cross-Platform Usage: It provides the facility of “Learn once write everywhere.” It works for both platform Android as well as iOS devices.
  2. Class Performance: The code written in React Native is compiled into native code, which enables it for both operating systems as well as it functions in the same way on both the platforms.
  3. JavaScript: JavaScript knowledge is used to build native mobile apps.
  4. Community: The large community of ReactJS and React Native helps us to find any answer we require.
  5. Hot Reloading: Making a few changes in the code of your app will be immediately visible during development. If the business logic is changed, its reflection is live reloaded on screen.
  6. Improving with Time: Some features of iOS and Android are still not supported, and the community is always inventing the best practices.
  7. Native Components: We will need to write some platform specific code if we want to create native functionality, which is not designed yet.
  8. Existence is Uncertain: As Facebook develops this framework, its presence is uncertain since it keeps all the rights to kill off the project anytime. As the popularity of React Native rises, it is unlikely to happen.

Disadvantages of React Native

  1. React Native is still new and immature: React Native is a newbie in Android and iOS programming languages and is still in its improvement stage, which can have a negative impact on the apps.
  2. Learning is tough: React Native is not easy to learn, especially for a fresher in the app development field.
  3. Lacks the Security Robustness: React Native is a JavaScript library and open-source framework, which creates a gap in the security robustness. When you are creating banking and financial apps where data is highly confidential, experts advise not to choose React Native.
  4. Takes More Time to Initialize: React Native takes a lot of time for initializing the runtime even for the hi-tech gadgets and devices.

ReactJS vs React Native

ReactJS

React Native

ReactJS initial release was in 2013. React Native initial release was in 2015.
Used for developing web applications. Used for developing mobile applications.
Can be executed on all platforms. Not platform independent. It takes more effort to be executed on all platforms.
Uses React-router for navigating web pages. Built-in navigator library for navigating mobile applications.
Uses HTML tags. Does not use HTML tags.
Use code components, which saves a lot of valuable time. Reuse React Native UI components and modules which allow hybrid apps to render natively.
Provides high security. Provides low security in comparison to ReactJS.
The Virtual DOM renders the browser code. Native uses its API to render code for mobile applications.

Which is better, React or React native?

Both ReactJS and React Native are important pillars for app and web development, and due to their flexible functionalities and an evolving Eco-system of libraries, they are gaining momentum with each passing day.

While ReactJS is basically a JavaScript library and React Native is the entire framework, the former is the heart of the latter, and compliments each other.

If ReactJS is optimal for creating apps with high functionality and complex calculations, then React Native is ideal to give a native feeling to your mobile apps.

Conclusion

React is a framework for building applications using JavaScript. React Native is an entire platform allowing you to build native, cross-platform mobile apps, and React.JS is a JavaScript library you use for constructing a high performing UI layer.

React.JS is the heart of React Native, and it embodies all react principles and syntax, so the learning curve is easy. The platform is what gave rise to their technical differences. Like the browser code in React is rendered through Virtual DOM while React Native uses Native API’s to render components on mobile.

So both the framework has huge market demand for web and mobile application development. We have also expertise in developing application in react and react native. If you have any quarries on these two framework then please book a free consultation or if you are looking to develop application on these two framework then you are in the right place. Contact us now

How To Manage API Request with AXIOS on a React Native App

APIs can make your life a whole lot easier. With an API, you can send requests to other services and get responses without having to build those requests and responses yourself. But building an API isn’t as simple as it sounds. It requires careful planning, testing, and debugging.

If you’re building an API for the first time, it can feel like an impossible mountain to climb. That’s where APIs like Axios come in. It has a great API and lots of helpful features. Here in this article you’ll understand how to use Axios to manage API requests in your React Native app.

What is AXIOS?

Axios is one of the easiest HTTP clients to learn and use. Making an API request is as simple as passing a configuration object to Axios or invoking the appropriate method with the necessary arguments. You will learn the basics of Axios in this section.

Configuring Axios

Type following command on terminal window to install Axios:

NPM Install Axios

How to make requests to an API using Axios

Making a call to an API using Axios, you can pass a configuration object to Axios or invoke a method for the corresponding CRUD operations.

Never miss an update from us. Join 10,000+ marketers and leaders.

For example, you can make a GET request to the /api/users endpoint in one of the following two ways:

[code language=”css”]</pre>
import axios from ‘axios’;
const baseUrl = ‘https://reqres.in’;
// Passing configuration object to axios
axios({
method: ‘get’,
url: `${baseUrl}/api/users/1`,
}).then((response) => {
console.log("<<<<<< Passing configuration object to axios >>>>>>", response.data.data);
});

// Invoking get method to perform a GET request
axios.get(`${baseUrl}/api/users/1`).then((response) => {
console.log("<<<<<< Invoking get method to perform a GET request >>>>>>", response.data.data);
});
[/code]

There are several other fields such as baseURL, transformRequest, transformResponse, and headers, among others, which you can include in the configuration object you pass to Axios.

[code language=”css”]</pre>
// Passing configuration object to axios
const fetchUserFirst = async () => {
const configurationObject = {
method: ‘get’,
url: `${baseUrl}/api/users/1`,
};
const response = await axios(configurationObject);
console.log("<<<<<< Fetch User First >>>>>>", response.data.data);
};

// Invoking get method to perform a GET request
const fetchUserSecond = async () => {
const url = `${baseUrl}/api/users/2`;
const response = await axios.get(url);
console.log("<<<<<< Fetch User Second >>>>>>", response.data.data);
};
[/code]

How to make multiple concurrent API requests using Axios

We can use the Promise.all or Promise.allSettled method of the Promise API with Axios to make multiple concurrent API requests from a React Native application.

[code language=”css”]
const concurrentRequests = [
axios.get(`${baseUrl}/api/users/1`),
axios.get(`${baseUrl}/api/users/2`),
axios.get(`${baseUrl}/api/users/3`),
];
// Using Promise.all
Promise.all(concurrentRequests)
.then((result) => {
console.log(result);
})
.catch((err) => {
console.log(err);
});
// Using Promise.allSettled
Promise.allSettled(concurrentRequests)
.then((result) => {
console.log(result);
})
.catch((err) => {
console.log(err);
});
[/code]

How to abort network request in Axios

Axios provides functionality for aborting network requests. A typical use case of this feature in React Native is the cancellation of network requests in the use effect hook when a component is unmounted while data is still in flight.

[code language=”css”]
useEffect(() => {
const source = axios.CancelToken.source();
const url = `${baseUrl}/api/users/${userId}`;
const fetchUsers = async () => {
try {
const response = await axios.get(url, { cancelToken: source.token });
console.log(response.data);
} catch (error) {
if(axios.isCancel(error)){
console.log(‘Data fetching cancelled’);
}else{
// Handle error
}
}
};
fetchUsers();
return () => source.cancel("Data fetching cancelled");
}, [userId]);
[/code]

How to create an instance of Axios

You can also create an instance of Axios with a custom configuration. Axios will merge the configuration object passed while creating the instance with the configuration passed to the instance method:

[code language=”css”]
const axiosInstance = axios.create({ baseURL: ‘https://reqres.in/’ });
axiosInstance.get(‘api/users/1’).then((response) => {
console.log(response.data);
});
[/code]

How to make GET request using Axios in React Native

Make a GET request to the /api/users endpoint to retrieve a user and store the user ID in state as shown in the code snippet below. You can change the user ID inside the onPress event handler attached to the Load User button. Changing the user ID will trigger a GET request to the API inside the useEffect hook.

After triggering a network request, we display a loading indicator on the screen. If we fetch the data successfully, we update state and remove the loading indicator. If we fail to retrieve the data for some reason, we stop the loading indicator and display an appropriate error message.

We abort the network request in the clean-up function if the user decides to close the app before getting a response from the server. Check the return value of the effect function in the useEffect hook. Following is the code in the App.js component:

[code language=”css”]
import axios from "axios";
import React, { useState, useEffect } from "react";
import {
StyleSheet,
Text,
ScrollView,
View,
Button,
Image,
Platform,
} from "react-native";
import Constants from "expo-constants";
const baseUrl = "https://reqres.in";
function User({ userObject }) {
return (
<View>
<Image
source={{ uri: userObject.avatar }}
style={{ width: 128, height: 128, borderRadius: 64 }}
/>
<Text style={{ textAlign: "center", color: "white" }}>
{`${userObject.first_name} ${userObject.last_name}`}
</Text>
</View>
);
}
export default function App() {
const [userId, setUserId] = useState(1);
const [user, setUser] = useState(null);
const [isLoading, setIsLoading] = useState(false);
const [hasError, setErrorFlag] = useState(false);
const changeUserIdHandler = () => {
setUserId((userId) => (userId === 3 ? 1 : userId + 1));
};
useEffect(() => {
const source = axios.CancelToken.source();
const url = `${baseUrl}/api/users/${userId}`;
const fetchUsers = async () => {
try {
setIsLoading(true);
const response = await axios.get(url, { cancelToken: source.token });
if (response.status === 200) {
setUser(response.data.data);
setIsLoading(false);
return;
} else {
throw new Error("Failed to fetch users");
}
} catch (error) {
if(axios.isCancel(error)){
console.log(‘Data fetching cancelled’);
}else{
setErrorFlag(true);
setIsLoading(false);
}
}
};
fetchUsers();
return () => source.cancel("Data fetching cancelled");
}, [userId]);
return (
<ScrollView contentContainerStyle={styles.container}>
<View style={styles.wrapperStyle}>
{!isLoading && !hasError && user && <User userObject={user} />}
</View>
<View style={styles.wrapperStyle}>
{isLoading && <Text> Loading </Text>}
{!isLoading && hasError && <Text> An error has occurred </Text>}
</View>
<View>
<Button
title="Load user"
onPress={changeUserIdHandler}
disabled={isLoading}
style={styles.buttonStyles}
/>
</View>
</ScrollView>
);
}
const styles = StyleSheet.create({
container: {
flex: 1,
backgroundColor: "dodgerblue",
alignItems: "center",
justifyContent: "center",
marginTop: Platform.OS === "ios" ? 0 : Constants.statusBarHeight,
},
wrapperStyle: {
minHeight: 128,
},
buttonStyles: {
padding: 100,
},
});
[/code]

How to make a POST request

POST is the HTTP method you use to send data to the server for updating or creating a resource. Making a POST request in Axios is similar to making a GET request. Most of the time, POST requests are made with user-generated data submitted using a form. Data requires validation on the client side before it is submitted.

Two main React packages for managing forms are Formik and React Hook Form. React Native form for the user’s full name and email in the code snippet below. Both TextInput components are controlled components.

After clicking the submit button, the TextInput fields and the submit button are disabled before you display a message to show you are creating the resource. Disabling the submit button ensures the user doesn’t make multiple submissions. After successfully submitting a POST request, you display a success message to the user:

[code language=”css”]
import axios from "axios";
import React, { useState, useEffect } from "react";
import {
StyleSheet,
Text,
ScrollView,
View,
Button,
Image,
Platform,
} from "react-native";
import Constants from "expo-constants";
const baseUrl = "https://reqres.in";
function User({ userObject }) {
return (
<View>
<Image
source={{ uri: userObject.avatar }}
style={{ width: 128, height: 128, borderRadius: 64 }}
/>
<Text style={{ textAlign: "center", color: "white" }}>
{`${userObject.first_name} ${userObject.last_name}`}
</Text>
</View>
);
}
export default function App() {
const [userId, setUserId] = useState(1);
const [user, setUser] = useState(null);
const [isLoading, setIsLoading] = useState(false);
const [hasError, setErrorFlag] = useState(false);
const changeUserIdHandler = () => {
setUserId((userId) => (userId === 3 ? 1 : userId + 1));
};
useEffect(() => {
const source = axios.CancelToken.source();
const url = `${baseUrl}/api/users/${userId}`;
const fetchUsers = async () => {
try {
setIsLoading(true);
const response = await axios.get(url, { cancelToken: source.token });
if (response.status === 200) {
setUser(response.data.data);
setIsLoading(false);
return;
} else {
throw new Error("Failed to fetch users");
}
} catch (error) {
if(axios.isCancel(error)){
console.log(‘Data fetching cancelled’);
}else{
setErrorFlag(true);
setIsLoading(false);
}
}
};
fetchUsers();
return () => source.cancel("Data fetching cancelled");
}, [userId]);
return (
<ScrollView contentContainerStyle={styles.container}>
<View style={styles.wrapperStyle}>
{!isLoading && !hasError && user && <User userObject={user} />}
</View>
<View style={styles.wrapperStyle}>
{isLoading && <Text> Loading </Text>}
{!isLoading && hasError && <Text> An error has occurred </Text>}
</View>
<View>
<Button
title="Load user"
onPress={changeUserIdHandler}
disabled={isLoading}
style={styles.buttonStyles}
/>
</View>
</ScrollView>
);
}
const styles = StyleSheet.create({
container: {
flex: 1,
backgroundColor: "dodgerblue",
alignItems: "center",
justifyContent: "center",
marginTop: Platform.OS === "ios" ? 0 : Constants.statusBarHeight,
},
wrapperStyle: {
minHeight: 128,
},
buttonStyles: {
padding: 100,
},
});
[/code]

How to make a DELETE request

DELETE requests using Axios the same way you make POST and PUT requests. DELETE request will delete a resource from the server side. You can replace the onSubmitFormHandler of the code for making a POST request with the event handler below to make a DELETE request.

[code language=”css”]
const onSubmitFormHandler = async (event) => {
if (!fullName.trim() || !email.trim()) {
alert("Name or Email is invalid");
return;
}
setIsLoading(true);
try {
const response = await axios.delete(`${baseUrl}/api/users/2`, {
fullName,
email,
});
if (response.status === 204) {
alert(` You have deleted: ${JSON.stringify(response.data)}`);
setIsLoading(false);
setFullName(”);
setEmail(”);
} else {
throw new Error("Failed to delete resource");
}
} catch (error) {
alert("Failed to delete resource");
setIsLoading(false);
}
};
[/code]

How to make a PUT request

Updating a resource requires either the PUT or PATCH method. If a resource exists, using the PUT method completely overwrites it, and creates a new resource if it doesn’t. PATCH makes partial updates to the resource if it exists and does nothing if it doesn’t.

Making a PUT request to an API is similar to making a POST request. The only difference is the configuration object passed to Axios, or the HTTP method needed to invoke to make a PUT request to the API. Replace the onSubmitFormHandler of the POST request with the code below to make a PUT request.

[code language=”css”]</pre>
const onSubmitFormHandler = (event) => {
if (!fullName.trim() || !email.trim()) {
alert("Name or Email is invalid");
return;
}
setIsLoading(true);
const configurationObject = {
url: `${baseUrl}/api/users/2`,
method: "PUT",
data: { fullName, email },
};
axios(configurationObject)
.then((response) => {
if (response.status === 200) {
alert(` You have updated: ${JSON.stringify(response.data)}`);
setIsLoading(false);
setFullName("");
setEmail("");
} else {
throw new Error("An error has occurred");
}
})
.catch((error) => {
alert("An error has occurred");
setIsLoading(false);
});
};
[/code]

How to handle errors

React-error-boundary (Simple reusable React error boundary component) is a simple reusable component based on React error boundary API that provides a wrapper around your components and automatically catches all errors from the children’s components hierarchy, and also provides a great way to recover your component tree. Create an Errorhandler component like the following code snippet.

[code language=”css”]</pre>
import * as React from "react";
import { ErrorBoundary } from "react-error-boundary";
import { View, StyleSheet, Button } from "react-native";
import { Text } from "components";
const myErrorHandler = (error: Error) => {
// Do something with the error
function ErrorFallback({ resetErrorBoundary }) {
return (
<View style={[styles.container]}>
<View>
<Text> Something went wrong: </Text>
<Button title="try Again" onPress={resetErrorBoundary} />
</View>
</View>
);
}
export const ErrorHandler = ({ children }: { children: React.ReactNode }) => (
<ErrorBoundary FallbackComponent={ErrorFallback} onError={myErrorHandler}>
{children}
</ErrorBoundary>
);
const styles = StyleSheet.create({
container: {
flex: 1,
flexDirection: "column",
alignItems: "stretch",
justifyContent: "center",
alignContent: "center",
paddingHorizontal: 12,
},
});
[/code]

Here you can find the sample code in this Github repository

Best Practices for using AXIOS

Global config

Set up a global configuration that handles all application requests using a standard configuration that is set through a default object that ships with Axios. This object contains:

    • baseURL: A relative URL that acts as a prefix to all requests, and each request can append the URL
    • headers: Custom headers that can be set based on the requests
    • Timeout: The point at which the request is aborted, usually measured in milliseconds. The default value is 0, meaning it’s not applicable.
    • With Credentials: Indicates whether or not cross-site Access-Control requests should be made using credentials. The default is false.
    • Response Type: Indicates the type of data that the server will return, with options including json (default), arraybuffer, document, text, and stream.
    • Response Encoding: Indicates encoding to use for decoding responses. The default value is utf8.
    • xsrfCookieName: The name of the cookie to use as a value for XSRF token, the default value is XSRF-TOKEN.
    • xsrfHeaderName: The name of the HTTP header that carries the XSRF token value. The default value is X-XSRF-TOKEN.
    • maxContentLength: Defines the max size of the HTTP response content in bytes allowed
    • maxBodyLength: Defines the max size of the HTTP request content in bytes allowed

Most of the time, only be using baseURL, header, and maybe timeout. The rest of them are less frequently needed as they have smart defaults, but it’s nice to know they are there in case you need to fix up requests.

Are you looking for a React Native developer

Contact Us

This is the DRYness at work. For each request, we don’t have to repeat the baseURL of our API or repeat important headers that we might need on every request.

Custom instance

Setting up a “custom instance” is similar to a global config, but scoped to specified components so that it’s still a DRY technique, but with hierarchy. Set up a custom instance in a new file (Ex: authAxios.js) and import it into the “concern” components.

[code language=”css”]
// authAxios.js
import axios from ‘axios’;
const customInstance = axios.create ({
baseURL : ‘https://axios-app.firebaseio.com’
})
customInstance.defaults.headers.post[‘Accept’] = ‘application/json’
// Or like this…
const customInstance = axios.create ({
baseURL : ‘https://axios-app.firebaseio.com’,
headers: {‘Accept’: ‘application/json’}
})
[/code]

Then import this file into the “concern” components:

[code language=”css”]

// form.js component import from our custom instance
import axios from ‘./authAxios’;
export default {
methods : {
onSubmit () {
axios.post(‘/users.json’, formData)
.then(res => console.log(res))
.catch(error => console.log(error))
}
}
}
[/code]

Axios Verbs

Group the Axios HTTP verbs, like GET, POST, DELETE, and PATCH, in the base config file, as below.

[code language=”css”]</pre>
export function getRequest(URL) {

return axiosClient.get(`/${URL}`).then(response => response);

}

export function postRequest(URL, payload) {

return axiosClient.post(`/${URL}`, payload).then(response => response);

}

export function patchRequest(URL, payload) {

return axiosClient.patch(`/${URL}`, payload).then(response => response);

}

export function deleteRequest(URL) {

return axiosClient.delete(`/${URL}`).then(response => response);
<pre>}
[/code]

Now import the custom functions directly wherever needed to make an API request, as in the code below.

[code language=”css”]</pre>
import { getRequest } from ‘axiosClient’;

async function fetchUser() {

try {

const user = await getRequest(‘users’);

} catch(error) {

//Log errors

}
<pre>}
[/code]

Interceptors

  • Interceptors helps with cases where the global config or custom instance might be too generic, in the sense that if you set up a header within their objects, it applies to the header of every request within the affected components. Interceptors have the ability to change any object properties on the fly. For instance, we can send a different header based on any condition we choose within the interceptor.
  • Interceptors can be in the main.js file or a custom instance file. Requests are intercepted after they’ve been sent out and allow us to change how the response is handled.

[code language=”css”]
// Add a request interceptor
axios.interceptors.request.use(function (config) {
// Do something before request is sent, like we’re inserting a timeout for only requests with a particular baseURL
if (config.baseURL === ‘https://axios-app.firebaseio.com/users.json’) {
config.timeout = 4000
} else {
return config
}
console.log (config)
return config;
}, function (error) {
// Do something with request error
return Promise.reject(error);
});
// Add a response interceptor
axios.interceptors.response.use(function (response) {
// Do something with response data like console.log, change header, or as we did here just added a conditional behaviour, to change the route or pop up an alert box, based on the reponse status
if (response.status === 200 || response.status 201) {
router.replace(‘homepage’) }
else {
alert(‘Unusual behaviour’)
}
console.log(response)
return response;
}, function (error) {
// Do something with response error
return Promise.reject(error);
});
[/code]

Conclusion

For most of your HTTP communication needs, Axios provides an easy-to-use API in a compact package.

There are some alternative libraries for HTTP communication, such as ky, a tiny and elegant HTTP client based on window.fetch; superagent, a small, progressive client-side HTTP request library based on XMLHttpRequest.

But Axios is a better solution for applications with a lot of HTTP requests and for those that need good error handling or HTTP interceptions.

We at Andolasoft has long expertise on API Request solution with AXIOS on a React Native App. We have highly experienced React Native and React developers to help you for the same. Book a free consultation on your issues.
How To Promote WordPress Plugin And Themes?

In the present situation WordPress has helped many businesses to get success. Large number of people with WordPress are making a living. They use this platform to sell goods and services. The WordPress developers, copywriters and designers, are working more on it to deliver a better and user-friendly website.

Whereas, many other people choose another option of making a living through WordPress. They are selling WordPress in the form of plug-in and themes.

However, developing a website is only the beginning. But getting paid customers is a more difficult task. You need to put more effort and attention into it.

The WordPress developers spend hours creating perfect websites. But your efforts need results, your plugins and themes need to be sold.

Lead Generation Plugin helps to generate the leads. It helps to obtain more contacts that help to visit your website. They can become potential customers as they show interest in services and products that are offered on your website.

Not only is lead generation tool effective but the WordPress theme is equally important for your website growth. When your visitors lands to your website the first things they observe is the theme. It is what creates a first impression to your visitors.

Do you want a WordPress website but don’t know how to create one? We will install and setup WordPress for you, absolutely free of cost!

Promotion methods to sell your Plugins and Themes:

Have you ever wondered how WordPress developers are experts in selling their themes and plugins? Even after you put lots of effort into your development, the result you receive is very less.

“More than 90% of visitors to our blog come from search engines. So, sellers can expect more potential users/buyers of their products when paying for promotions or collaborating with us”

With these highly effective methods, you are definitely going to generate more customers for your WordPress Plugins and themes.

So follow these winning strategies:

Offer a Free Version:

Many people always find ways to try new things. So, if they are not aware of you or you are a new developer, launch your very first theme or Plugin.

So, in such a scenario you can market your product by offering something for free first.

It’s a very effective method that many developers follow and has achieved success with it.

Although the free version doesn’t offer many features, this allows people to try a new model and later buy it to enjoy the overall features.

Never miss an update from us. Join 10,000+ marketers and leaders.

Share your plugin to WordPress Repository:

If you have offered a free limited version of the plugin, you can now understand why it is important.

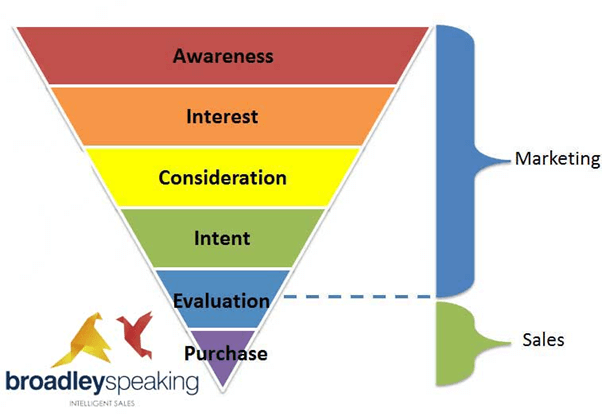
With the lead generation plugin you can manage your marketing process as given in the below image.

Marketing Process(Source: Broadley Speaking)

It is a necessary step, many of your competitors lie on the same page with high reviews and ratings. You are definitely going to get lots of customers and customers for the pro commercial version.

Also, you can place the WordPress.org approved sign on your plug-in website. It is proof that your plug-in will meet all the standards and requirements of the WordPress.org community.

Develop connected Products:

The other way of marketing your product is by developing a connected product. You might need some time and effort to get the particular user requirements. But this method is surely going to pay off.

For example, you can develop connected plugins that work in both ways. It can be downloaded as stand-alone plugins or as add-ons for the main plugin.

Weekly Newsletter:

By creating a Weekly Newsletter for your WordPress Plugin and WordPress themes, you get to create more and more customers into your website.

It is the most beneficial way of promoting your WordPress Plugin and Themes.

Engaging Content for Audience and Search Engine:

When you have already decided to promote your theme and plugin, you need to do some extra work. This means you need to fill out the listing for the WordPress directory. It means the entire tab, people that includes FAQ and screenshot.

“Marketing is telling the world you’re a rock star. Content marketing is showing the world you are one.” – Robert Rose

It also defines how you are making your website full of resources for users. On your website, you need to develop a blog with FAQs, case studies and uses for plugins.

With more helpful content on your website, the more professional look you are providing your website.

When you fill your websites with content you encourage them to visit your site again and again. Take the advantage by sending an occasional communication.

Offer a monthly email newsletter, it’s a better way to be in touch, inform the users about your updates, and provide a forum for feedback.

Content is a better way to make people reach your website and get engaged with your product. It is also a reason how SEO finds you. Create high-quality, engaging, and original articles. You can also allow guest posts and other blogs to get maximum benefits.

Advertise Your Plugins and Themes:

Well, you need to spend some money to bring your target audience to your website. You need to advertise your work. Not every type of advertisement works, but some do, and these are:

  1. Paid submissions: In this form of advertisement you need to pay to place your plugin details on other’s website.
  2. Paid Reviews: In this advertisement form, you need to pay the most popular blog of WordPress to write about your product and they do. This is a professional way where your potential customers read about you and visit your website.
  3. Google AdWords: It is a pay-per-click advertising form. You can achieve good results, but you need to have some experience and knowledge of using it. Or you are going to spend your money and time.

So these are some forms of advertising that you can use to advertise your website. If your plugin varies from others in design, usability, and features, you will automatically get more customers. They will share it and recommend it to other users.

Never miss an update from us. Join 10,000+ marketers and leaders.

FAQ:

How to sell your WordPress theme?

To sell your WordPress theme you need to follow these plans:

  • Create a plan
  • Find the right niche for your theme
  • Know your competitors
  • Decide your product price
  • Provide unique design
  • Offer documentation and support
  • Add correct functionality
  • Add plugin to your theme

Can I gain profit by selling WordPress themes?

For many years selling WordPress themes has been a most profitable business.

If you manage to create beautiful, reliable, and stable themes, for which you are sure it will provide great customer support. It is not going to be a burden, these businesses will perform very well.

Where should I sell my plugins?

Here is the list of places that you can use to sell your WordPress themes and Plugins:

Conclusion:

So, this is a hell of a lot of information, but you cannot avoid that this is some very important information that is very effective for your growth.

You need to apply these tactics to market your product. However, you need to market WordPress first to grow your products and achieve your business goals.

With these actionable tactics. You are surely going to generate more sales and revenue. Focus on growing your products and adding value to customers.

Are you facing any problem in developing your WordPress Plugins and Themes or want to create any modification in your website, contact to Andolasoft. Our dedicated WordPress developers will help you in developing your website or creating any changes to your existing WordPress Website and custom Plugins and Themes development.