Now-a-days the Digital Products are highly popular for branding of businesses.
Wondering about, what are the digital products? Here you go,
The products which can be delivered virtually to a buyer is called digital product.
This includes products like eBooks, Infographics, photographs, videos, templates, web graphics and training materials are very easy to sale/distribute online using web or mobile apps.
However, the selling of physical products is tedious and time consuming being having complexities as involves inventory, shipping, warehouses etc.
Therefore, digital eCommerce has become one of the ever-increasing medium to build better connections and establish relationships with customers. Digital eCommerce maximizes your business sales by directly connecting with website visitors who also save their time.
“For starting entrepreneurs selling digital products is the way to go. Low cost, low risk, the sales process can be automates and it’s scalable”.
Tor Refsland, Time Management Chef
“Whereas a physical product might need weeks (or month) to be produced, it can take less than a day to create and set up a digital product for sale”.
Erika Kalmar, Online Biz Wiz.
“Digital is the most sustainable way to distribute information. The question really is about how much we can turn into digital”.
Laurence O’Bryan, the Book Promote
Let’s have a quick look at the latest eCommerce growth forecast of worldwide digital buyers and worldwide retail eCommerce sales from eMarketer.
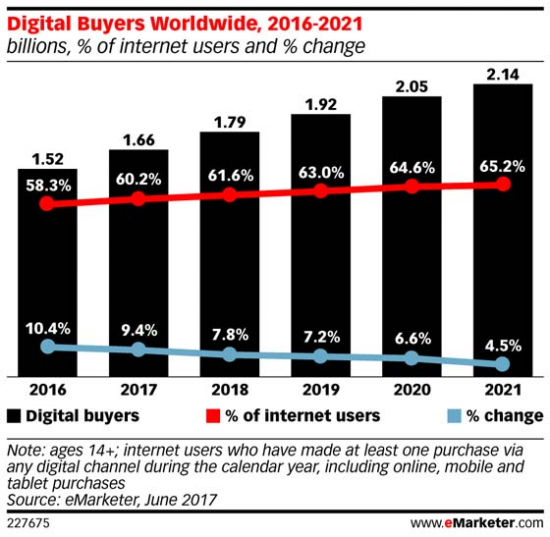
(Source: eMarketer)
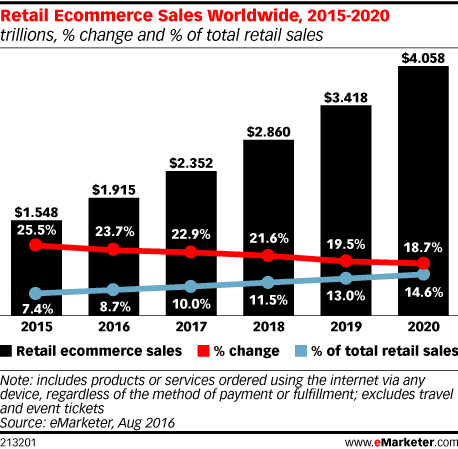
(Source: eMarketer)
In this article, I am going to share the list of top digital products you can sell online to maximize your sales as well as to get connected with your target audience.
Top Digital Products to Sell Online
1. eBook
E-Book is the most popular and fastest growing digital product for both user and creator. It is one of the simplest processes to share any information in written text format;where you can educate and advice readers using your own content or you can curate content from different sources.
According to Statista, $15B revenue was generated from eBook on 2015 and there is a projection of 16% growth in annually till 2020 and the overall growth expected to be 93%.
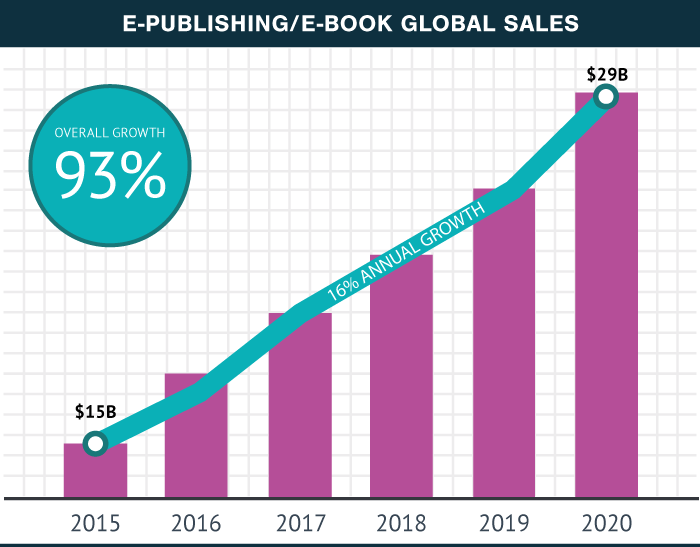
(Source: Statista)
2. Videos
Video is another popular and effective digital product to deliver information to your target audiences over internet. It engages more users comparing the textual information.It may be of entertainment, motivational, educational or informative. If you have talents such as, speaking, singing, dancing and other then you can create your own video and upload these to make money online.
Almost 50% of internet users look for videos related to a product or service before visiting a store
thinkwithgoogle.com
Online shoppers who view demo videos are 1.81 x more likely to purchase than non-viewers
theblog.adobe.com
3. Images and Photograph
High resolution quality images have more demand now these days. Bloggers and webmasters are very keen to purchase quality images to use in their webpage and blogs. If you are a good photographer or designer, you can produce great images to market via your own website.
According to the report, global demand for digital photography market was valued at around USD 77.66 billion in 2015 and is expected to reach approximately USD 110.79 billion in 2021, growing at a CAGR of slightly above 6.1% between 2016 and 2021
(Source: globenewswire.com)
4. Infographic and Digital Arts
Latest trend being the Infographics/Digital Arts, which the graphic designer and digital artist can create unique and high quality digital product like logo, Infographic, icons and various arts to sell online to make money.
Infographic are the way to share information among the target audience and directly connect with them.
According to Statista, the revenue of graphic design services (NAICS 54143) in United States from 2008 to 2020 will reach approximately 9.26 billion U.S. dollars.
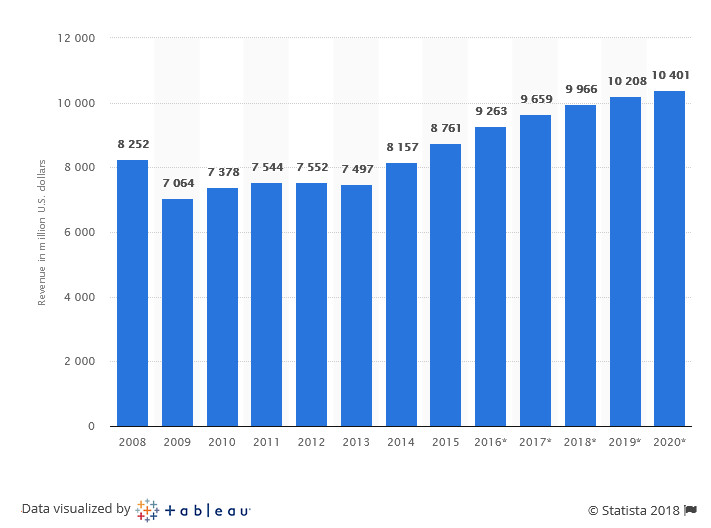
(Source: Statista)
5. Documents and Courses
Documents like blog, white paper, resume and proposal are the normal form of digital products to share information. You can become a guest bloggers to write for other website to earn money.
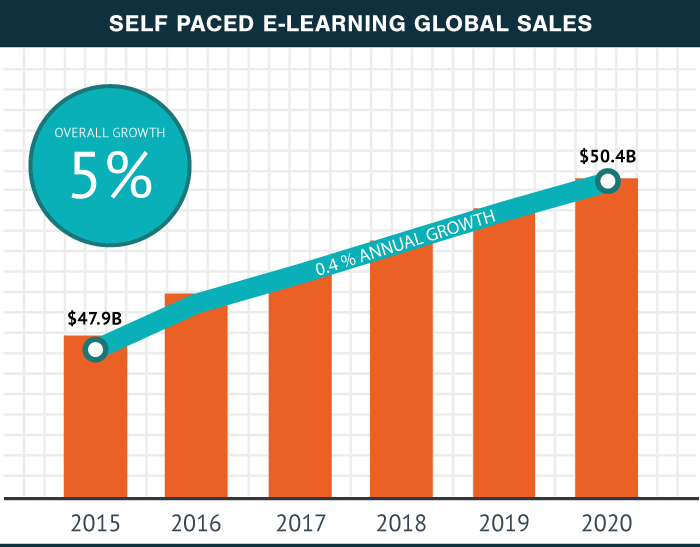
eLearning and providing courses online is the modern innovations of studying and its demand is rising day by day. You can share your online tutorial and documents for paid download and you can also online teaching.
In 2015 the eLearning market was worth some place around $165 billion. At a 5% expansion consistently, that puts us on track for a nearly $182 billion market in 2017 and hitting practically $240 billion by 2023.
(Source: elearningindustry.com)
6. Professional Service
As discussed earlier, in this eCommerce age people do lot of purchase services like the digital products. They don’t care about money they spend but they are very concerned about value for money. Professional services like graphic designing, web designing, copy writing, translating and many more are come under the digital service.
7. Add-ons
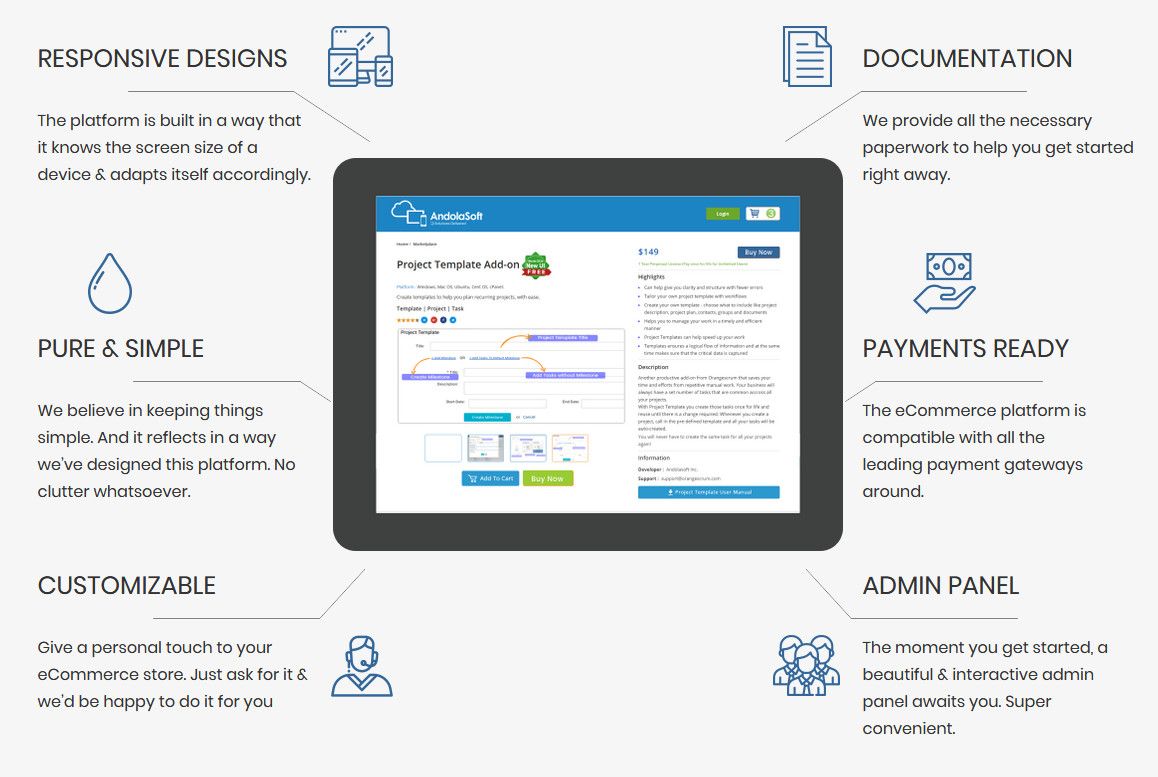
Besides the eBook, graphical images and videos, you can create and sell Add-ons, Plugins and themes as digital products. You can keep all these in your own website marketplace and get connected with your visitors.
Andolasoft has developed so many project management add-ons and CRM Plugins to make your project management and customer relationship management easy.These add-in and plugins has customization option to make your work smarter. Try our Marketplace now.
8. Web Applications
Web applications like SaaS (Software as a Service) are not the digital products directly but these are helpful for selling them. Through customized SaaS applications you can reach out to target audience to generate good amount revenue.
Users are paying us regularly to access our SaaS web application Orangescrum – Project Management Tool and Wakeupsales – CRM Tool. Try these now

Conclusion:
The demands of digital products are growing everyday, selling digital products to maximize the revenue and keep in touch with the real audiences. We at Andolasoft do always try to serve you better with our new digital products matching the evolving of the technology with time.
Latest, is our own digital shopping cart (JuggernautCart) with digital products to serve others in building their own shopping carts. JuggernautCart is easy to use and affordable shopping cart to boom your digital sales according to your need.
Interested to know more about digital Product and Service! Download Our eBook