Game-Changing Power of React Native for Businesses in 2024

Hey there, savvy readers! Ready to dive into the tech trends shaping business landscapes in 2024? Well, you’re in for a treat! Picture this: a world where React Native apps are not just buzzwords but the driving force behind a business revolution.

Yep, you heard it right – the demand for React Native app development is skyrocketing, and we’re about to spill the beans on why it’s the game-changer your business needs.

Today, businesses of all industries need mobile apps to cater to a wider audience segment.

Especially in the connected world businesses need mobile app development services to send their brand messages and offers to users who use mobile apps.

React Native mobile app development is one of the leading and most popular cross-platform mobile apps. It powers apps such as Discord, Facebook, Skype, UberEats, Airbnb etc.

Thanks to its versatility and ease-of-use, today more and more developers and businesses are preferring React Native for mobile app development.

React native apps provide the perfect solution as businesses can create apps for all mobile devices cost-effective.

With this cross-platform development technology, developers write the code-base once and deploy it on all mobile OS.

So, join us as we unravel the magic of React Native in the ever-evolving realm of business operations. Let’s make 2024 the year your business goes from good to mind-blowingly awesome!

  1. Enterprise Mobility Solutions:

Enterprises are leveraging React Native to build comprehensive mobility solutions.

Never miss an update from us. Join 10,000+ marketers and leaders.

These apps streamline internal processes, enhance employee productivity, and facilitate seamless communication.

From project management to HR operations, React Native apps are adaptable to diverse enterprise needs.

  1. E-Commerce Applications:

The e-commerce landscape continues to evolve, and businesses are capitalizing on React Native mobile app development capabilities to create responsive and feature-rich mobile shopping experiences.

These apps offer a consistent user interface across platforms, providing a smooth and intuitive buying process.

  1. Healthcare and Telemedicine Apps:

The healthcare sector is witnessing a digital transformation, with React Native playing a pivotal role in the development of healthcare and telemedicine applications.

These apps facilitate remote consultations, appointment scheduling, and health monitoring, contributing to more accessible and efficient healthcare services.

  1. Educational Platforms:

Education technology has become a cornerstone of modern learning, and React Native is at the forefront of developing educational apps.

These platforms offer interactive content, collaborative features, and personalized learning experiences, making education more engaging and accessible.

  1. IoT-Integrated Applications:

With the Internet of Things (IoT) gaining momentum, businesses are integrating React Native into apps that interact seamlessly with IoT devices.

Whether it’s smart home applications or industrial IoT solutions, React Native offers a cross-platform approach for building apps that connect and control IoT ecosystems.

  1. Social Media Platforms:

React Native is an excellent choice for developing social media applications that require a consistent user experience across iOS and Android.

These apps facilitate user engagement, content sharing, and real-time interactions, providing a platform for businesses to connect with their audience.

  1. On-Demand Service Apps:

React Native is well-suited for on-demand service applications, such as food delivery, ride-sharing, and home services.

These apps provide a unified user experience and can be deployed rapidly, allowing businesses to meet the growing demand for convenience and instant services.

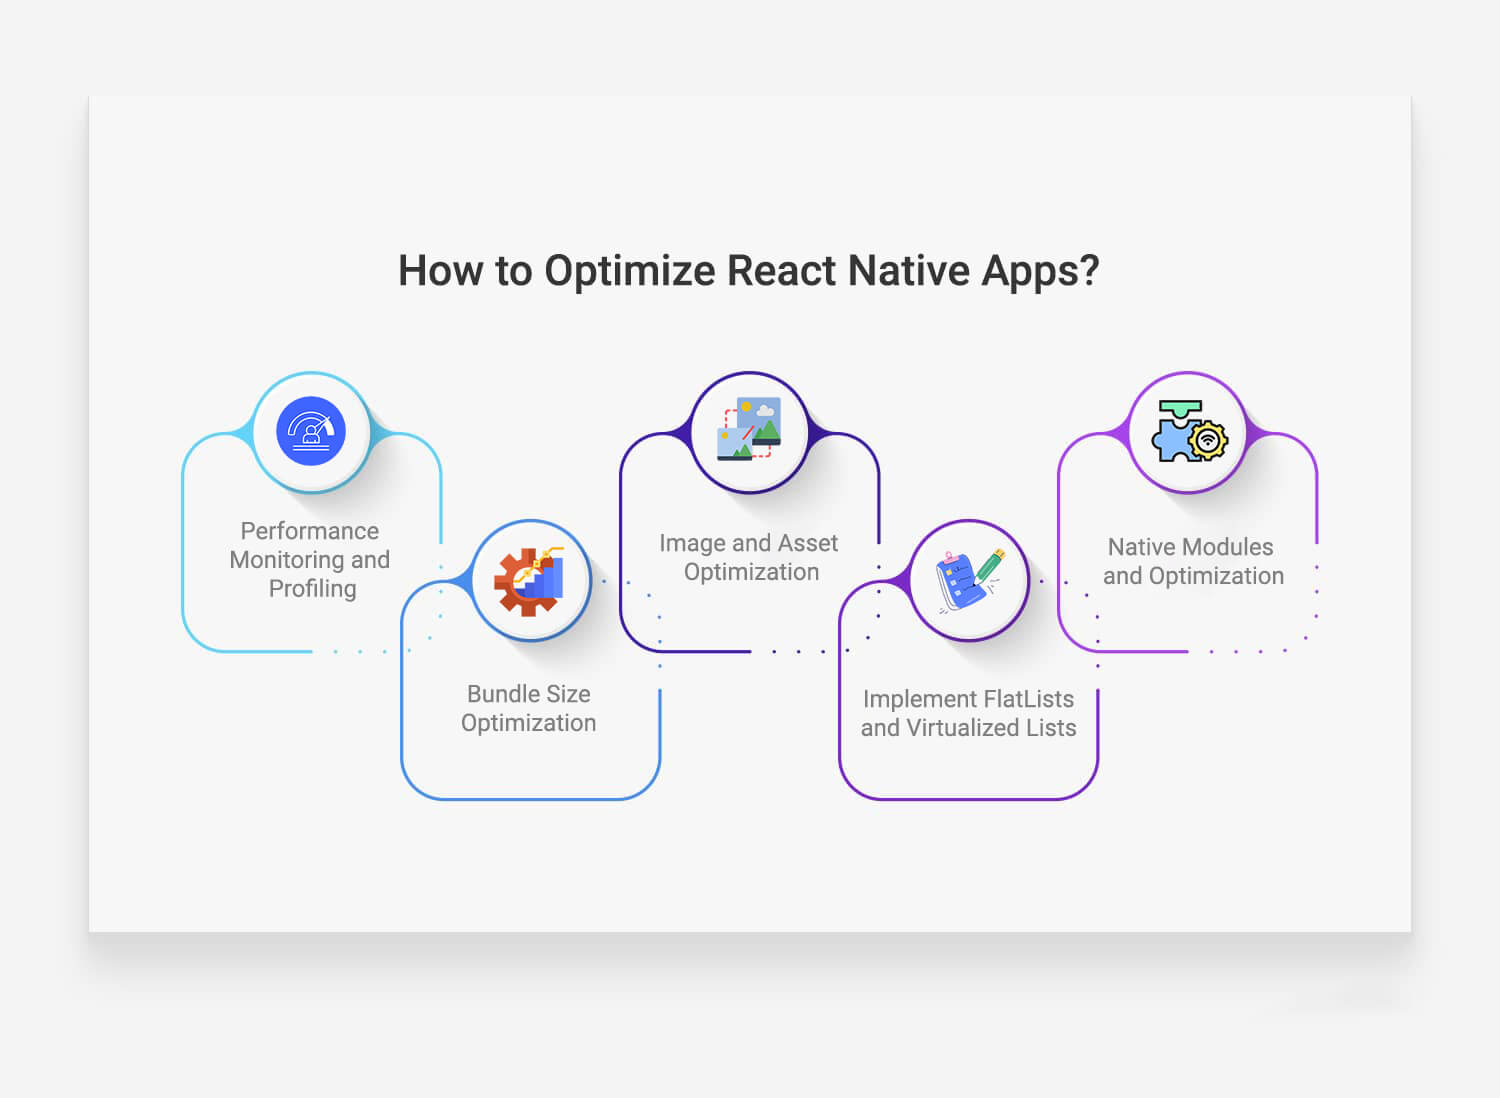
How to Optimize React Native Apps?

How to Optimize React Native Apps

  1. Performance Monitoring and Profiling:

Regularly monitor and profile your React Native app’s performance using tools like React DevTools or React Native Debugger.

Identify and address any bottlenecks, memory leaks, or performance issues.

Profiling helps you understand which components are causing performance issues and allows you to make informed optimizations.

  1. Bundle Size Optimization:

Minimize the size of your app bundle to reduce loading times, especially on slower network connections.

Utilize tools like “react-native-bundle-analyzer” to analyze your bundle size and identify unnecessary dependencies.

Consider code splitting and lazy loading for large applications to load only the necessary components when needed.

  1. Image and Asset Optimization:

Optimize images and other assets to reduce the overall size of your app. Use image compression tools, and consider using the appropriate image format for different scenarios (JPEG for photographs, PNG for transparent images).

Leverage libraries like “react-native-fast-image” to enhance image loading performance, and load images asynchronously to avoid blocking the main thread.

  1. Implement FlatLists and Virtualized Lists:

When dealing with lists of data, use React Native’s FlatList or VirtualizedList components to render only the items currently visible on the screen.

This significantly improves the performance of lists by reducing the number of rendered components and optimizing memory usage.

Additionally, implement keyExtractor for efficient list rendering.

  1. Native Modules and Optimization:

Leverage native modules to offload performance-critical tasks to native code.

If your application involves computationally expensive operations, consider implementing native modules using Android’s NativeModules or iOS’s NativeModules to achieve better performance.

This allows you to tap into the native capabilities of the device and reduce the load on the JavaScript thread.

Remember that optimization is an ongoing process, and it’s essential to test your app on real devices to ensure that optimizations have the desired impact.

Regularly update dependencies, follow best practices, and stay informed about the latest tools and techniques to keep your React Native app running efficiently.

Best Practices to Build Powerful Apps Using React Native

Building powerful apps using React Native requires a combination of best practices to ensure performance, maintainability, and a positive user experience.

Here are some top best practices:

  1. Follow Component-Based Architecture:

Embrace a component-based architecture to break down your app into modular and reusable components.

This approach improves maintainability, encourages code reusability, and facilitates collaboration among developers.

  1. Optimize and Monitor Performance:

Regularly monitor and optimize your app’s performance using tools like React DevTools, Debugger, and other profiling tools.

Identify and address performance bottlenecks, optimize renders, and ensure a smooth user experience across various devices.

  1. Use Functional Components and Hooks:

Embrace functional components and hooks for state management and side effects.

Hooks like useState and useEffect provide a cleaner and more concise way to manage component state and lifecycle methods, making the codebase more readable and maintainable.

  1. Implement Navigation Efficiently:

Choose a navigation library like React Navigation and implement navigation efficiently.

Opt for stack navigators, tab navigators, and drawer navigators as needed.

Use navigation hooks and context to handle navigation state and avoid unnecessary renders.

  1. Optimize Images and Assets:

Optimize images and assets to reduce the app’s overall size. Use appropriate image formats, compress images, and leverage tools like ImageOptim or TinyPNG.

Consider lazy loading or dynamic loading for assets that are not immediately needed to improve initial loading times.

  1. Secure Your App:

Prioritize security by implementing secure coding practices. Avoid using hard coded secrets, validate user inputs, and implement secure authentication mechanisms.

Regularly update dependencies to patch security vulnerabilities, and follow best practices for secure data storage.

  1. Utilize Code Splitting and Lazy Loading:

Implement code splitting and lazy loading to load only the necessary components when they are needed.

This helps reduce the initial bundle size and improves the app’s startup performance, especially on slower network connections.

  1. Handle Offline Scenarios:

Design your app to handle offline scenarios gracefully. Implement offline storage solutions like AsyncStorage or SQLite for data persistence.

Provide feedback to users when the app is offline and sync data with the server once a connection is re-established.

  1. Test Thoroughly on Real Devices:

Test your app thoroughly on real devices to ensure compatibility and performance across different platforms.

Are you looking for React Native Services

Contact Us

Utilize testing frameworks like Jest for unit testing and Detox for end-to-end testing.

Regularly perform manual testing on various devices to catch potential issues.

  1. Stay Updated and Engage with the Community:

Keep your dependencies and React Native version up-to-date to benefit from the latest features, improvements, and security patches.

Engage with the React Native community through forums, conferences, and social media to stay informed about best practices and emerging trends.

By incorporating these best practices, you can build powerful and efficient React Native apps that deliver a superior user experience while maintaining a robust and maintainable codebase.

Conclusion

As we navigate the ever-evolving landscape of business operations in 2024, React Native technology stands as a beacon of innovation and efficiency.

Today, React Native apps are empowering businesses to deliver mobile apps that are stunning, engaging and are cross-platform compatible.

Therefore, React Native app development has become one of the most innovative, and successful mobile apps across different industries.

From enterprise mobility solutions to healthcare applications and beyond, the versatility of React Native is reshaping industries and setting new standards for cross-platform app development.

To stay at the forefront of this transformative wave, remember to not only explore the diverse types of React Native apps but also adhere to best practices for optimization and development.

By doing so, your business can not only keep pace with the demands of 2024 but also thrive in a digital landscape that rewards innovation, efficiency, and user-centric experiences.

Here’s to a future where React Native continues to propel businesses towards unparalleled success – one app at a time. Thank you for joining us on this insightful journey!

Key Difference Between ReactJS And React Native

ReactJS and React Native are two leading JavaScript frameworks that allow users to build mobile user interfaces (MUI). They both provide developers with an opportunity to quickly prototype mobile apps and manage complexity as projects grow in scope. Both ReactJS and React Native are used to create native-like apps. However, there are certain differences between the two. Let me explain one by one

What is ReactJS?

React.JS often referred to as React or ReactJS is a JavaScript library responsible for building a hierarchy of UI components or in other words, responsible for the rendering of UI components. It provides support for both front-end and server-side.

Advantages of ReactJS

  1. Easy to learn and use: ReactJS is much easier to learn and use. Any developer who comes from a JavaScript background can easily understand and start creating web apps using react.
  2. Creating dynamic web applications becomes easier: To create a dynamic web application specifically with HTML was tricky, which requires complex coding, but ReactJS solved that issue and makes it easier. It provides less coding and gives more functionality.
  3. Reusable components: ReactJS web application is made up of multiple components, and each component has its logic and controls. These components can be reused wherever needed. The reusable code helps to make your apps easier to develop and maintain.
  4. Performance enhancement: ReactJS improves performance due to virtual DOM. The React Virtual DOM exists entirely in memory and is a representation of the web browser’s DOM. Due to this, when we write a react component, we do not write directly to the DOM. Instead, we are writing virtual components that will turn into the DOM, leading to smoother and faster performance.
  5. The support of handy tools: ReactJS supports a handy set of tools which make the task of the developers understandable and easier.

What is React Native?

React Native is an open-source JavaScript framework used for developing a mobile application for iOS, Android, and Windows. It uses only JavaScript to build a cross-platform mobile app. React Native is the same as react, but it uses native components instead of using web components as building blocks. It targets mobile platforms rather than the browser.

Facebook developed the React Native in 2013 for its internal project Hackathon. In March 2015, Facebook announced that React Native is open and available on GitHub.

Advantages of React Native

There are several advantages of React Native for building mobile applications. Some of them are given below:

  1. Cross-Platform Usage: It provides the facility of “Learn once write everywhere.” It works for both platform Android as well as iOS devices.
  2. Class Performance: The code written in React Native is compiled into native code, which enables it for both operating systems as well as it functions in the same way on both the platforms.
  3. JavaScript: JavaScript knowledge is used to build native mobile apps.
  4. Community: The large community of ReactJS and React Native helps us to find any answer we require.
  5. Hot Reloading: Making a few changes in the code of your app will be immediately visible during development. If the business logic is changed, its reflection is live reloaded on screen.
  6. Improving with Time: Some features of iOS and Android are still not supported, and the community is always inventing the best practices.
  7. Native Components: We will need to write some platform specific code if we want to create native functionality, which is not designed yet.
  8. Existence is Uncertain: As Facebook develops this framework, its presence is uncertain since it keeps all the rights to kill off the project anytime. As the popularity of React Native rises, it is unlikely to happen.

Disadvantages of React Native

  1. React Native is still new and immature: React Native is a newbie in Android and iOS programming languages and is still in its improvement stage, which can have a negative impact on the apps.
  2. Learning is tough: React Native is not easy to learn, especially for a fresher in the app development field.
  3. Lacks the Security Robustness: React Native is a JavaScript library and open-source framework, which creates a gap in the security robustness. When you are creating banking and financial apps where data is highly confidential, experts advise not to choose React Native.
  4. Takes More Time to Initialize: React Native takes a lot of time for initializing the runtime even for the hi-tech gadgets and devices.

ReactJS vs React Native

ReactJS

React Native

ReactJS initial release was in 2013. React Native initial release was in 2015.
Used for developing web applications. Used for developing mobile applications.
Can be executed on all platforms. Not platform independent. It takes more effort to be executed on all platforms.
Uses React-router for navigating web pages. Built-in navigator library for navigating mobile applications.
Uses HTML tags. Does not use HTML tags.
Use code components, which saves a lot of valuable time. Reuse React Native UI components and modules which allow hybrid apps to render natively.
Provides high security. Provides low security in comparison to ReactJS.
The Virtual DOM renders the browser code. Native uses its API to render code for mobile applications.

Which is better, React or React native?

Both ReactJS and React Native are important pillars for app and web development, and due to their flexible functionalities and an evolving Eco-system of libraries, they are gaining momentum with each passing day.

While ReactJS is basically a JavaScript library and React Native is the entire framework, the former is the heart of the latter, and compliments each other.

If ReactJS is optimal for creating apps with high functionality and complex calculations, then React Native is ideal to give a native feeling to your mobile apps.

Conclusion

React is a framework for building applications using JavaScript. React Native is an entire platform allowing you to build native, cross-platform mobile apps, and React.JS is a JavaScript library you use for constructing a high performing UI layer.

React.JS is the heart of React Native, and it embodies all react principles and syntax, so the learning curve is easy. The platform is what gave rise to their technical differences. Like the browser code in React is rendered through Virtual DOM while React Native uses Native API’s to render components on mobile.

So both the framework has huge market demand for web and mobile application development. We have also expertise in developing application in react and react native. If you have any quarries on these two framework then please book a free consultation or if you are looking to develop application on these two framework then you are in the right place. Contact us now

How To Manage API Request with AXIOS on a React Native App

APIs can make your life a whole lot easier. With an API, you can send requests to other services and get responses without having to build those requests and responses yourself. But building an API isn’t as simple as it sounds. It requires careful planning, testing, and debugging.

If you’re building an API for the first time, it can feel like an impossible mountain to climb. That’s where APIs like Axios come in. It has a great API and lots of helpful features. Here in this article you’ll understand how to use Axios to manage API requests in your React Native app.

What is AXIOS?

Axios is one of the easiest HTTP clients to learn and use. Making an API request is as simple as passing a configuration object to Axios or invoking the appropriate method with the necessary arguments. You will learn the basics of Axios in this section.

Configuring Axios

Type following command on terminal window to install Axios:

NPM Install Axios

How to make requests to an API using Axios

Making a call to an API using Axios, you can pass a configuration object to Axios or invoke a method for the corresponding CRUD operations.

Never miss an update from us. Join 10,000+ marketers and leaders.

For example, you can make a GET request to the /api/users endpoint in one of the following two ways:

[code language=”css”]</pre>
import axios from ‘axios’;
const baseUrl = ‘https://reqres.in’;
// Passing configuration object to axios
axios({
method: ‘get’,
url: `${baseUrl}/api/users/1`,
}).then((response) => {
console.log("<<<<<< Passing configuration object to axios >>>>>>", response.data.data);
});

// Invoking get method to perform a GET request
axios.get(`${baseUrl}/api/users/1`).then((response) => {
console.log("<<<<<< Invoking get method to perform a GET request >>>>>>", response.data.data);
});
[/code]

There are several other fields such as baseURL, transformRequest, transformResponse, and headers, among others, which you can include in the configuration object you pass to Axios.

[code language=”css”]</pre>
// Passing configuration object to axios
const fetchUserFirst = async () => {
const configurationObject = {
method: ‘get’,
url: `${baseUrl}/api/users/1`,
};
const response = await axios(configurationObject);
console.log("<<<<<< Fetch User First >>>>>>", response.data.data);
};

// Invoking get method to perform a GET request
const fetchUserSecond = async () => {
const url = `${baseUrl}/api/users/2`;
const response = await axios.get(url);
console.log("<<<<<< Fetch User Second >>>>>>", response.data.data);
};
[/code]

How to make multiple concurrent API requests using Axios

We can use the Promise.all or Promise.allSettled method of the Promise API with Axios to make multiple concurrent API requests from a React Native application.

[code language=”css”]
const concurrentRequests = [
axios.get(`${baseUrl}/api/users/1`),
axios.get(`${baseUrl}/api/users/2`),
axios.get(`${baseUrl}/api/users/3`),
];
// Using Promise.all
Promise.all(concurrentRequests)
.then((result) => {
console.log(result);
})
.catch((err) => {
console.log(err);
});
// Using Promise.allSettled
Promise.allSettled(concurrentRequests)
.then((result) => {
console.log(result);
})
.catch((err) => {
console.log(err);
});
[/code]

How to abort network request in Axios

Axios provides functionality for aborting network requests. A typical use case of this feature in React Native is the cancellation of network requests in the use effect hook when a component is unmounted while data is still in flight.

[code language=”css”]
useEffect(() => {
const source = axios.CancelToken.source();
const url = `${baseUrl}/api/users/${userId}`;
const fetchUsers = async () => {
try {
const response = await axios.get(url, { cancelToken: source.token });
console.log(response.data);
} catch (error) {
if(axios.isCancel(error)){
console.log(‘Data fetching cancelled’);
}else{
// Handle error
}
}
};
fetchUsers();
return () => source.cancel("Data fetching cancelled");
}, [userId]);
[/code]

How to create an instance of Axios

You can also create an instance of Axios with a custom configuration. Axios will merge the configuration object passed while creating the instance with the configuration passed to the instance method:

[code language=”css”]
const axiosInstance = axios.create({ baseURL: ‘https://reqres.in/’ });
axiosInstance.get(‘api/users/1’).then((response) => {
console.log(response.data);
});
[/code]

How to make GET request using Axios in React Native

Make a GET request to the /api/users endpoint to retrieve a user and store the user ID in state as shown in the code snippet below. You can change the user ID inside the onPress event handler attached to the Load User button. Changing the user ID will trigger a GET request to the API inside the useEffect hook.

After triggering a network request, we display a loading indicator on the screen. If we fetch the data successfully, we update state and remove the loading indicator. If we fail to retrieve the data for some reason, we stop the loading indicator and display an appropriate error message.

We abort the network request in the clean-up function if the user decides to close the app before getting a response from the server. Check the return value of the effect function in the useEffect hook. Following is the code in the App.js component:

[code language=”css”]
import axios from "axios";
import React, { useState, useEffect } from "react";
import {
StyleSheet,
Text,
ScrollView,
View,
Button,
Image,
Platform,
} from "react-native";
import Constants from "expo-constants";
const baseUrl = "https://reqres.in";
function User({ userObject }) {
return (
<View>
<Image
source={{ uri: userObject.avatar }}
style={{ width: 128, height: 128, borderRadius: 64 }}
/>
<Text style={{ textAlign: "center", color: "white" }}>
{`${userObject.first_name} ${userObject.last_name}`}
</Text>
</View>
);
}
export default function App() {
const [userId, setUserId] = useState(1);
const [user, setUser] = useState(null);
const [isLoading, setIsLoading] = useState(false);
const [hasError, setErrorFlag] = useState(false);
const changeUserIdHandler = () => {
setUserId((userId) => (userId === 3 ? 1 : userId + 1));
};
useEffect(() => {
const source = axios.CancelToken.source();
const url = `${baseUrl}/api/users/${userId}`;
const fetchUsers = async () => {
try {
setIsLoading(true);
const response = await axios.get(url, { cancelToken: source.token });
if (response.status === 200) {
setUser(response.data.data);
setIsLoading(false);
return;
} else {
throw new Error("Failed to fetch users");
}
} catch (error) {
if(axios.isCancel(error)){
console.log(‘Data fetching cancelled’);
}else{
setErrorFlag(true);
setIsLoading(false);
}
}
};
fetchUsers();
return () => source.cancel("Data fetching cancelled");
}, [userId]);
return (
<ScrollView contentContainerStyle={styles.container}>
<View style={styles.wrapperStyle}>
{!isLoading && !hasError && user && <User userObject={user} />}
</View>
<View style={styles.wrapperStyle}>
{isLoading && <Text> Loading </Text>}
{!isLoading && hasError && <Text> An error has occurred </Text>}
</View>
<View>
<Button
title="Load user"
onPress={changeUserIdHandler}
disabled={isLoading}
style={styles.buttonStyles}
/>
</View>
</ScrollView>
);
}
const styles = StyleSheet.create({
container: {
flex: 1,
backgroundColor: "dodgerblue",
alignItems: "center",
justifyContent: "center",
marginTop: Platform.OS === "ios" ? 0 : Constants.statusBarHeight,
},
wrapperStyle: {
minHeight: 128,
},
buttonStyles: {
padding: 100,
},
});
[/code]

How to make a POST request

POST is the HTTP method you use to send data to the server for updating or creating a resource. Making a POST request in Axios is similar to making a GET request. Most of the time, POST requests are made with user-generated data submitted using a form. Data requires validation on the client side before it is submitted.

Two main React packages for managing forms are Formik and React Hook Form. React Native form for the user’s full name and email in the code snippet below. Both TextInput components are controlled components.

After clicking the submit button, the TextInput fields and the submit button are disabled before you display a message to show you are creating the resource. Disabling the submit button ensures the user doesn’t make multiple submissions. After successfully submitting a POST request, you display a success message to the user:

[code language=”css”]
import axios from "axios";
import React, { useState, useEffect } from "react";
import {
StyleSheet,
Text,
ScrollView,
View,
Button,
Image,
Platform,
} from "react-native";
import Constants from "expo-constants";
const baseUrl = "https://reqres.in";
function User({ userObject }) {
return (
<View>
<Image
source={{ uri: userObject.avatar }}
style={{ width: 128, height: 128, borderRadius: 64 }}
/>
<Text style={{ textAlign: "center", color: "white" }}>
{`${userObject.first_name} ${userObject.last_name}`}
</Text>
</View>
);
}
export default function App() {
const [userId, setUserId] = useState(1);
const [user, setUser] = useState(null);
const [isLoading, setIsLoading] = useState(false);
const [hasError, setErrorFlag] = useState(false);
const changeUserIdHandler = () => {
setUserId((userId) => (userId === 3 ? 1 : userId + 1));
};
useEffect(() => {
const source = axios.CancelToken.source();
const url = `${baseUrl}/api/users/${userId}`;
const fetchUsers = async () => {
try {
setIsLoading(true);
const response = await axios.get(url, { cancelToken: source.token });
if (response.status === 200) {
setUser(response.data.data);
setIsLoading(false);
return;
} else {
throw new Error("Failed to fetch users");
}
} catch (error) {
if(axios.isCancel(error)){
console.log(‘Data fetching cancelled’);
}else{
setErrorFlag(true);
setIsLoading(false);
}
}
};
fetchUsers();
return () => source.cancel("Data fetching cancelled");
}, [userId]);
return (
<ScrollView contentContainerStyle={styles.container}>
<View style={styles.wrapperStyle}>
{!isLoading && !hasError && user && <User userObject={user} />}
</View>
<View style={styles.wrapperStyle}>
{isLoading && <Text> Loading </Text>}
{!isLoading && hasError && <Text> An error has occurred </Text>}
</View>
<View>
<Button
title="Load user"
onPress={changeUserIdHandler}
disabled={isLoading}
style={styles.buttonStyles}
/>
</View>
</ScrollView>
);
}
const styles = StyleSheet.create({
container: {
flex: 1,
backgroundColor: "dodgerblue",
alignItems: "center",
justifyContent: "center",
marginTop: Platform.OS === "ios" ? 0 : Constants.statusBarHeight,
},
wrapperStyle: {
minHeight: 128,
},
buttonStyles: {
padding: 100,
},
});
[/code]

How to make a DELETE request

DELETE requests using Axios the same way you make POST and PUT requests. DELETE request will delete a resource from the server side. You can replace the onSubmitFormHandler of the code for making a POST request with the event handler below to make a DELETE request.

[code language=”css”]
const onSubmitFormHandler = async (event) => {
if (!fullName.trim() || !email.trim()) {
alert("Name or Email is invalid");
return;
}
setIsLoading(true);
try {
const response = await axios.delete(`${baseUrl}/api/users/2`, {
fullName,
email,
});
if (response.status === 204) {
alert(` You have deleted: ${JSON.stringify(response.data)}`);
setIsLoading(false);
setFullName(”);
setEmail(”);
} else {
throw new Error("Failed to delete resource");
}
} catch (error) {
alert("Failed to delete resource");
setIsLoading(false);
}
};
[/code]

How to make a PUT request

Updating a resource requires either the PUT or PATCH method. If a resource exists, using the PUT method completely overwrites it, and creates a new resource if it doesn’t. PATCH makes partial updates to the resource if it exists and does nothing if it doesn’t.

Making a PUT request to an API is similar to making a POST request. The only difference is the configuration object passed to Axios, or the HTTP method needed to invoke to make a PUT request to the API. Replace the onSubmitFormHandler of the POST request with the code below to make a PUT request.

[code language=”css”]</pre>
const onSubmitFormHandler = (event) => {
if (!fullName.trim() || !email.trim()) {
alert("Name or Email is invalid");
return;
}
setIsLoading(true);
const configurationObject = {
url: `${baseUrl}/api/users/2`,
method: "PUT",
data: { fullName, email },
};
axios(configurationObject)
.then((response) => {
if (response.status === 200) {
alert(` You have updated: ${JSON.stringify(response.data)}`);
setIsLoading(false);
setFullName("");
setEmail("");
} else {
throw new Error("An error has occurred");
}
})
.catch((error) => {
alert("An error has occurred");
setIsLoading(false);
});
};
[/code]

How to handle errors

React-error-boundary (Simple reusable React error boundary component) is a simple reusable component based on React error boundary API that provides a wrapper around your components and automatically catches all errors from the children’s components hierarchy, and also provides a great way to recover your component tree. Create an Errorhandler component like the following code snippet.

[code language=”css”]</pre>
import * as React from "react";
import { ErrorBoundary } from "react-error-boundary";
import { View, StyleSheet, Button } from "react-native";
import { Text } from "components";
const myErrorHandler = (error: Error) => {
// Do something with the error
function ErrorFallback({ resetErrorBoundary }) {
return (
<View style={[styles.container]}>
<View>
<Text> Something went wrong: </Text>
<Button title="try Again" onPress={resetErrorBoundary} />
</View>
</View>
);
}
export const ErrorHandler = ({ children }: { children: React.ReactNode }) => (
<ErrorBoundary FallbackComponent={ErrorFallback} onError={myErrorHandler}>
{children}
</ErrorBoundary>
);
const styles = StyleSheet.create({
container: {
flex: 1,
flexDirection: "column",
alignItems: "stretch",
justifyContent: "center",
alignContent: "center",
paddingHorizontal: 12,
},
});
[/code]

Here you can find the sample code in this Github repository

Best Practices for using AXIOS

Global config

Set up a global configuration that handles all application requests using a standard configuration that is set through a default object that ships with Axios. This object contains:

    • baseURL: A relative URL that acts as a prefix to all requests, and each request can append the URL
    • headers: Custom headers that can be set based on the requests
    • Timeout: The point at which the request is aborted, usually measured in milliseconds. The default value is 0, meaning it’s not applicable.
    • With Credentials: Indicates whether or not cross-site Access-Control requests should be made using credentials. The default is false.
    • Response Type: Indicates the type of data that the server will return, with options including json (default), arraybuffer, document, text, and stream.
    • Response Encoding: Indicates encoding to use for decoding responses. The default value is utf8.
    • xsrfCookieName: The name of the cookie to use as a value for XSRF token, the default value is XSRF-TOKEN.
    • xsrfHeaderName: The name of the HTTP header that carries the XSRF token value. The default value is X-XSRF-TOKEN.
    • maxContentLength: Defines the max size of the HTTP response content in bytes allowed
    • maxBodyLength: Defines the max size of the HTTP request content in bytes allowed

Most of the time, only be using baseURL, header, and maybe timeout. The rest of them are less frequently needed as they have smart defaults, but it’s nice to know they are there in case you need to fix up requests.

Are you looking for a React Native developer

Contact Us

This is the DRYness at work. For each request, we don’t have to repeat the baseURL of our API or repeat important headers that we might need on every request.

Custom instance

Setting up a “custom instance” is similar to a global config, but scoped to specified components so that it’s still a DRY technique, but with hierarchy. Set up a custom instance in a new file (Ex: authAxios.js) and import it into the “concern” components.

[code language=”css”]
// authAxios.js
import axios from ‘axios’;
const customInstance = axios.create ({
baseURL : ‘https://axios-app.firebaseio.com’
})
customInstance.defaults.headers.post[‘Accept’] = ‘application/json’
// Or like this…
const customInstance = axios.create ({
baseURL : ‘https://axios-app.firebaseio.com’,
headers: {‘Accept’: ‘application/json’}
})
[/code]

Then import this file into the “concern” components:

[code language=”css”]

// form.js component import from our custom instance
import axios from ‘./authAxios’;
export default {
methods : {
onSubmit () {
axios.post(‘/users.json’, formData)
.then(res => console.log(res))
.catch(error => console.log(error))
}
}
}
[/code]

Axios Verbs

Group the Axios HTTP verbs, like GET, POST, DELETE, and PATCH, in the base config file, as below.

[code language=”css”]</pre>
export function getRequest(URL) {

return axiosClient.get(`/${URL}`).then(response => response);

}

export function postRequest(URL, payload) {

return axiosClient.post(`/${URL}`, payload).then(response => response);

}

export function patchRequest(URL, payload) {

return axiosClient.patch(`/${URL}`, payload).then(response => response);

}

export function deleteRequest(URL) {

return axiosClient.delete(`/${URL}`).then(response => response);
<pre>}
[/code]

Now import the custom functions directly wherever needed to make an API request, as in the code below.

[code language=”css”]</pre>
import { getRequest } from ‘axiosClient’;

async function fetchUser() {

try {

const user = await getRequest(‘users’);

} catch(error) {

//Log errors

}
<pre>}
[/code]

Interceptors

  • Interceptors helps with cases where the global config or custom instance might be too generic, in the sense that if you set up a header within their objects, it applies to the header of every request within the affected components. Interceptors have the ability to change any object properties on the fly. For instance, we can send a different header based on any condition we choose within the interceptor.
  • Interceptors can be in the main.js file or a custom instance file. Requests are intercepted after they’ve been sent out and allow us to change how the response is handled.

[code language=”css”]
// Add a request interceptor
axios.interceptors.request.use(function (config) {
// Do something before request is sent, like we’re inserting a timeout for only requests with a particular baseURL
if (config.baseURL === ‘https://axios-app.firebaseio.com/users.json’) {
config.timeout = 4000
} else {
return config
}
console.log (config)
return config;
}, function (error) {
// Do something with request error
return Promise.reject(error);
});
// Add a response interceptor
axios.interceptors.response.use(function (response) {
// Do something with response data like console.log, change header, or as we did here just added a conditional behaviour, to change the route or pop up an alert box, based on the reponse status
if (response.status === 200 || response.status 201) {
router.replace(‘homepage’) }
else {
alert(‘Unusual behaviour’)
}
console.log(response)
return response;
}, function (error) {
// Do something with response error
return Promise.reject(error);
});
[/code]

Conclusion

For most of your HTTP communication needs, Axios provides an easy-to-use API in a compact package.

There are some alternative libraries for HTTP communication, such as ky, a tiny and elegant HTTP client based on window.fetch; superagent, a small, progressive client-side HTTP request library based on XMLHttpRequest.

But Axios is a better solution for applications with a lot of HTTP requests and for those that need good error handling or HTTP interceptions.

We at Andolasoft has long expertise on API Request solution with AXIOS on a React Native App. We have highly experienced React Native and React developers to help you for the same. Book a free consultation on your issues.